But I can't get over how great this lighting project is. The owners of Abilene Bar in the Carrol Gardens neighborhood of Brooklyn needed inexpensive lighting for their restaurant and came up with this idea.
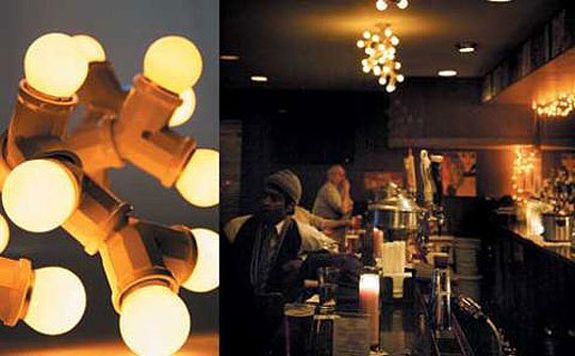
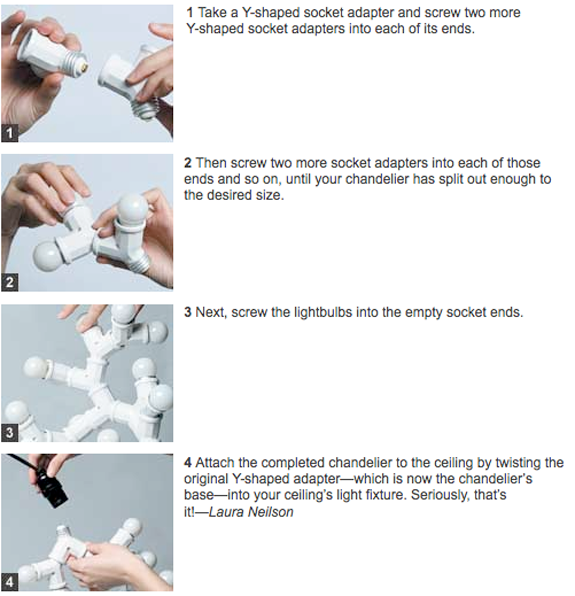
They layered many of these simple and inexpensive socket adapters from Home Depot together to create a coral or branch effect. The best part is there is absolutely no hard-wiring required. The first socket just screws right into your existing light bulb socket. Completely genius!
I like the white sockets seen here, but I'd also consider spray painting the outside of the sockets red or gold.

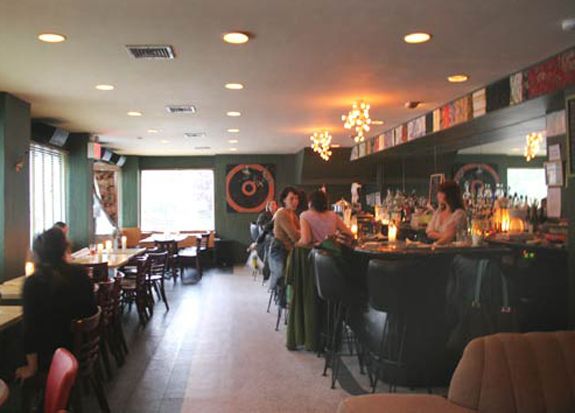
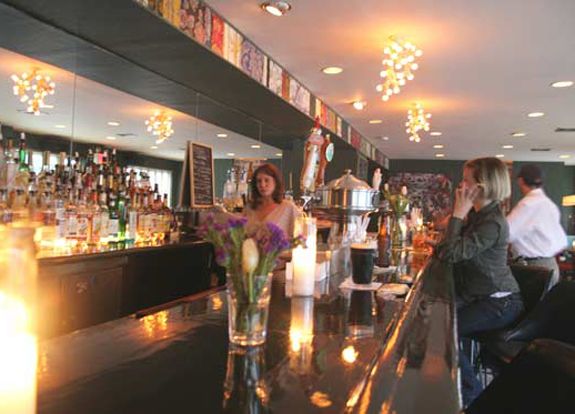
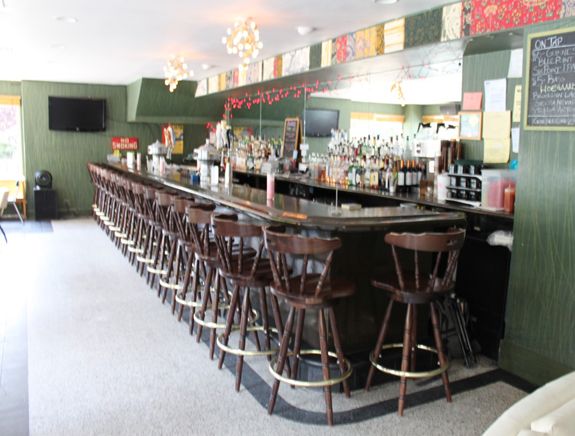
Image sources: Time Out NYC, NY Mag
wow...that is genius..and so do-able...i would also prefer them painted a dull gold/silver ...thanks for sharing, Jenny!! do check out my gilt-themed post today when you have a moment!! xx meenal
ReplyDeleteI love these! And so simple! I think they'd look great in a bedroom :)
ReplyDeleteThat's so cool! I wonder if that would work in my hallway, might hang down too far...hmmm...
ReplyDeleteWhat a great idea. I agree, painting them would look amazing!
ReplyDeleteEmily Henderson did this on the latest episode of Secrets; she made them red/coral.
ReplyDeleteWow! That's so pretty! I'd love to see it painted a bright, fun pop of color. I can't believe how easy that is. I recently DIY'ed a light fixture, but this one has me thinking of doing these for the guest bath. Thanks for sharing.
ReplyDeletethey look fabulous over that bar, I'd even try it at home if we had a real bar where people sit on stools and all that jazz! :)
ReplyDeleteTheres a "why didnt I think of that?!" moment waiting to happen! So clever and easy-thanks for sharing!
ReplyDeleteI love this ~ very creative!!!
ReplyDeleteJenny, I posted about this project a few weeks ago, made the chandelier, but haven't gotten around to putting it up yet...great project, huh?
ReplyDeletehttp://meetmeinphiladelphia.blogspot.com/2011/02/to-do-diy-lighting-fixture.html
That is so cool!
ReplyDeleteObsessed with this idea!!! Amazing!! Tweeting about it now!!!
ReplyDelete;)
Thank you, Jenny! This will be perfect in my new kitchen!
ReplyDeleteWOW! I really think I will try that! Thanks.
ReplyDeleteThis is GENIUS. I'm OBSESSED. I want to do this in my house somewhere (someday, when we actually have walls on the 2nd and 3rd floor-- ha!). Great post, Jenny!!
ReplyDeletexoxo
Kelly
Oh I love seeing a similar one in orangey red on Emily Henderson's show last week, such a fun idea -- it's so plaful and modern!
ReplyDeletewhat a great idea! i love the chunky, knobby appearance...it's almost like an old, knotty tree sprouted light bulbs!
ReplyDeleteWhat a cool little diy project. Thanks for posting.
ReplyDeletethis is brilliant! It makes me think even I could do it!
ReplyDeletegenius! i'm also envisioning some gold paint...
ReplyDeleteWow, that is such a cool idea! I wish I knew about this a couple of apartments ago when I had a few of those fancy "1 exposed lightbulb" fixtures... Thanks!
ReplyDeletethis same DIY fixture was featured on Secrects from a Stylist last Saturday (Emily Henderson's new show on HGTV)- If youre not watching- you should!
ReplyDeleteGenious idea! I love an easy DIY project! I also saw this on a new HGTV show- "Secrets of a Stylist"
ReplyDeleteI love how it looks when it's finished, and I love your idea of spray painting them a different color! Thanks so much for this tutorial!!
What a great idea and it seems simple enough to do! I love the organic shape of the fixture, so creative :) Thanks for sharing!
ReplyDelete-Forever Lovely
http://foreverlovelydesign.blogspot.com/
that is awesome! I love it! Thank you so much for sharing, I just might have to try this out for myself.
ReplyDeleteThose remind me of a piece of coral and would be fun in a turquoise color!
ReplyDeletei love this idea, whenever to finally buy a place this is definitely going to happen. in more than one room.
ReplyDeleteGenius!!!
ReplyDeleteI saw this exact same thing on Secrets from a Stylist... I bet you this becomes a trend
ReplyDeleteI'm so glad you posted this! I just saw a similar DIY on Secrets From A Stylist and was hoping for instructions!
ReplyDeleteTHanks Jenny!
Really nice to see an easy but great looking outcome!
ReplyDeleteOmg I'm extremely excited about this notion! I live in a rental and have ugly light fixtures. This would be perfect in the dining room and bedroom! Woohoo and hooray!
ReplyDeleteIt's always the simplest ideas that give the biggest impact! I agree they'd be amazing in red or gold!
ReplyDeleteYup! This idea is great! I just saw Emily Henderson do this last weekend on her show!
ReplyDeletewhat an awesome DIY project! thanks for sharing it, love it!
ReplyDeleteDear Jenny, I can´t wait to make one myself, thank you for sharing, I liked it so much that I wrote about it on my blog too ;)
ReplyDeleteJust brilliant...will have to remember this for sure!
ReplyDeleteEmily henderson made some of these on one of her latest episodes and painted them in red. it looked superb with the mid century interiors.
ReplyDeleteThis comment has been removed by the author.
ReplyDeleteI saw something very similar in a room done by designer Erin Martin, one of my favorite designers, at the San Francisco Elle Decor Show Home. She used filament bulbs and it was gorgeous. Here is a link to a picture http://tinyurl.com/4cnftbe
ReplyDeleteDoes anyone know where else to find the DIY for the bubble chandelier? I clicked the link to the ReadyMade website but it looks like it is no longer available there. Any ideas? I really want to try this one!
ReplyDeleteJust might be the answer to my daughters hair salon lighting problem, we did not know what to do that was cool... down the middle of the salon... thanks for the post. xo
ReplyDeleteOh my god! These are fantastic!!!
ReplyDeleteThey look great, but I'm curious - wouldn't it be unsafe to plug so many into a socket that's designed for a single bulb? Are there any electricians reading this who can clear it up for me?
ReplyDeleteYou are fancy! And your lights are fancy! Thanks for the tutorial!
ReplyDelete