I finally styled the shelves a little bit this weekend and I thought some of you might like to see how I usually approach shelf styling.
1) Gather up all your potential accessories, keeping in mind the dimensions of your shelves.
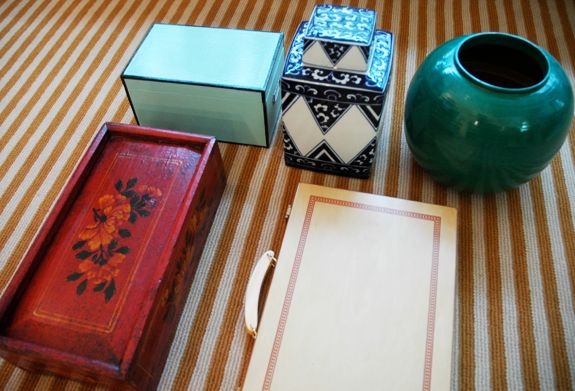
a) Big items - usually storage pieces. These bigger pieces help to visually break things up on the shelves. Here, I decided on a mix of colors and patterns. The emerald green vase and the ginger jar are from Home Goods. The red Chinese box is an antique and the lacquered aqua box is an old IKEA hack. The wood box with the handle is a backgammon set I didn't know we had. I found it with our other games (it might have been a wedding present? yikes.) and it's actually really pretty. I'm excited to relearn Backgammon!
b) Books. I decided to display a couple of the pretty book sets we have. I'm sure you know about the Coralie Bickford-Smith classics. The others simply look pretty or have sentimental meaning to our family.

Which reminds me. Right before we left Delaware, I found a huge box of Reader's Digest books for free. The spines have cool color blocking, but the patterned covers are to die for. I love that every book is different. (Check out eBay here for lots of these)

c) Tchotchkes. I know they're not for everyone, but I love little accessories. I like to buy my travel souvenirs in local antique shops or flea markets, so all of the little things we have are reminders of places we've lived or visited. I didn't spend more than a few dollars on anything here, so it doesn't scare me if my girls want to examine items. Plus it's fun to tell them the story behind an object.
Also in this group are some family pictures and a few small pieces of art. Jordan Ferney's husband, Paul, painted my hometown's Red Mountain beautifully.

2) Place your bigger storage items on the shelves first. I usually like to start out with a symmetrical arrangement and then adjust as I go. Some of the bigger items here start out in the center and then get moved later.
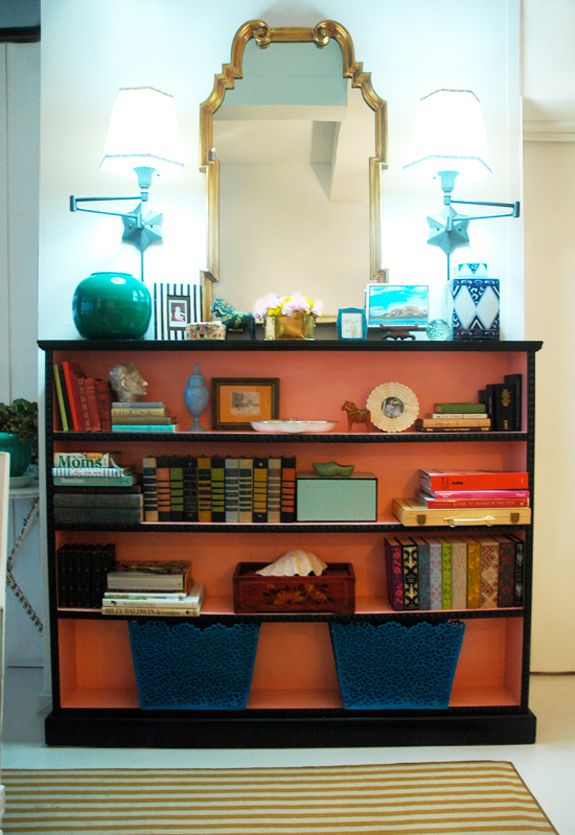
I put that little milk glass tray on the top shelf for corralling keys and polaroid pictures. The two wooden boxes hold stationary and the turquoise felt bins are for baby changing supplies. Also, we keep fish food in the blue jar up top. Everything does double duty in an apartment!
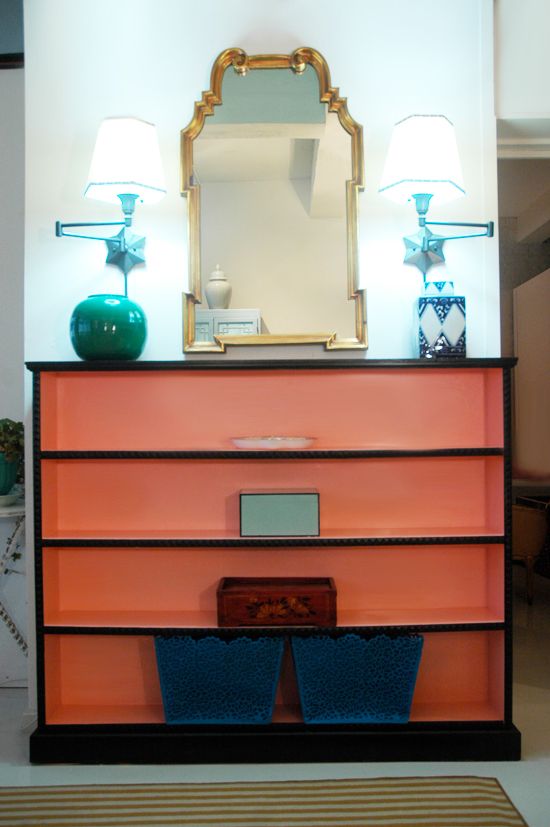
3) Next step: Place your bigger books and stack them horizontally. I like to push my stacks of books all the way over so that the bottoms of all the books bump up to the shelf edge rather than being center justified. Personal preference - just looks cleaner to me.
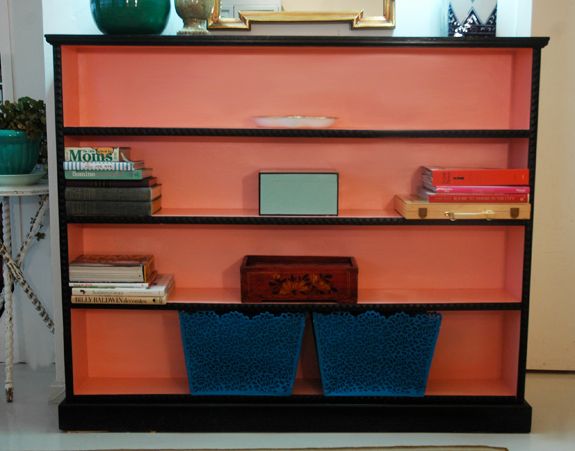
4) Next, place any groupings of books. Here, I added the Bickford-Smith series and some of the Reader's Digest books. Keep these upright.

5) Add other random small books. Consider grouping by color or category. All the books in the left hand corner are antique books bought in our favorite cities, about our favorite cities. The books on the right are for night time family scriptures and some other books that are special to us, including a really beautiful book of poetry from my Grandma.
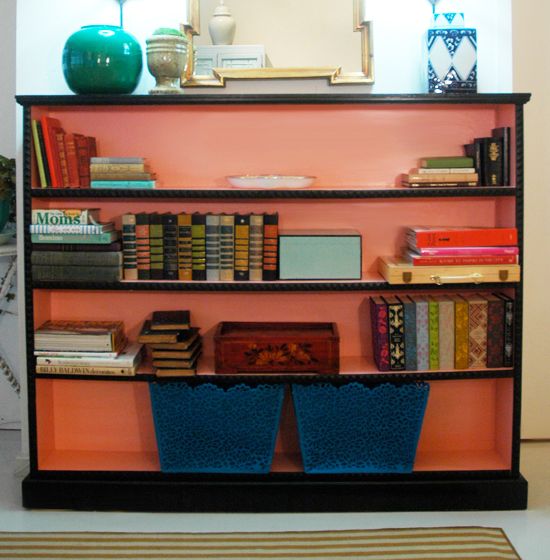

5) Add other random small books. Consider grouping by color or category. All the books in the left hand corner are antique books bought in our favorite cities, about our favorite cities. The books on the right are for night time family scriptures and some other books that are special to us, including a really beautiful book of poetry from my Grandma.

6) OVER-accessorize. In this step I like to layer on all the little stuff. I really pack it in and fill up almost every inch of space.
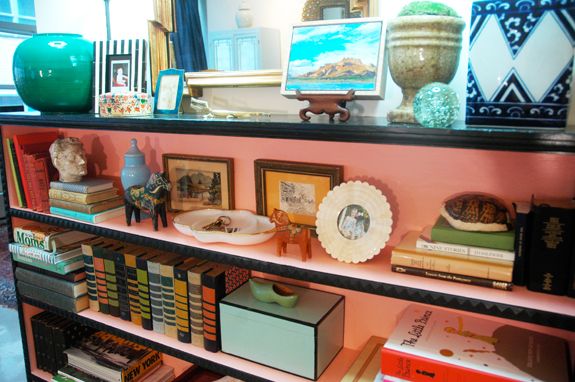
7) Edit. Step back and figure out what's working and what's not. Pull off an item that isn't the right color or the right size and then step back again. Keeping pulling accessories off until there is a good balance of empty and filled space.
- Try to balance the colors of items used and also the scale/heights. If a grouping is all the same color or all the same height, the shelves will read as really flat.
- Remember that things meant to be examined should be kept at eye level. Don't put picture frames on the bottom shelves.

- Also, don't forget fresh flowers! Those $3 bags of corner store carnations and mums really help make regular days feel special. The arrangements literally last weeks if I change the water every couple of days. I usually do tone-on-tone flower mixes in bright colors, but here I used baby pink carnations and yellow mums for Easter.
- Try to balance the colors of items used and also the scale/heights. If a grouping is all the same color or all the same height, the shelves will read as really flat.
- Remember that things meant to be examined should be kept at eye level. Don't put picture frames on the bottom shelves.

- Also, don't forget fresh flowers! Those $3 bags of corner store carnations and mums really help make regular days feel special. The arrangements literally last weeks if I change the water every couple of days. I usually do tone-on-tone flower mixes in bright colors, but here I used baby pink carnations and yellow mums for Easter.
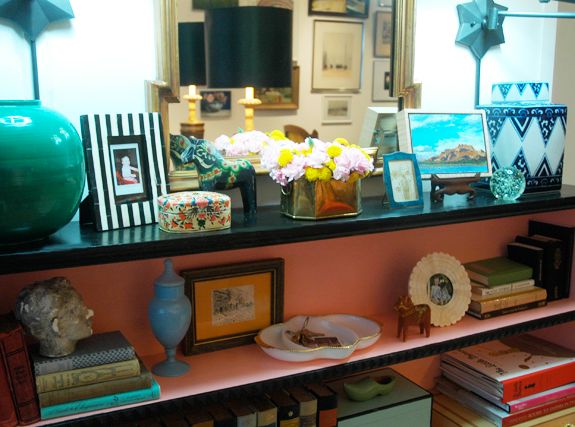
And that's pretty much it! I'm sure everything will be a little different next week, since it still needs some tweaking, but I think this is about the right mix of books and accessories for me and for the purposes of this shelf.
This was a great tutorial. I have bookshelves to style and this is so helpful.
ReplyDeleteThanks for sharing.
Love. Great tips! Now, will your little one leave all that stuff alone?
ReplyDeleteThis was an awesome post - SO useful! I have known how to style shelves before - and always wondered if there were tricks. I seriously can't wait till my kids nap later so I can take everything off our shelves, scrounge around the house, and re-do ours. SO FUN! Thank you Jenny!!!
ReplyDeleteThe real question is how do you keep your kids from messing with it???
ReplyDeleteThanks for the break down! Looks great!
ReplyDeleteI love the tutorial, especially since I just started pulling everything off the shelves in our den yesterday to redo them. Also, I love that you aren't afraid of carnations! I bought a bunch two weeks ago at walmart for $5 and most of them are still going strong. They look so sweet clustered together in mint julep cups and other small vases. Thanks for sharing. I love how the shelf turned out!
ReplyDeleteJenny! We inherited a complete collection of the same Reader's Digest books (1963-1989) last year and I was so thrilled because they're beautiful! I have them displayed in much the same way!
ReplyDeleteMore great advice! Thanks!
ReplyDeleteWhat a great tutorial! I love that you overload the shelves then edit. Thanks for sharing.
ReplyDeletehi jenny - love those turquoise felt bins on the bottom shelf. where are they from? thanks!
ReplyDeleteLooks just right, and the color on the back of the shelves allows everything to pop! Janell
ReplyDeleteLooks really great! Thanks for sharing! ps. I spy a gallery wall in the background...
ReplyDeleteAndrea and Ali - I mentioned this in the body of the post, but it really doesn't bother me when my kids play with our stuff. I think it's important to give them that responsibility. I tell them about how special these things are and 9/10 they do a great job of being gentle. I use the 'one-finger' rule a lot at home and in stores and it works really well. Evie is obviously not at an age where I can explain that sort of thing to her, but most of the accessories here are out of her reach. Even still, she doesn't really touch that shelf. (you know how it is - if something's been there for a while, it becomes invisible to kids).
ReplyDeleteI love this discussion topic though. We talked about it more here:
http://littlegreennotebook.blogspot.com/2010/07/discussion-topic-can-you-have-children.html
I'd love your feedback.
xoxoxo
Thanks, guys! I know this approach is not for everyone, but I'm a 'more is more' person in a lot of ways. :)
ReplyDeleteBrandy - I LOVE carnations! I think they are so pretty - as long as they are not blue or green! :)
Sassy Kathy - The bins are from Homegoods. I usually get storage bins and boxes from there or Container Store. IKEA is a last resort for organizational stuff for me.
xoxo
Anne - busted! Still working on that wall, but pics of the dining area are on the way!
ReplyDeletexx
Such a great post to see your process! I love how this little shelf turned out. I have that same fireking dish and I love it!
ReplyDeleteI love the more is more idea, so this is great for me, thanks for sharing, your professional tips are very much appreciated Jenny!
ReplyDeleteGreat tutorial - I'm going to give this a try on my shelves!
ReplyDeleteLove this...and it just so happens that I purchased a small lot of those Reader's Digest books recently on etsy (from here: http://www.etsy.com/shop/Edismiles?section_id=7618908)...reasonably priced, but you scored bit with those! Love it!
ReplyDeleteI've been on the hunt for adorably-styled bookshelves for my ever growing love affair with books...it's a problem! (http://thegreffetfamily.blogspot.com/2011/03/library-house.html)
i love when you share these practical posts! everyone has a bookcase, right?! thanks jenny!
ReplyDeleteI've actually been trying to figure out how to style my bookshelf in a guest bedroom...thanks for the great tips!!
ReplyDeleteGreat post! I was JUST thinking about restyling my book shelves last week and was planning on researching ideas today.
ReplyDeleteGREAT post- I love how you gave a recipe for styling a shelf- I totally do the layer, stand back and examine and adjust phase...many times:) And ps, I have never seen the word tchotchkes spelled- I would have never in a million years even known where to start on that one- love that I now know- thanks!!!
ReplyDeleteThis is a great step-by-step! My question is, what if you have a ton of books, I mean they fill the shelves and you have open shelving? I have this one old shelf from Ikea that is filled with books and there a few little nic-nacs placed in front of each shelf, but it's too symmetrical and I don't know how to restyle it (we have to keep all the books!) Any advice?
ReplyDeletethis is so great, jenny! i love how you approached the children & tchotchkes thing. completely agree. those brass sconces are going to make this little wall such a highlight! xo
ReplyDeleteKiley - I would get more shelving if you have packed your bookshelves completely. If it's not an option to get a match to yours, I would sell the old one and buy a new pair of Billys from IKEA.
ReplyDeleteI have a great tutorial coming up in the next week or two for how to spruce up a series of Billys. In the meantime, here's an old post though from back in the day:
http://littlegreennotebook.blogspot.com/2008/11/ikea-bookshelves-get-facelift.html
This is a great tutorial!
ReplyDeleteAt which Michael's location did you get the molding for the shelves?
Just ordered a new bookcase that needs some sprucing and I love the studded trim you bought! (or if you know of a place online to get it..)
Thanks!
Great post! I'm getting ready for my annual 'pull all the books out and dust them off' chore. This will help me do something a bit more interesting with my bookcase, which is mostly books and photos at the moment.
ReplyDeleteLove that coral color on the back of your shelves. The only thing I would change there is to put the ginger jar on the bottom between your baskets! jmo...Thanks for the tutorial!
Looks great! One of my favorite things to do is tweak and re-tweak our living room shelves. Puttering does something good for my spirit, as does editing.
ReplyDeleteFirst I love the bookcase makeover itself and now this! Thank you so much -- I will definitely be referencing this post!
ReplyDeleteJenny, thanks so much for the info... gotta love homegoods! :)
ReplyDeleteWow this looks so good. What great tips. I have some books and a bookshelf that needs so work and you have made me want to get in there and tackle it!
ReplyDeleteThis so beyond extremely helpful! I've never seen anything like this that actually shows you the evolution of what shelf organization can look like.
ReplyDelete--Courtney
Thanks, thanks, thank you! Great lesson. I love a well ordered, well styled and well lived-in home. Thanks for the time to create this post. Much appreciated.
ReplyDeleteThanks, thanks, thank you! Great lesson. I love a well ordered, well styled and well lived-in home. Thanks for the time to create this post. Much appreciated.
ReplyDeleteBeautiful. It is a gift to style a bookshelf, and an earned one at that.
ReplyDeleteThank you. I really appreciate the step-by-step photos and narrative, as I find styling a bit intimidating.
ReplyDeleteThis comment has been removed by the author.
ReplyDeleteGreat tutorial! The books look amazing in the coral shelves! The colors in the decor remind me of the tea party I threw this weekend... I guess great minds think alike! (although my version is slightly lighter ha)
ReplyDeleteThe only element that I possibly have a concern with in this tutorial is the baskets! They're gorgeous... but something about their placement keep drawing my eyes away from the other shelves. I cant concentrate on all the other amazing elements... mostly likely its just me being crazy. Love IT!
http://www.fancyhouseroad.com/2011/04/18/just-tea-for-two-and-two-for-tea-tea-party/
keighley xo
Yeah, I thought about maybe putting some other things down on the bottom shelf, but Evie does get into that stuff. She would have broken the ginger jar by now or ripped out pages of a book. :) And I actually don't mind seeing more of the coral paint on the bottom shelf. I think it's nice to have the empty space and helps things from getting too cluttered looking.
ReplyDeletexx
This is amazing.
ReplyDeletePs- Love your site! You have amazing style.
Jenny, I love seeing pictures of your house! Thanks for sharing!
ReplyDeleteTiffany
{Living Savvy} www.savvydesignwest.com
This post is AWESOME. I sit and stare at my bookshelves far too much, wondering why they look so lame. It's all becoming so clear.
ReplyDeleteThank you!
Looks so great - I love that you painted the inside of the bookshelf coral. And by the way, I have the same exact milk dish trimmed in gold and the same blue glass urn :)
ReplyDeleteGreat post. It is very useful. It looks great. Thanks for sharing.
ReplyDelete-family pictures
Hi Jenny,
ReplyDeleteIt appears we both had Reader's Digest books on the brain yesterday...
http://girlandgreatdane.blogspot.com/2011/04/birthday-wishlist.html
I have the same exact little painted black horse.
ReplyDeleteI love the look of books coordinated by color or pattern. I've seen a lot of shelves styled this way and it always looks so much more put together. This causes serious debate in our house though. My husband is the "reader" of the house and has accumulated quite a collection. However, he insists they be arranged alphabetical by author, and I can see his point. As beautiful as an arranged-by-color look is, it's just not that practical. Jenny, any tips for helping the visual clutter of books arranged by nothing more than the letter the author's name happens to begin with?
ReplyDeleteSorry, I'm reposting my comment because my link didn't work! Yikes! I am just so proud!:)
ReplyDeleteThank you for this post! I almost died when I saw it because I have the same Reader's Digests I found at a flea market and couldn't pass up. I only paid $5 for 10 books. My family has teased me about my granny books for too long!:) Now I KNOW I'm not crazy because you have the BEST taste!
Here's my entry. I am now thinking of painting my cabinet blue and I am searching for a sassy bench!
http://thefrakersacres.blogspot.com/2011/01/entrycheck.html
I blogged about you here:
http://thefrakersacres.blogspot.com/2011/04/um-i-feel-smart.html
Your bookcase is beautiful!
This was a great tutorial. I have bookshelves to style
ReplyDeleteThis post was VERY helpful! I have lived in my house for almost 3 years, and I have never liked the way my built in shelves in my den where styled. I redid the shelves using your tips, and I love them now. I would love to see a post on styling kitchen shelves!
ReplyDelete