Here are the rest of the steps: Part 1, Part 2, Part 3, Part 4
Sewing a chair cushion is very similar to sewing a self-welt pillow with a zipper. Not hard at all.
Step 1: Using a seam ripper, carefully pull apart the original cushion. I used an extra large seam ripper which makes the process fly by.

Step 2: Use the original cushion pieces as a template to cut out pieces from the new fabric. Pay close attention to the pattern on your fabric. You want things to line up as much as possible.

Step 3: Always have your iron out and hot when you are sewing. Press everything! My mom (who is an AMAZING seamstress) always says that the key to professional looking sewing projects is in the pressing. The fabric will be much easier to sew and there will be less mistakes. Here we are pressing the back panel, where the zipper sits.


Step 4: Whip up some more piping. This photo was taken when we made the double-cord welting (instructions here), but the idea is the exact same. You'll need less width though for single cord piping.

Step 5: Sew the piping to both the top and bottom pieces of cushion. My seam allowance here was about 1/2".

A quick tip: if you cut the seam of the piping a little just around the curves, the piping will be much more flexible and it won't pull or rip from the inside.

Step 6: Sew the middle panel (which in the case of my cushion was one long strip the wrapped around three sides) to the top piece.

We had a little trouble getting the pattern to match on one cushion (below) because we were short on fabric, but this pattern has so much going on, that it doesn't bother me at all.

Step 7: Reassemble the zipper using the old cushion as your template. You can even reuse the old zipper if it sort of matches your new fabric (mine didn't).

The old cushion had a small panel that covered the beginning and end of the zipper. It's a pretty clean look, though you don't really see the back of the cushion from behind the chair.

Step 8: Once your zipper is in and the three-sided panel was all sewn in place, it was time to attach the bottom panel. Just like sewing a cushion, you turn everything inside out, with the zipper open so you can turn it back to it's right side after sewing.

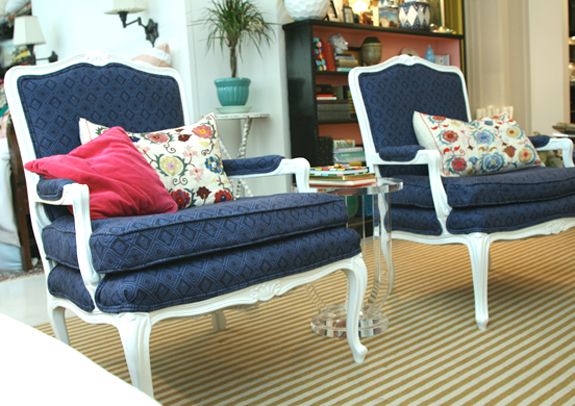
And that's it! The cushions fit just right and are easily removable for washing.

I took these photos as we were running out the door to catch our plane, so forgive the less than great styling. I definitely need some new pillows for to the chairs. I found this awesome red and green leopard print that might be *perfect*.
Off to help with more wedding stuff. I promise to post as often as possible while we're away. I have some really exciting projects to share with you that I photographed before we left. xoxo

Jenny, they look amazing! Your tutorial inspired me to give reupholstering a try and I just finished. If you want to see here is the post.
ReplyDeletehttp://beekeepersgranddaughter.blogspot.com/2011/07/theres-first-time-for-everything.html
Not near as fabulous as yours but I went for it! Thank you for all the wonderful tutorials you post! You are awesome!
I am in awe....this would exceed my sewing skills, but it is nice to have something to which to aspire!! Your new chairs look great and I have definitely learned something from your how-tos. Thank you for posting them! I also received my latest BHG and enjoyed your low-budget tips for updating your rooms.
ReplyDeleteholy moly...these look so good. I've been following the tutorial along its steps. never tried upholstery but you make it seem do-able!!!
ReplyDeleteLove the way they look!!!
ReplyDeletesuzanne
I am always so impressed by your work but this really takes the cake! I just sanded down a table I found on a street corner in NYC and I thought that was tough! You inspire me! Thanks for great blogs
ReplyDeleteI so wish I found your tutorial two months ago when I found a similar chair at a local thrift store without the back for $25. I've been sewing forever but couldn't figure out how to reupholster the back so didn't buy it. I went back today after reading your tutorial but alas, the chair was gone. Darn it. Oh well, I will bookmark this for the next chair I find.
ReplyDeleteThank you so much for posting this series! I am way less intimidated to try upholstery now.
ReplyDeleteAnd the chairs looks A-MAZING!
ReplyDeleteHow in the heck do you do all you do with little ones?
ReplyDeleteCan you explain that in a post or two? During nap time?
pve
love the chairs! You're amazing! Where did you get your curtains? I'm looking for some just like those! Thanks :)
ReplyDeleteYour chairs turned out beautiful. Thanks for all the great tips.
ReplyDeleteWOW- they are stunning! Where are the pillow from on the chairs? The one with the floral-esque pattern? I like them!
ReplyDeleteAwesome! I am also very curious HOW in the world you run all this with little kids! Please share :))
ReplyDeleteSeriously girl, you just get better. I'm so impressed with your sewing skills. I have much to aspire to. Your place is really coming together, from the looks of your pictures. Can't wait to see more!!!
ReplyDeleteI can't believe how beautiful they look! Well, I can believe it....you are amazing! I am always in awe of the colors you mix together; they look fantastic.
ReplyDelete"Forgive the styling" made me laugh. This could be in a magazine! :)
so much love!
ReplyDeleteJenny - the chairs turned out wonderful! They are gorgeous and look so perfect in your space. I am constantly amazed by your talent. Well done!
ReplyDeletedid you also prewash your fabric like all the sewing books tell you to to prevent shrinkage later?
ReplyDeleteYou never cease to amaze me! I hate making box cushions with piping but yours turned out fantastic. I did attempt a cushion like that but to make a custom dog bed for my dog!
ReplyDeleteBTW: Your living area is gorgeous!
Jenny this has been incredibly helpful and in light of the fact that I bought a caneback bench for my sunroom that needs to be reupholstered, I am feeling very brave now!
ReplyDeleteThank you!
wonderwallinteriors.blogspot.com
The chairs turned out amazing! I love the step by step tutorial. It makes me almost feel brave enough to try it. Also, where did you find your striped rug? I love it!
ReplyDeleteSo great.
ReplyDeleteBookmarking the other parts.
Rashon
www.ilovethrifting.com
They look wonderful!
ReplyDeleteGorgeous! You've done it again :)
ReplyDeleteThanks so much for the detailed tutorials! I'm diving into 2 chairs next week. Also, never apologize for Disneyland and celebrations! We all understand that!
ReplyDeleteBEAUTIFUL JOB!
ReplyDeleteWow, you must have the patience of a saint! I love how you keep saying everything is so easy. ha! when threading a needle is one's biggest challenge, then your work looks like painting the Sistine Chapel...beautiful!
ReplyDeleteThank you so much for the wonderful tutorial! Your chairs look ah-mazing. I might just be feeling confident enough to reupholster my two wing chairs now!
ReplyDeleteI agree they look so pretty. You did an excellent job! This has been a great tutorial.
ReplyDeleteBeautiful makeover! I can sew, but this is definitely making me want to learn!
ReplyDeleteYou did a great job on those chairs, Jenny! I loved reading the steps in your progressive posts but my favorite thing was seeing some extra shots of your apartment in the Part 5 post. Have you considered posting some more photos of your home? I would love to see all of it!
ReplyDeleteJenny, thank you so much for sharing these tutorials! I'm sure I'm not the only one inspired to hunt down some old chairs in need of some love. The cushion part might test my sewing skills, but you've given me the confidence to try! The chairs look lovely.
ReplyDeleteLove it - thanks so much for sharing - they were worth the wait. What is that beautiful daybed looking thing in the background of one of the chair photos? It looks like the perfect little nest for reading and napping. I'm intrigued.
ReplyDeleteGreat job - you make it seem so easy!
ReplyDeleteThis is adorable! Great job!
ReplyDeleteYour chairs look great! Thanks for sharing your tutorial! I'm in the process of refinishing three chairs, so it's been fun to read some of your tips.
ReplyDeletelooks so great!!! not sure if I would ever try this, but I amazed with your finished chairs! great set of posts.
ReplyDelete- {darlene}
What a great series....I still can't do it, but never thought I could since I don't sew. I liked seeing the process though!
ReplyDeleteStacy
Thank you so much for this in-depth tutorial Jenny! You are awesome!!!
ReplyDeleteoh my goodness that room already looks amazing. are you around end of august? i'll be in nyc and would love to meet up again!
ReplyDeleteOmg this is like when a professional golfer says something like "just lean, twist and swing and you'll make it each time".. hahaha I would be in tears trying to do this and my seams would be wobbly and incorrect- I am pretty sure this is impossible. But you are making it look so easy!
ReplyDeleteI am insanely jealous of your sewing skills.
They look incredible!
All I can say is thank you, thank you, thank you! I have been looking for diy instructions that are easy to follow!
ReplyDeletegood job . It looks terrific
ReplyDeleteOkay- so I've been following this reupholstry series- and I recently went to Brimfield and got an amazing piece- although its not a chair (a couch settee for my dining room) I think i can totally follow your guidelines to reupholster it! thanks for the wonderful tutorial- and giving me the confidence to reupholster- I'm so excited to start (now I just need to pick a fabric:) I'll send you a pic once I'm done! thanks again!
ReplyDeleteThank you so much for this - with my IPad nearby, I feel like I can finally attack the chairs I have wanted to redo for a very long time!!!
ReplyDeleteWhat a great series on reupholstering! I just found the exact same chairs at an estate sale, but I lack your sewing skills. Any recommendations for a quality yet inexpensive reupholstering business in NYC area?
ReplyDeleteErin
Hi Erin! I use Bettertex in SoHo. Not cheap, but the most reasonable I've found in the city. They are good, but you sort of have to stay on top of them to finish by a deadline.
ReplyDeleteHope that helps!
xx
Of course I want your chairs! Who wouldn't?! But I'm in DC. And of course you can probably get 2-3x what I'm able to pay.
ReplyDeleteYou have inspired me to bite the bullet and slipcover my couch. I know there are great tutorials--I've seen a few out there already.
Would love your bergere chairs.
ReplyDeleteHow much do you want for them?
I stumbled upon your upholstery tutorials on pinterest. Super helpful! I am reupholstering a cane chair and definitely needed some help. Thanks a ton.
ReplyDeleteLove the chairs!
ReplyDeleteI found a chair that I wanted to do and couldn't find a place for the back. Your tutorial was great and just what I needed.