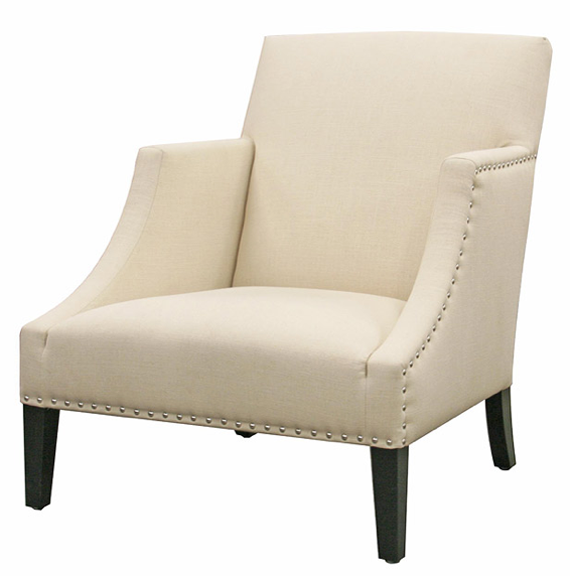
I don't know what I was thinking then a while back when I ordered some cheap chairs on a whim. I had been shopping for a new pair of chairs for a long time, but everything I liked was at least $1500 per chair with my discount (like the Odette chairs below from MGBW). We're thinking of moving in September so it just didn't make sense to shell out thousands for chairs right now. Plus, I didn't want to wait two months to get them.
Then last month we hosted five dinner parties and I was desperate for chairs. I looked on Overstock and Wayfair when I was up against a wall and saw these chairs. They were on sale for $275 each and I had a 25% coupon code and there was free shipping, so I went ahead and just bought them. I liked the shape of the arms (they sort of reminded me a little bit of the Odette chairs) and I liked the nail head trim. And they came in just two days.
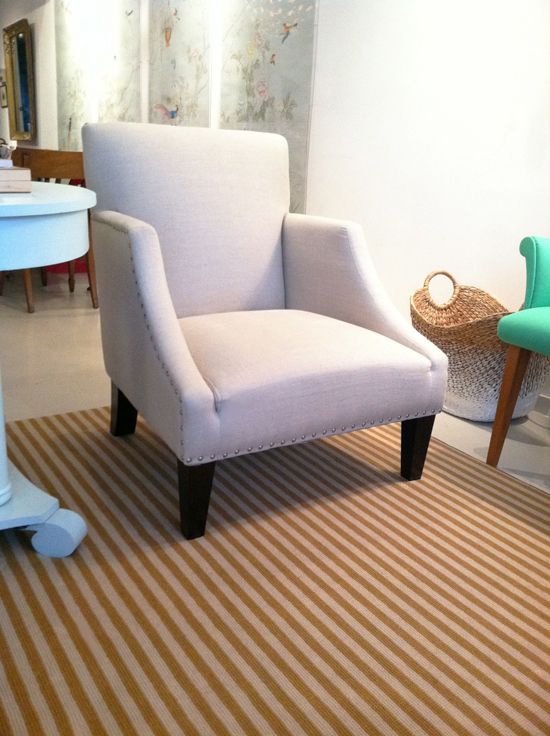
When they arrived I was a bit disappointed. They weren't as nice and crisp looking as the photos and they just felt blah. Rather than deal with returning them (and since we *really* needed extra seating), I decided to jazz the chairs up.
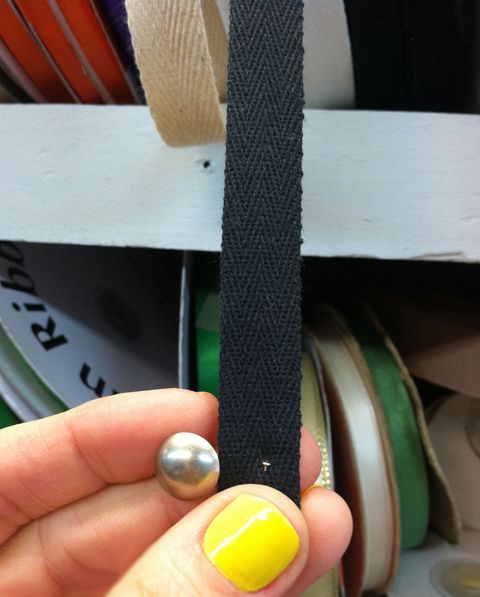
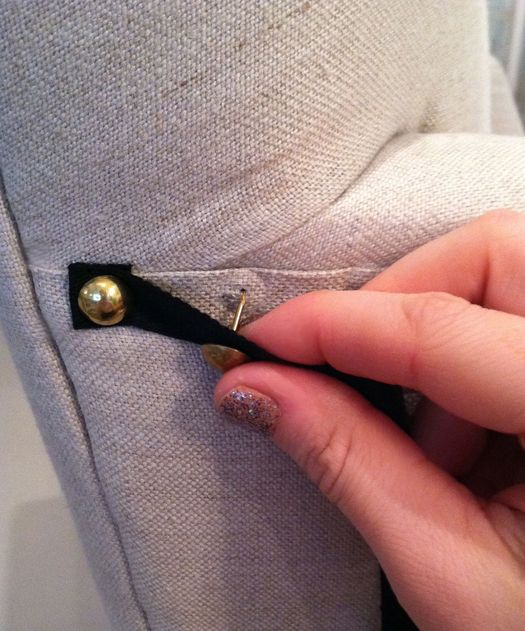
I went to my local fabric store (JEM) and bought six yards of black twill tape that was about the same width of the upholstery nail.
I used these handy staple removers to take out all the old upholstery nails
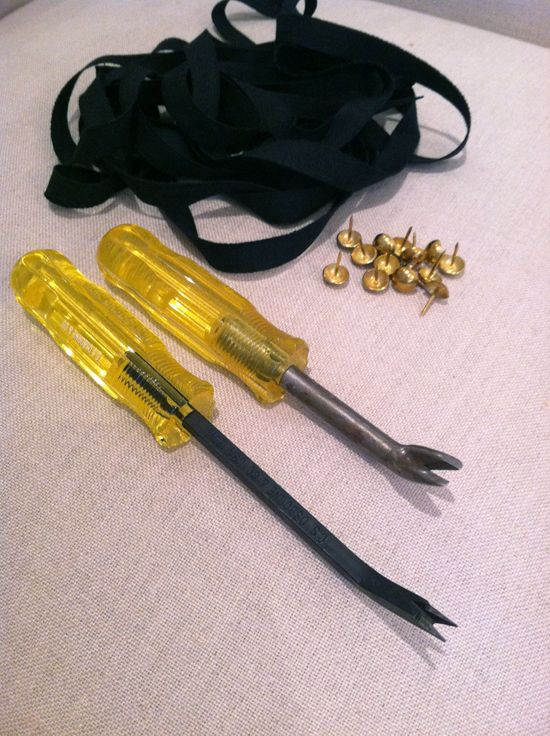
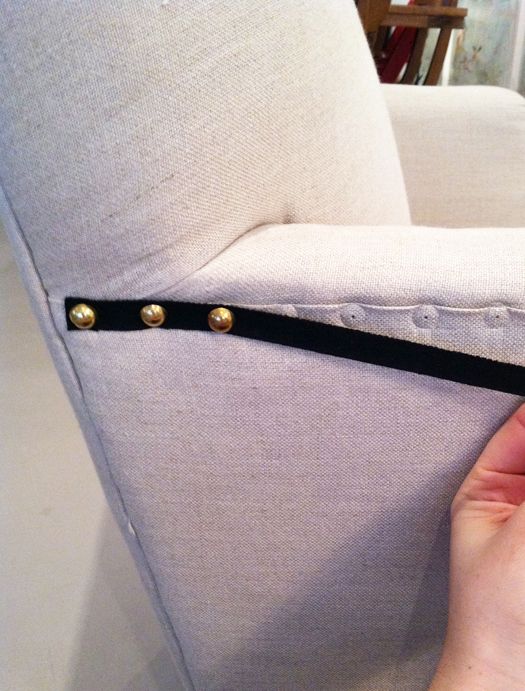
I actually thought the brushed nickel was pretty and would have looked great with the black twill tape, but I have some polished nickel lighting nearby and it was all looking a little matchy-matchy. So I bought some brass nails and brass caster cups for the front feet.
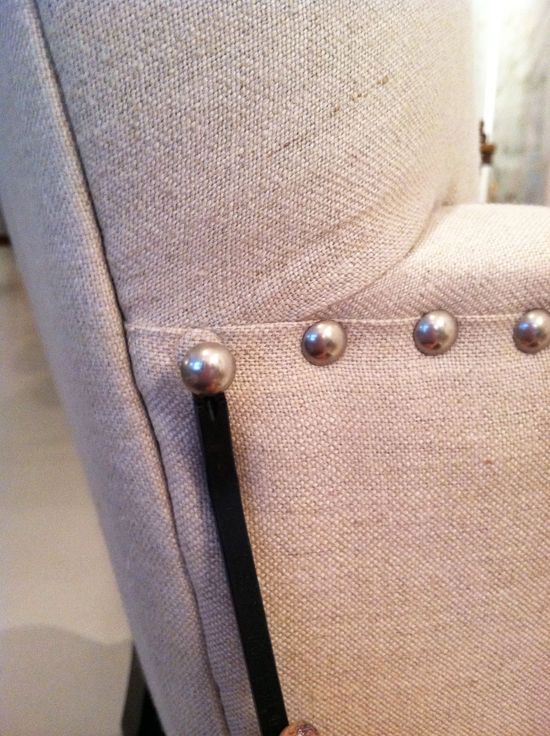
To get started with the new trim job, I just rolled the end of the twill tape under:
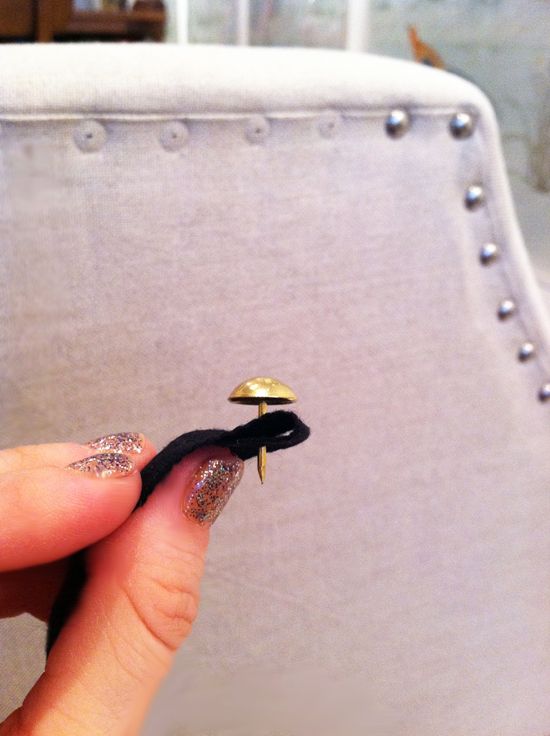
And used the old nail hole to make things really easy.
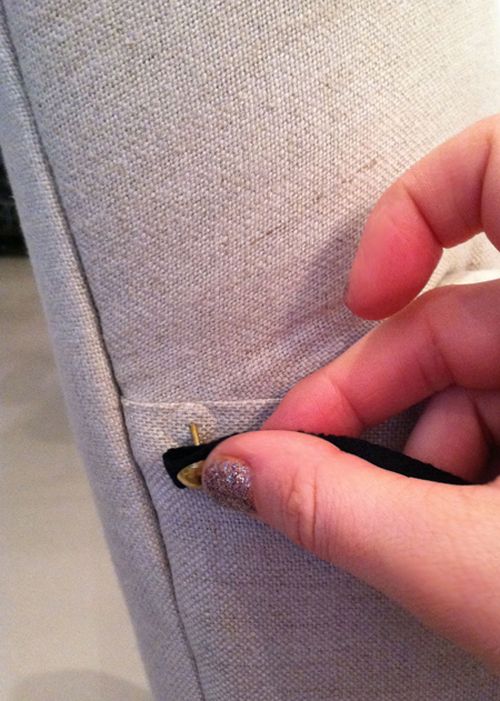
The only real trick to keep in mind is to pull the ribbon tight so there is no gaping between the nails. I also went back and tapped everything in with an upholstery hammer.
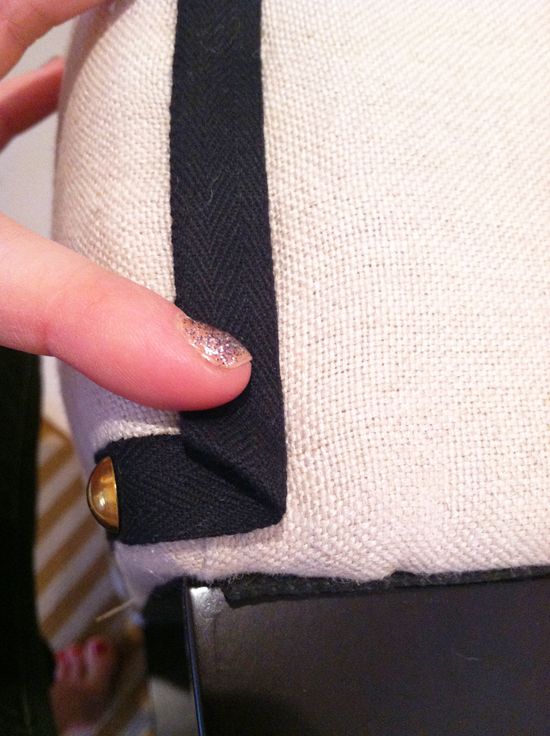
To keep the corners smooth, I just folded the ribbon in under itself and put the nail into the folds.
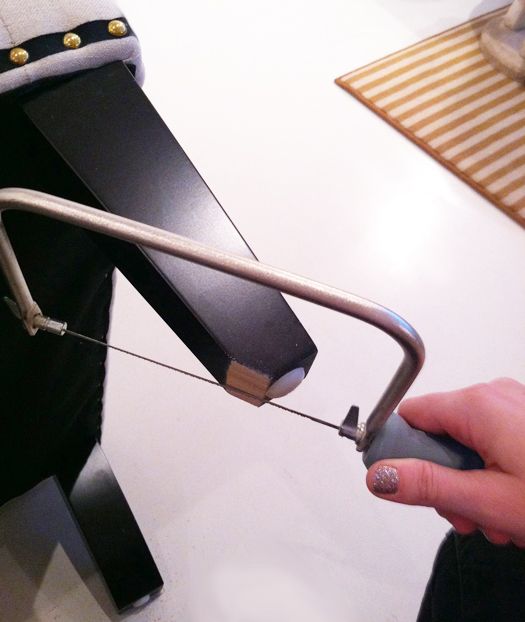
I added brass caster cups from Lee Valley but the legs ended up being a little wider than I expected so I had to cut away some of the wood so the casters would fit right. It was a pain! Totally recommend double checking your dimensions before adding casters!
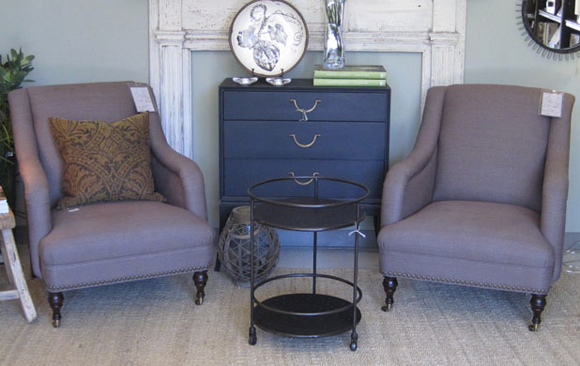
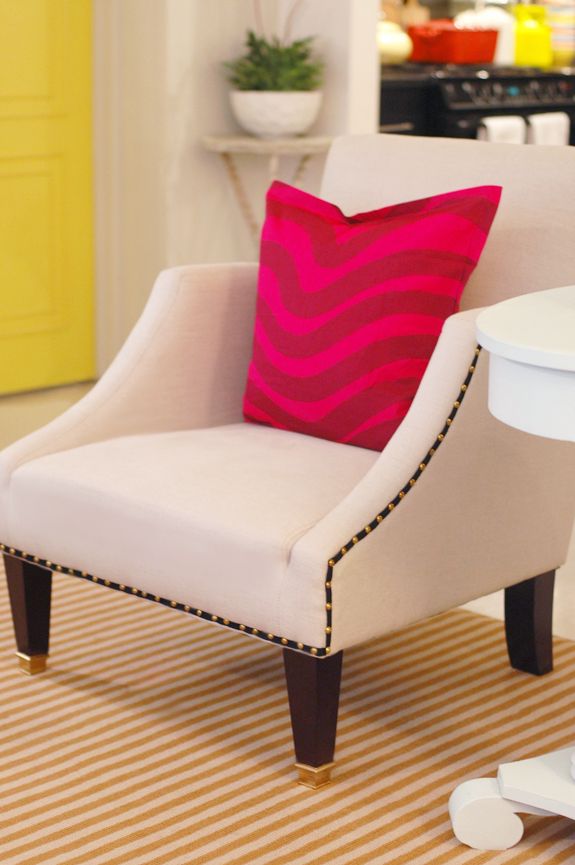
Here's the front view of the finished chairs. It's not a drastic change, but I think the trim and casters help the chairs look a little less cheap.
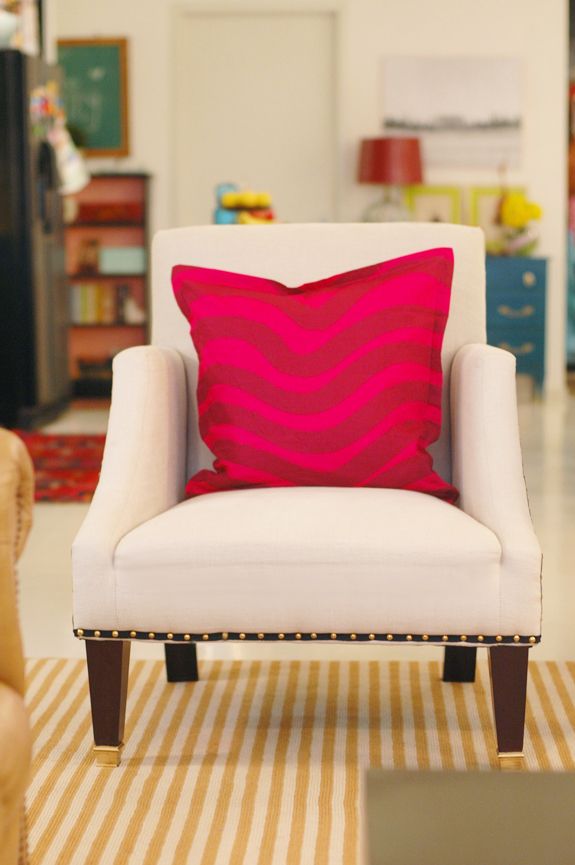
I like them from the side best.
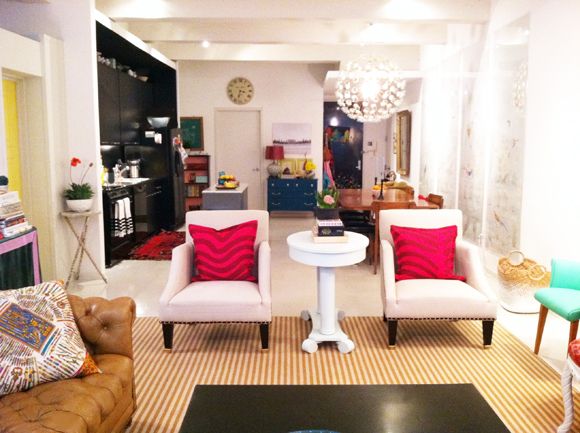
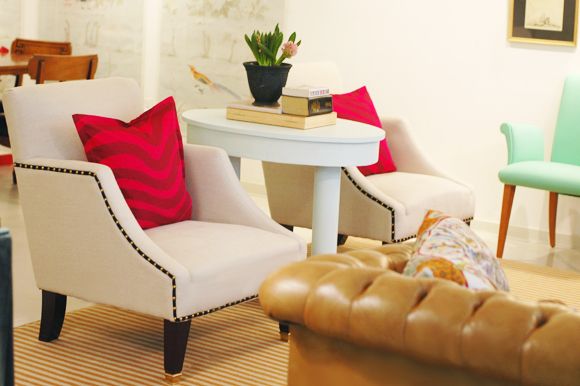
Here's a wider shot of the space. In case you need a refresher here's a link to our floor plan.
They've grown on me. I like the shape of the arms a lot and I think the new contrasting trim highlights the shape. So even though I broke my own rule about not wasting money on cheap upholstery, I think I'm pretty happy with these chairs for now and they fit in well with the mix of furniture styles I have in the space.
What a classy jazz-up! I love how you continued up the side of the arms. It's crisp and downright sexy.
ReplyDeleteyou made this cheep chair very priceless. it is perfectly designed.
ReplyDeleteThanks for this nice idea.
Exam Papers
I love them, now. You changed your nail polish.
ReplyDeleteLemons to Lemonade...Good job...they look super....
ReplyDeleteYou are fabulous and those are fabulous. I swear. Queen of DIY.
ReplyDeleteDefinite improvement! Love that you switched to brass nailheads.
ReplyDeleteSo much better! Amazing how the little details really make a difference! And I love your use of color in the space....you have a talent for mixing and matching color and fabric!
ReplyDeleteLady, you jazz up my day....I am in awe of your tricks and your glittery polish!
ReplyDeletepve
You're amazing...is there anything you don't think of?!
ReplyDeletenice transformation. the brass is purrfecto. moving out of the city? ah,you are living my dream life, a loft in NYC!
ReplyDeleteLove the trim. Such a pop of color that makes the chairs stand out even more with the bright colorful pillows.
ReplyDeleteI hear you on waiting to buy the quality, "right" piece. I've jumped the gun a few times out of sheer desperation (as in: I need something to SIT ON!) and regretted it later. You really made them special though - all's well that ends well!
ReplyDelete-SF
I really enjoy reading your posts. You have such great ideas for turning inexpensive into something that looks downright fabulous! Keep posting more terrific ideas for decorating!
ReplyDeleteKat
They look so much more custom! way to go.. and I LOVE those caster cups, really amps it up!
ReplyDeleteNancy
Powellbrowerhome.com
They look so much more custom! way to go.. and I LOVE those caster cups, really amps it up!
ReplyDeleteNancy
Powellbrowerhome.com
DIY always saves you a lot of money. You have given them a new fresh custom look. Awesome.
ReplyDeleteLove the trim idea! And the wide shot of your home- so bright and fresh!
ReplyDeleteLOVE! What a difference a little detailing makes!
ReplyDeleteYou are so darn good at this stuff. I love the way the casters look and you just gave me an idea for my living room chair. LOVE that. And the trim looks awesome, especially from the side. So good to seee your house too :)
ReplyDeleteGreat job Jenny!
Bethany
www.PowellBrowerHome.com
it's beautiful!!!!
ReplyDeletewow!
JENNY! What fabric did you use for those hot pink pillows??? That is the EXACT FABRIC I have been searching for for ages!! Please share your source!
ReplyDeleteYou're a genius. The chairs look much more interesting now. And I LOVE your apartment. So cool.
ReplyDeleteThose look awesom! Great work!
ReplyDeleteThey look great! Love the sparkly nail polish too. :)
ReplyDeleteSO interesting to see a pulled-back shot of the whole loft. I've looked at the floor plan before but for some reason was picturing it differently as a 3D space (it looks like you've moved a few things too). It's like a totally different apartment! Haha.
ReplyDeleteSuch a great transformation! Also, love your changing nail polish. I was just looking back on your original floor plan: do you not have windows in your bedrooms? It looks like the only bank of windows is the one that stretches across the living room / office space. Just curious!
ReplyDeleteSuch a great transformation! Also, love your changing nail polish. I was just looking back on your original floor plan: do you not have windows in your bedrooms? It looks like the only bank of windows is the one that stretches across the living room / office space. Just curious!
ReplyDeletewow, you really made those chairs look pricey! I think the pillow really helps too. Love that your nail polish changes in different shots. Funny what we notice :)
ReplyDeleteGreat update on the chair, I especially love the feet! What a treat it was to see your place from that angle! I'm pretty sure that made my day!
ReplyDeleteLove the transformation of the chairs. Quick question- I'm trying to source a couch similar to yours for our new home. Any recommendations? I haven't been able to locate any with the tufted seat- just backs. Thanks in advance!
ReplyDeleteI guess only you can make a silk purse out of a sow's ear! The chairs look amazing - thank you for sharing the DYI! Cynthia
ReplyDeleteThose chairs look great! I have been looking for chairs just like those. Can you tell me which store you ordered them from and where you got the coupon? Thanks for always sharing such fantastic ideas!
ReplyDeleteLooks so sleek. I love it.
ReplyDeleteChampagne Lifestyle on a Beer Budget
I think it looks great! Love the pop of pink too!
ReplyDeleteThose look great. Also, I have the same question as Shanna - where did you get your couch?
ReplyDeleteI love these! The black is such a classic but fun twist!
ReplyDeleteI love how the brass really compliments the rug and sofa. Your chairs and home are beautiful!
ReplyDeleteJulia
Love it! Excellent job transforming those chairs! (By the way, I have the Odette chairs in a lighter color and I often think they are a little blah. I guess a beige chair can be blah!)
ReplyDeleteI love how easy that looks (I'm sure it might have been easy, but it took time to actually do!). The pink pillows also are perfect to dress the chairs up.
ReplyDeleteJessica
stayathomeista.com
pretty snappy stuff...and so much more elegant than simply tossing an Indian throw over the lot!
ReplyDeleteI always love to see your home! Looking great!
ReplyDeleteAnnie
http://houseonrene.blogspot.com/
just curious: why didn't you use an adhesive on the tape to attach to the fabric, then the tack, just for extra stay-put-ness? (of course that's not a word) or did I miss something?
ReplyDeletethanks
just curious: why didn't you use an adhesive on the tape to attach to the fabric, then the tack, just for extra stay-put-ness? (of course that's not a word) or did I miss something?
ReplyDeletethanks
No need for extra adhesive, Kate! The nails hold the trim down very well.
ReplyDeletexx
The chairs look great. The brass nails go well with the camel colour of your leather sofa.
ReplyDeletethis is fantastic! you did such a great job
ReplyDeleteThey look great!
ReplyDeleteWhat a great idea! I especially like the casters.. brilliant. Your home is gorgeous, I love the flow and all the beautiful, bright colors!
ReplyDeleteNow that's a DIY...amazing transformation and love the casters!!
ReplyDeleteThis looks fantastic!
ReplyDeleteQuestion: When you added the caster cups, did you also have to shorten the front legs so that they chair seat isn't sloping back ward due to the extra height?
Thanks!
Sarah - I didn't end up shortening the legs. The new slight slope was actually helpful and made the chairs a little more comfortable!
ReplyDeletexx
i loved the way you transformed the chairs, pink pillow is like the cherry on the top. Your posts are so inspiring...
ReplyDeleteThe chairs looks awesome and very stylish. I just loved the design. Thanks for sharing here. Keep up the good work.
ReplyDeleteLove the trim. it's beautiful~
ReplyDeleteI love how you come up with the most creative ideas!!!
ReplyDeleteOMG!!! this is awesome...It's almost hard to believe that its a DIY concept.
ReplyDeletethe trim adds a lot! I think they look really nice!
ReplyDeleteThe chairs look great! How do you manage to squeeze in so many projects!? What happened to the last DIY w/the louis chairs?
ReplyDeleteNice changes you have there! Really lovely to the eyes!
ReplyDeleteAnother awesome DIY, they are always so tasteful and creative. And how do you have time for 5 dinner parties in one month?! Wow.
ReplyDeleteJenny - I love that round 3-legged table in the corner near the kitchen that has a plant on top of it. Where can I find something like that? Is there a proper name for this type of table instead of "3 legged round table"? lol
ReplyDeletethanks,
Annie
Lovely updates! It really is the details that make a space feel put together.
ReplyDeleteI love what you did these - what a fun mini-makeover! The black gives them a little something something for sure, well done!
ReplyDeleteThat is a great change! I especially the touch of gold on the feet. It's all in the details!
ReplyDelete