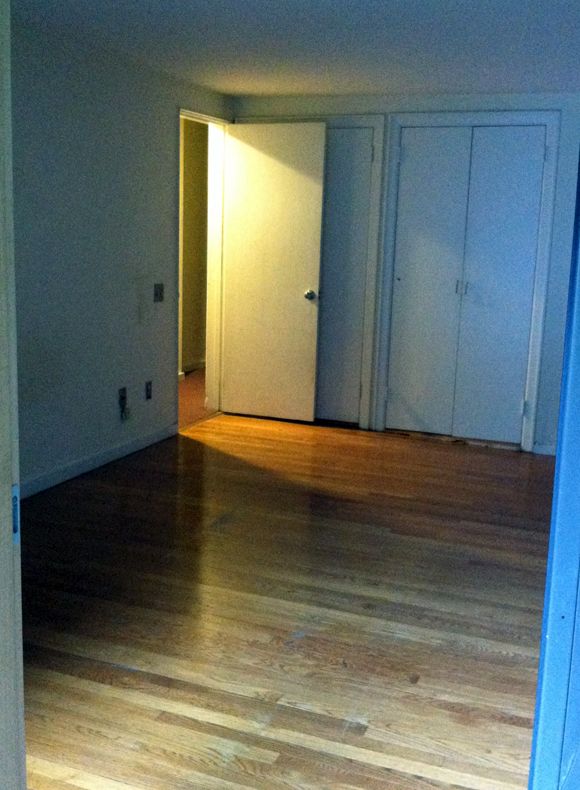
There are two closets in my office that hold a lot of good stuff - fabric and trim and wallpaper samples. Since I use these closets often, I decided to make them prettier and I gave the doors a little facelift recently. Here's what the boring hollow core doors looked like on move-in day.
The painters our landlord insisted on using didn't prime any of the doors before painting them black (with latex paint??), so I've been going back one by one and re-coating with primer and oil-based paint. Here's what the doors looked like after removing the old hardware and giving them a light sanding. This was also after I took down the blue wallpaper. (We had a little photoshoot in the space a couple months ago and the wallpaper needed to be removed. It's a long story, but I was fine with it.)
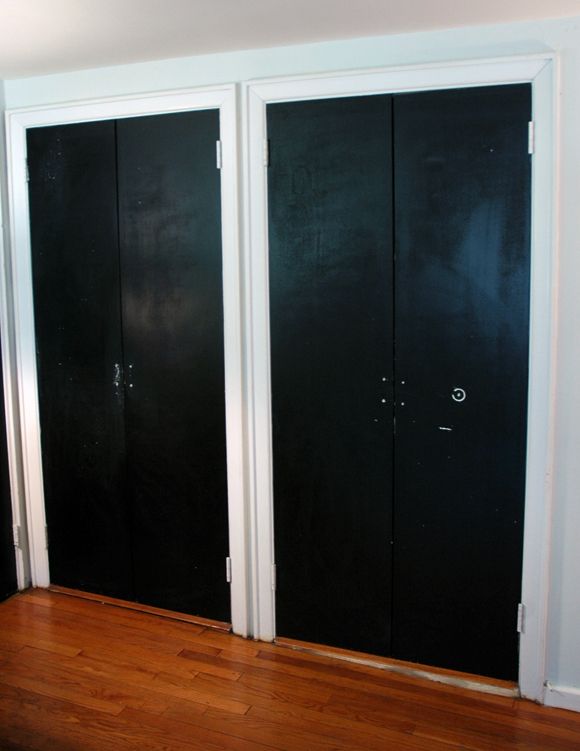
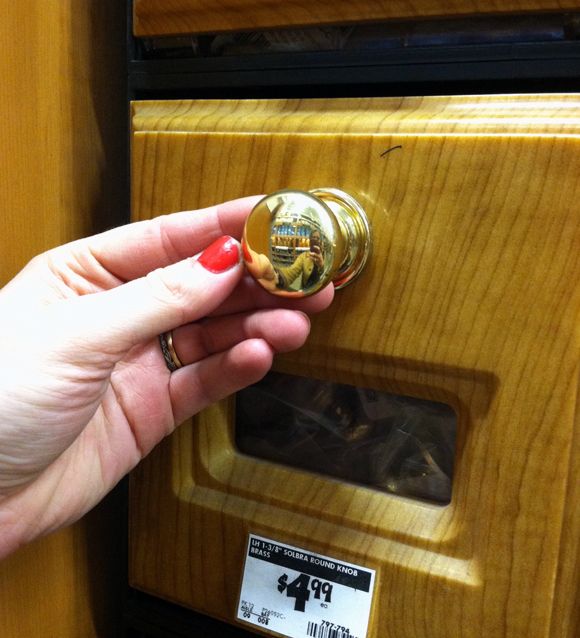
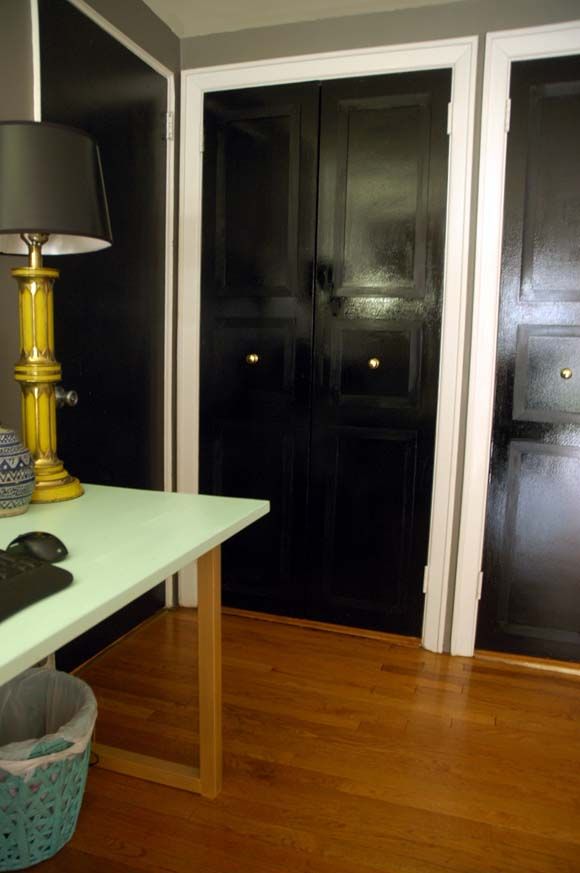
At one point I had installed a big brass knob on the far right door, thinking I had four knobs, but I actually only had three (you can see one of them in this post). Bummer. The knobs were a little big for the closet doors anyway, so I started looking around for a good, but mostly inexpensive alternative. I found these solid brass knobs at Home Depot for $5 each and they fit the bill just fine. A little on the small side compared to the others, but probably a more appropriate size for closet doors.
I sanded the doors down by hand, which was a mistake. I should have pulled out my palm sander or even stripped the doors with my beloved Citristrip. There was definitely a texture left that I hoped wouldn't showed through the new paint, but it did a bit. It's not all that horrible in person, but learn from my mistakes and don't take the shortcuts here like I did. :) Hopefully your doors are smoother than mine were and the whole problem can be avoided.
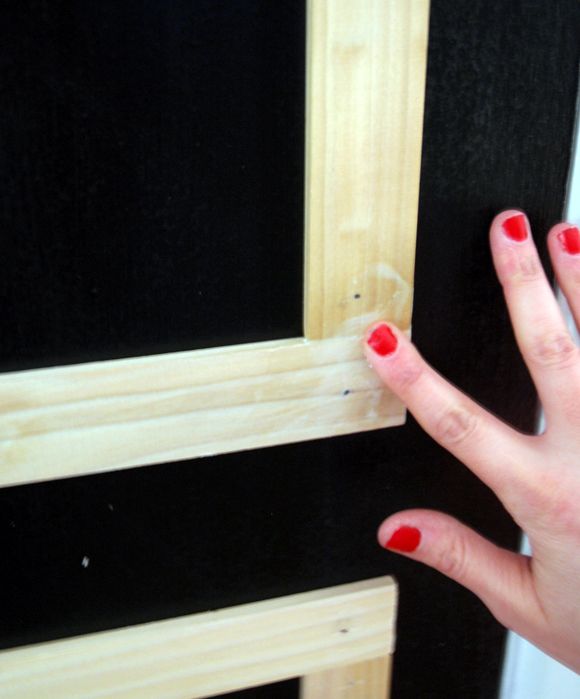
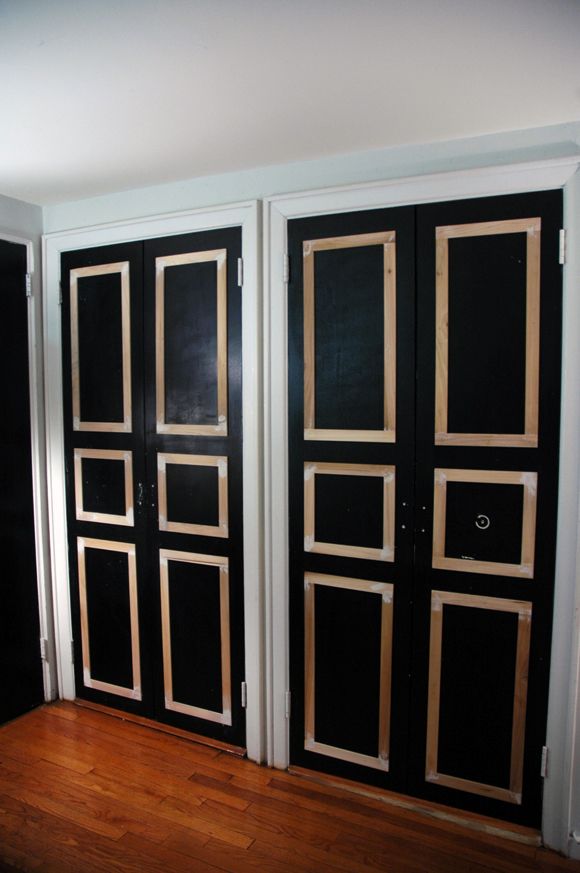
I had a bunch of pre-cut trim from a few old projects that I decided to use on the closet doors. Since all of it was pre-cut, all my long pieces were ready to be installed on the door with my brad gun and this project was a cinch. I only had to cut the short pieces and the pieces for the small boxes in the center of each door.
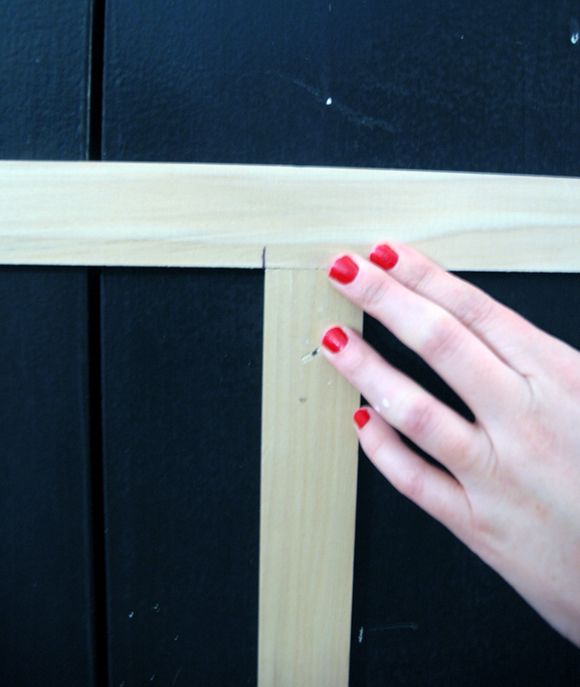
I made things really easy on myself and made it so every border was 3" wide. This way I could just eyeball the placement of the trim, hold it up, verify with a ruler that the trim edge was 3" away from the door edge (or the next piece of trim) and then put in a nail with my brad gun. No marking out, no levels. Fast and easy.
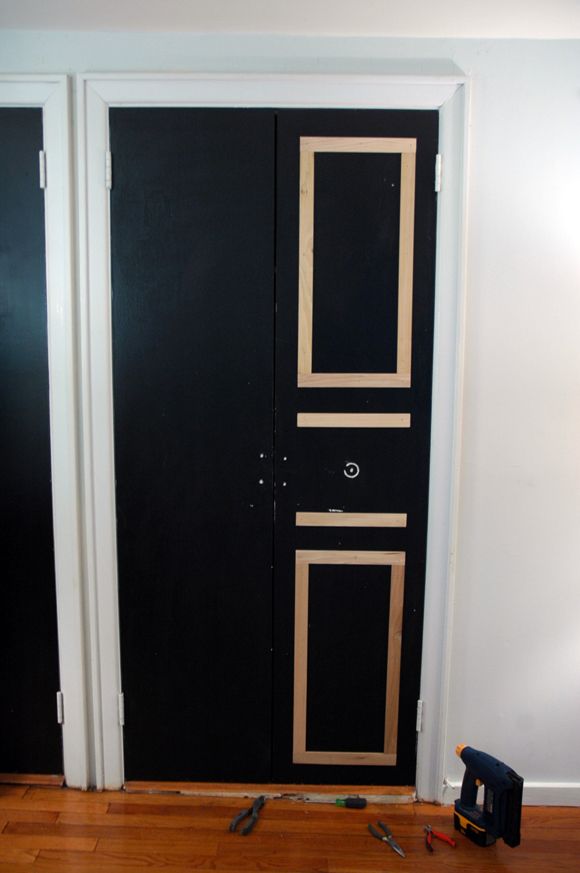
Once all the molding was nailed up, I sealed all the seams with paintable caulking and gave that a light sanding when it had dried.
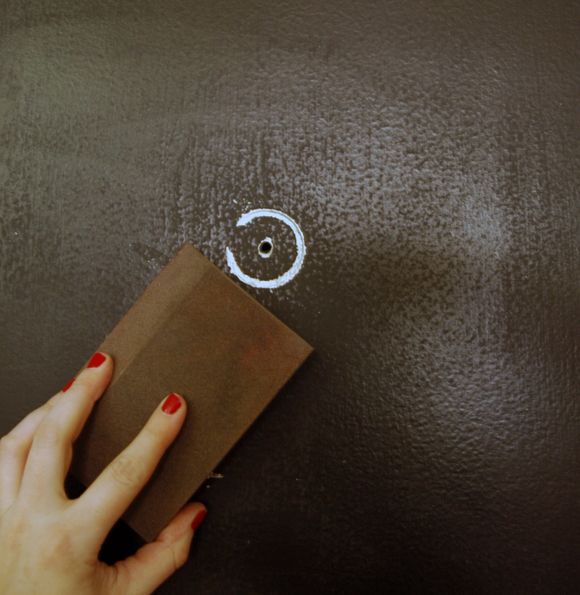
The old hardware holes were patched too and then the doors were ready to be painted.
The only dark-tint primer I had on hand was a cheap brand that I'm not a big fan of, but I used it anyway to prime the new trim. Not surprisingly, it didn't do a great job of sealing the raw wood. So the trim took the oil-based paint differently than the old door did. C'est la vie, I guess. (Note to self: Only buy Zinsser!)
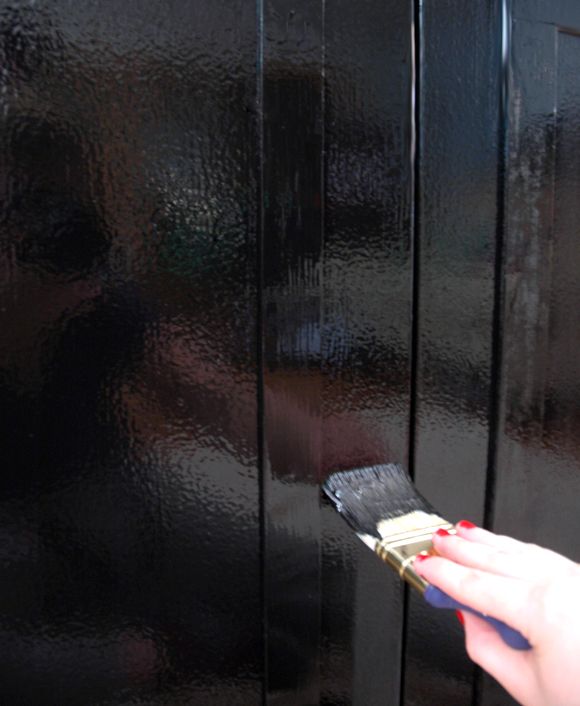
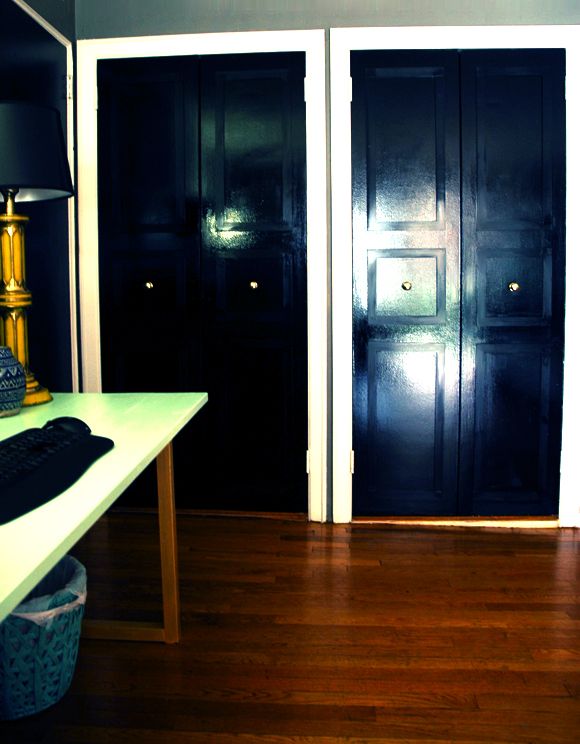
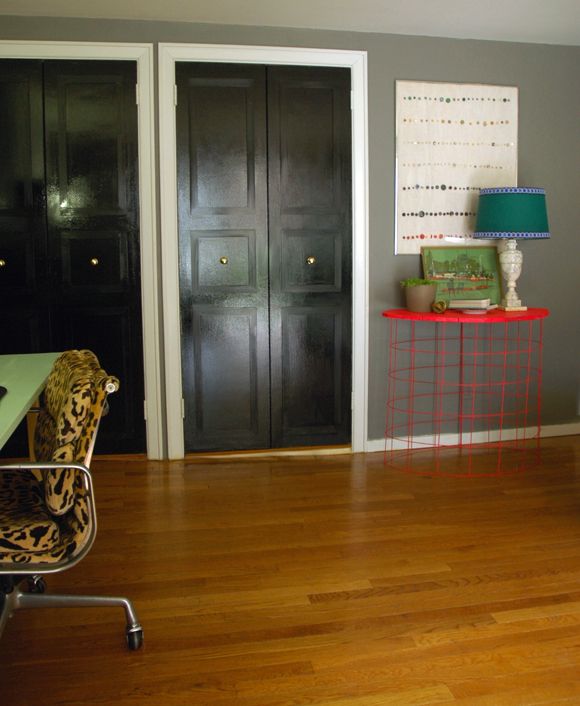
It's hard to photograph super glossy walls and doors, so you'll just have to trust me that it looks prettier in person. :) But I'm happy with how the project turned out.
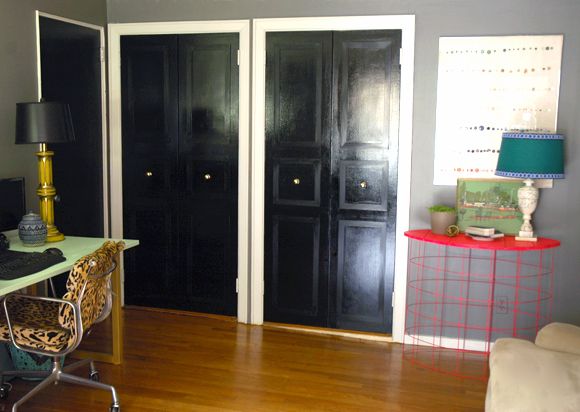
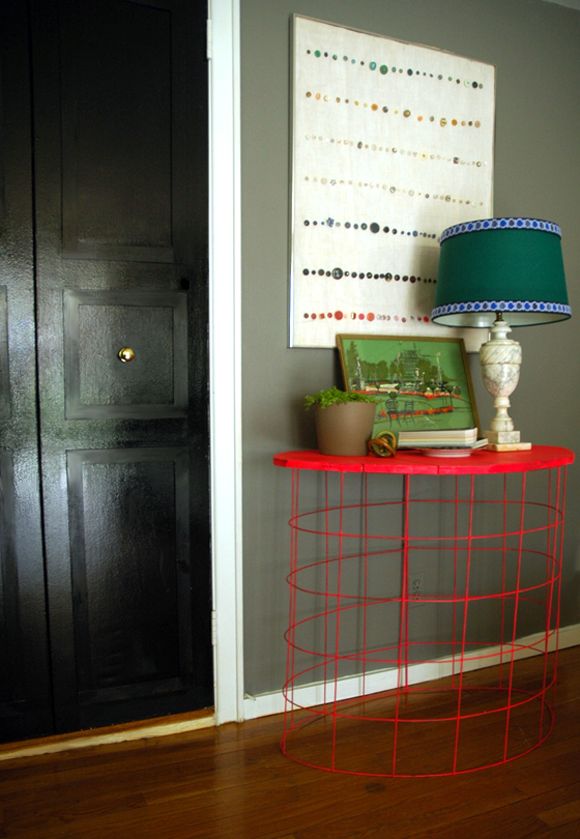
I love the shine and the bit of dimension that the new trim adds. And I love the new wall color (BM Chelsea Gray) with the black doors too. The masculine neutrals help tone down some of the brighter colors I have in the space (like the neon tetanus console). :)
One step closer to finishing this room that still needs a lot of work!
PS Here's the door in our old loft to my girls room that I trimmed out (without any power tools!) and painted a bright yellow. And another, better shot in this post.
Have you trimmed out any of your interior doors? I love how it can really elevate those hollow core doors so many of us are cursed with! :)
Looking forward to hearing the wallpaper story - and you moved your whiteboard - the button art is pretty there! Good work on the doors - love black and the use of the flat trim, too!
ReplyDeleteThe doors look great! I'm adding some trim to a door of mine-they are just terribly bland. I took a peek at the yellow door too, so cheery! It make a of difference.
ReplyDeleteLooks lovely! What color are the walls in your office?
ReplyDeleteThat looks just fantastic! Great job!
ReplyDeleteI followed your yellow door tutorial to the letter (except I used grey paint leftover from my kitchen instead of yellow) for the bathroom door in my UES rental. It makes me smile just about every day, and my husband loves to point out to visitors what I did because it really makes such a difference! Thanks for continuing to inspire!
ReplyDeleteOooh I love the drama of those doors! Trim is such a great way to add some interest - love it!
ReplyDeleteWe wanted to trim out our closet doors, but because they are sliders we couldn't have the extra bulk. I did a little paint trick instead (and you would almost never know it wasn't the real deal from afar!): http://thesweetestdigs.com/2012/09/10/the-diy-files-two-tone-closet-doors/
Smart to design the trim so you could just "eyeball" the placement...measuring perfectly always takes so much extra time (something I always seem to get hung up on). The doors make a huge difference in the room!
ReplyDeleteWhat fabric is your office chair covered in? I've been meaning to ask you! And NEED that in my life.
ReplyDeletex Bianca
www.afabulouschallenge.com
Fun changes! I'm wondering if I could do a similar install on the metal door leading to my garage? Maybe I'd just use Hard As Nails or something. I agree--beautiful doors add so much to a space.
ReplyDeleteit's amazing what a little trim can do! love your color choice too, it adds so much drama and sophication to the room! oh, and amen on the zinsser primer. that's the only kind i'll use! xo
ReplyDelete-ashley
ashleystephens.com
I did a super glossy backsplash in my new kitchen and I can't seem to get a great photo of it either. It's frustrating to keep telling people, "It looks really good in person, trust me."
ReplyDeleteAbsolutely love them! So creative!
ReplyDeleteSusan
simplymodernhome.com
I wish I had a flat door to do this to! I love anything with molding!
ReplyDeleteWhat oil based paint did you use on these doors? Bear just came out with a line that they cant tint (or color match!) to anything. Don't really want to use rustoleum if I can't find the color I want. Advice would be so helpful!
ReplyDeleteYour doors look great! One of my projects this year is to paint all my doors glossy black. I'm debating my closet doors. I have two double door closets in each bedroom (yea! for lots of storage) and I think I'm going to paint them and the trim around them the wall color to minimize them.
ReplyDeleteI have a similar door in my rental that I would love to do this too! Too bad we live in a complex and are sooo limited as to what we can do!
ReplyDeleteChampagne Lifestyle on a Beer Budget
I'm recovering from a DIY where I didn't prime before using an oil-based paint on unfinished wood....things went bad. Streaky, non uniform coat BAD. I noticed that for this project, you did prime the unfinished trim, but for your (amazing) chartreuse parsons console table, you didn't need to prime first. When using oil based paint, any tips for when to use primer on unfinished surfaces, and when you don't need to? I think I definitely need a little Zinsser in my life after my most recent project.
ReplyDeleteGreat tutorial, Jenny. I really like how the pink console stands out against the new paint color now. :)
ReplyDeletexx, Brittany
ThriftyHabit.com
Zoe - a lot of it depends on the wood. The console wood was very dense and smooth, so I sort of lucked out there. The trim wood here is more porous, so I knew I would have to prime. I am seriously so annoyed et myself for not waiting the eight hours until our hardware store opened so I could pick up a can of tinted Zinsser. Dumb, dumb, dumb.
ReplyDeleteIt's probably always a good idea to prime, it's just an extra step and requires more sanding for a perfectly smooth finish.
xo
Amy - the walls are BM Chelsea Gray - one of my very favorite paint colors. It's a really nice, not-too-dark (but still dramatic) gray.
ReplyDeletexo
Wow! They look great! Love your honesty on taking short cuts and the lessons learned. Boy do I relate. Anyway, the black is just gorgeous. I have mirrored closet doors, but I have a few interior doors that could benefit greatly from this look. Thanks for sharing.
ReplyDeleteBianca - I totally need to post about the office chairs! I lucked out and found four yards of Scalamandre silk velvet Leopardo for about $300, which is completely unheard of. I think it retails for more than $1000 PER YARD.
ReplyDeleteFor a budget version though, Duralee (or maybe it's Kravet?) makes the exact same, or at least very similar, pattern in a cotton velvet.
xo
Ed and Brooke - I used Rustoleum's enamel here, but if you're looking for a tintable oil-based go with Benjamin Moore's or Sherwin Williams' porch and floor paint. It's oil-based and really hard-wearing. I use it all the time.
ReplyDeleteLOVE LOVE LOVE your blog! Get excited every Monday morning when I know the posts will start back up again!
ReplyDeleteReally love all the grays you are using in your home. Was wondering if you stick to the color tips of not using a green or gray base paint in a North facing room? (Farrow and Ball website) Wanting to paint my master a great, warm gray, but it's north facing and already a little gray-ish and sad because of the lighting. Would something like your BM Anchor gray help or hurt this situation? Thanks!
You have such a creative eye! It's approachable and inspiring. Good work with the closet doors and the room!
ReplyDeleteI could spend all day on your blog! Your color choices always speak to me :) Awesome work!
ReplyDeletecarpedieminteriordesign.blogspot.com
Is your land-lord giving you a discount on your rent for all this work? It's certainly better than you found it!
ReplyDeleteHow do you manage the paint fumes when it's too cold to open windows? Seriously, I painted a piece of furniture and the odor was terrible. Do you add something to the paint or have some other trick?
ReplyDeleteHow do you manage the paint fumes when it's too cold to open windows? Seriously, I painted a piece of furniture and the odor was terrible. Do you add something to the paint or have some other trick?
ReplyDeleteDo you know I rammed my leg into a metal post down at our creek last week, and you (and your tetanus) were the first thing to come to mind after the stars disappeared. Crossing my fingers for no tetanus myself. :)
ReplyDeleteDo you miss the blue wall paper? The gray is sharp, but I loved that wallpaper, too.
Cute! I love that you took the time to paint the cabinet doors. I'm moving into my new rental next month, and dreaming of areas I'd like to paint, especially smaller ones that would be easy to switch back to white later on. Cabinet doors would be a unique and easier choice! Thanks for the inspiration. :)
ReplyDelete{lamourcheznous.wordpress.com}
Such an upgrade!
ReplyDeleteJenny
Www.simcoestreet.blogspot.com
Brilliant! I want a cabinet just like yours, pretty. Think mine need some upgrade too. Got my eye on your next posts.
ReplyDeleteLove what you did with this closet doors ♥
ReplyDeleteGreat job and this black color add chic and luxury to the room!
I love that button art hanging over your console!! I may have to make something like that in the near future :)
ReplyDeleteWisteria has great mirrors. I've posted about their octagon mirror before (http://thepinkchalkboard.blogspot.com/2012/04/chalkboard-favorites-mirror-of-moment.html) and just found another (MUCH CHEAPER) version at grandinroad.com called the Multifaceted Liza Beveled Mirror.
ReplyDeleteLove it! But seriously...fill us in on how you keep perfectly manicured nails with 3 little ones and all these projects. I must know the secret!
ReplyDeletewhat a fun little DIY project to spruce up those doors. I really love the black!
ReplyDeleteblair
http://design-that-inspires.com
Wow, they turned out super chic! Nicely done!!
ReplyDeleteWhat a great project. I bet this would be fun in a contrasting color too and you could add it to any door.
ReplyDeleteI love that art in that space, tell me about it!