I teamed up with The Home Depot, Maytag and Tide to celebrate a summer promotion where if before August 2 you buy a select Maytag washer and a 150 oz bottle of Tide, you'll get a $100 Mastercard gift card. My part of the celebration is sharing my laundry room redo along with my best tips on renovating a laundry room on a budget. The extra exciting part is The Home Depot, Maytag and Tide are giving away a Maytag washer and dryer and year's supply of Tide HD that comes with a laundry room design plan courtesy of yours truly, AND, wait for it... $5,000 to do it with! So fun, right?
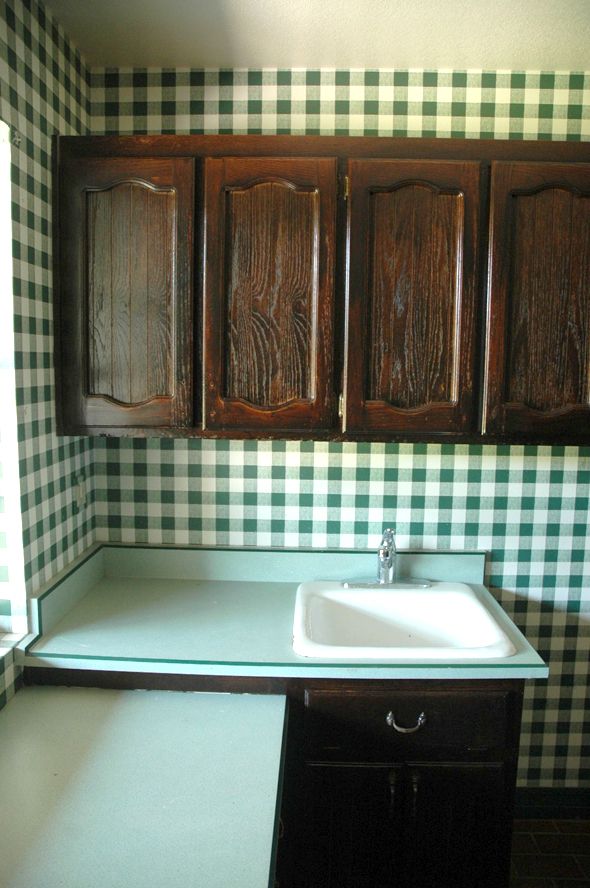
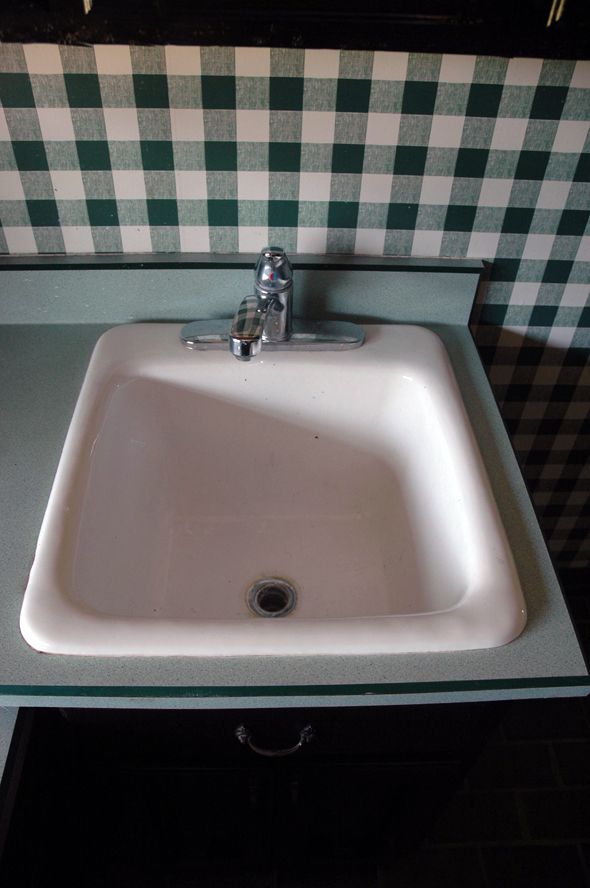
But first, I want to show you what Michael and I were able to do on a tight budget in our sad, green checkered laundry room.
I was tempted to start from scratch in here. But when it was time to figure out a budget for this room redo we were also picking out floor$ and front door$, so I was like, yeah... you know what, we're going to just paint everything in here and see what happens. :)
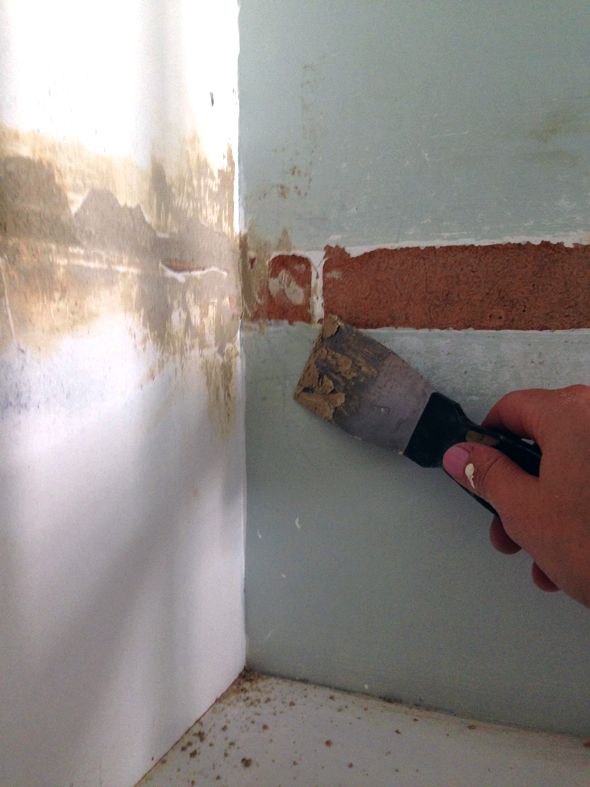
The walls were painted Benjamin Moore's Cashmere Gray (one of my favorites - it's a soft green-blue gray) and the floors were painted two and three shades darker on the same card. I think keeping the paint colors in the same color family helped the floors to not look so crazytown. I used water-based alkyd paint on the floors which holds up as well as oil-based paint, but dries lightyears faster and is a breeze to clean in comparison.
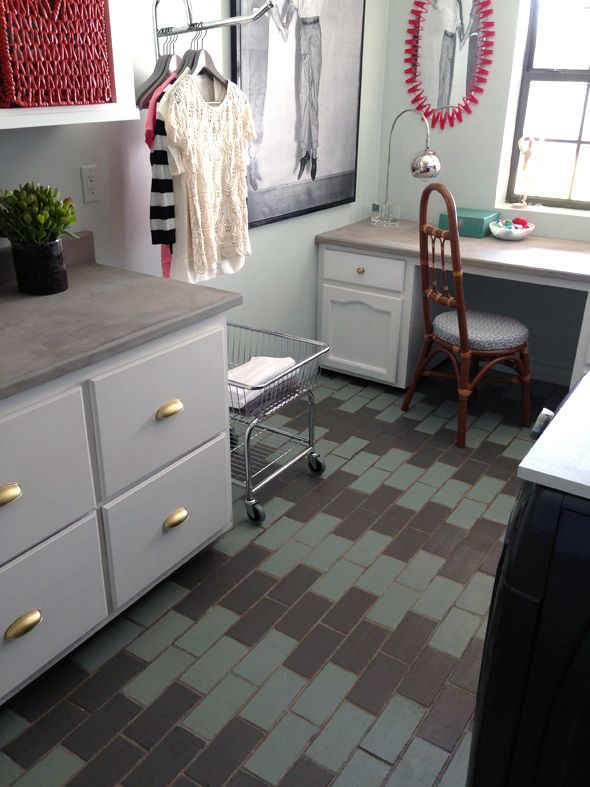
Kind of looks like a stripey ikat right? So much better than the before.
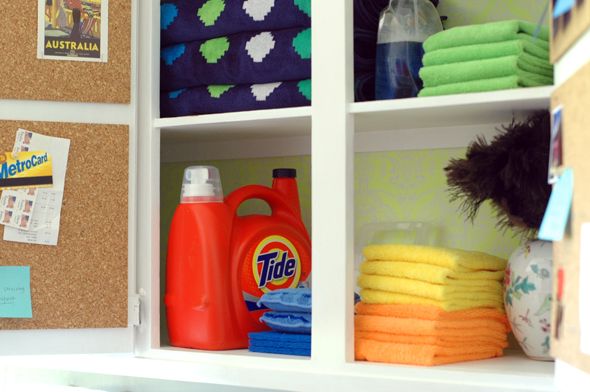
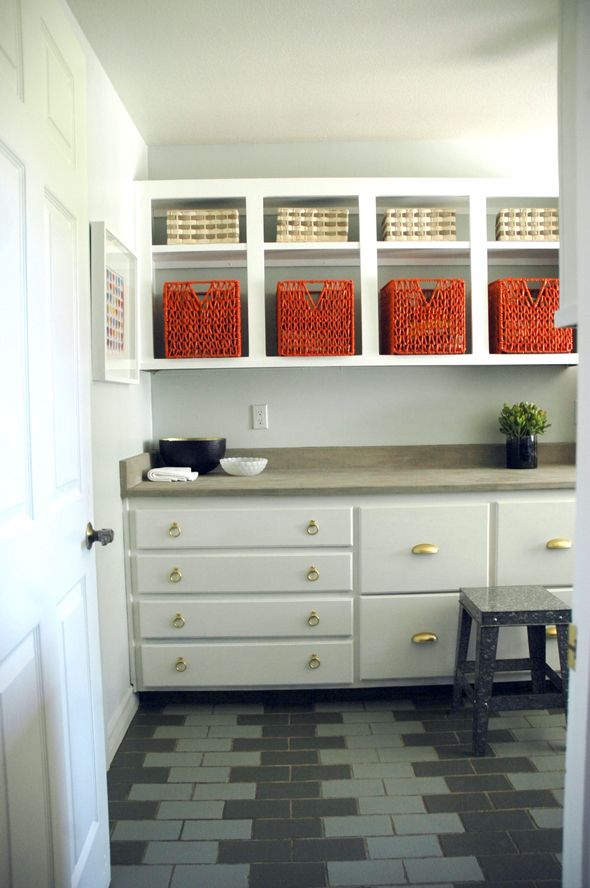
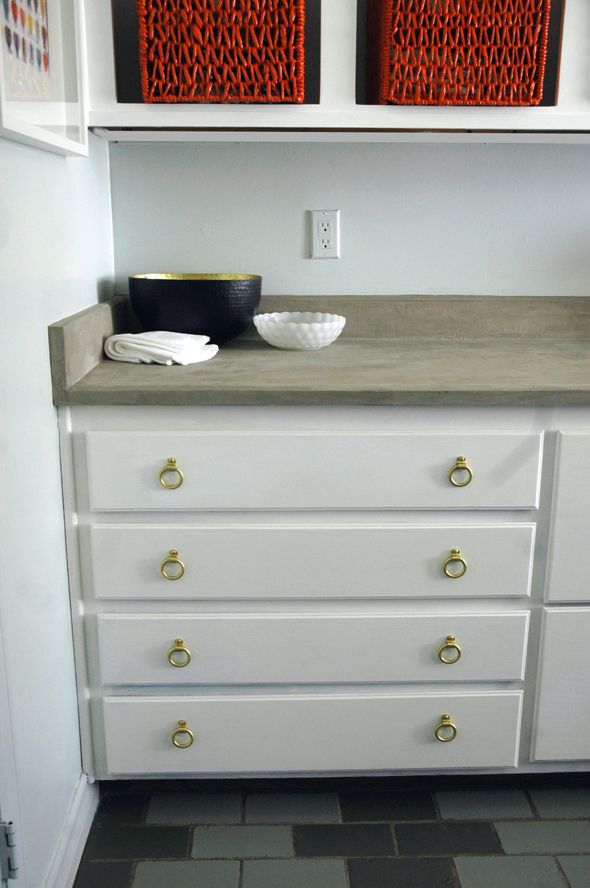
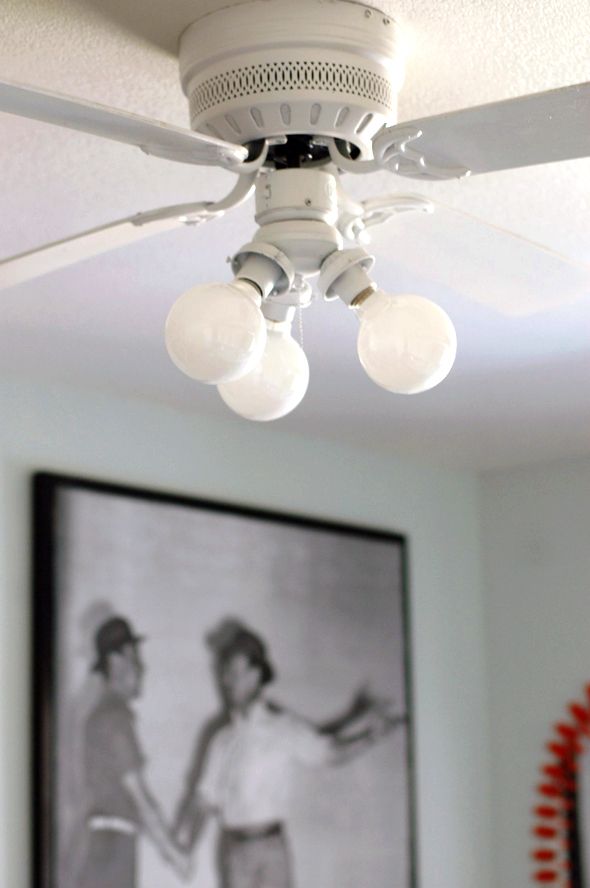
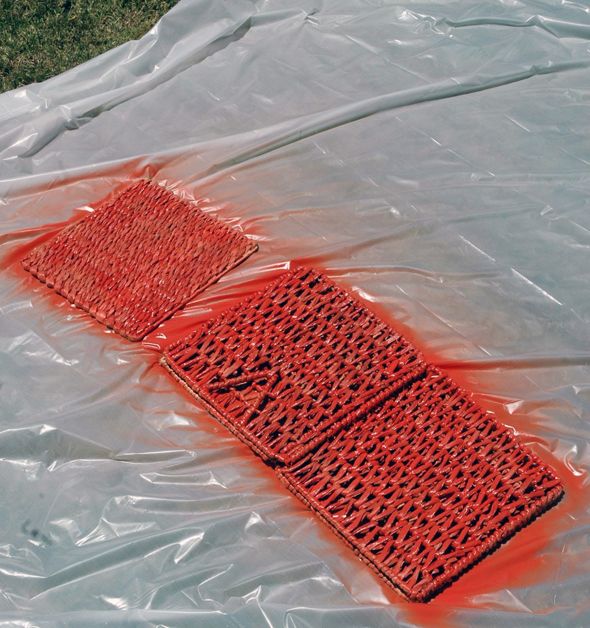
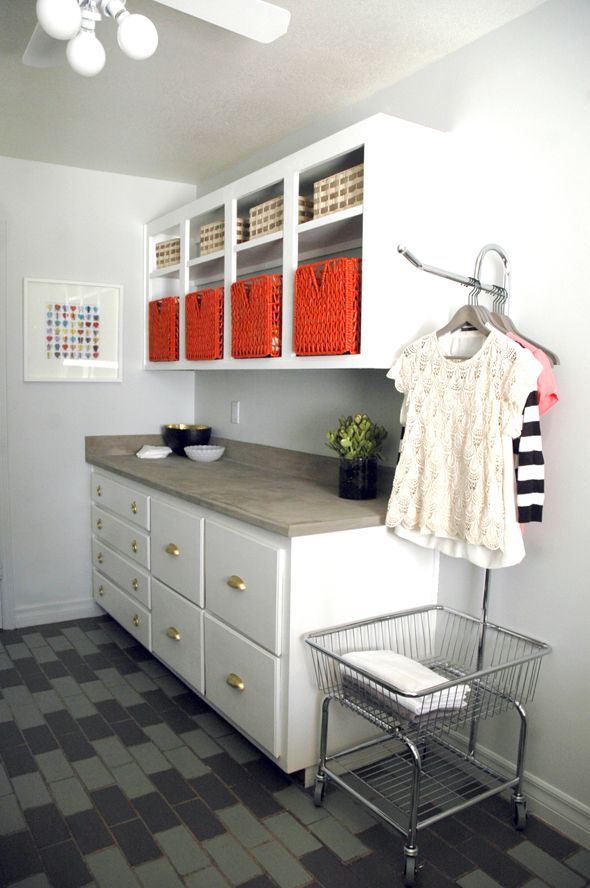
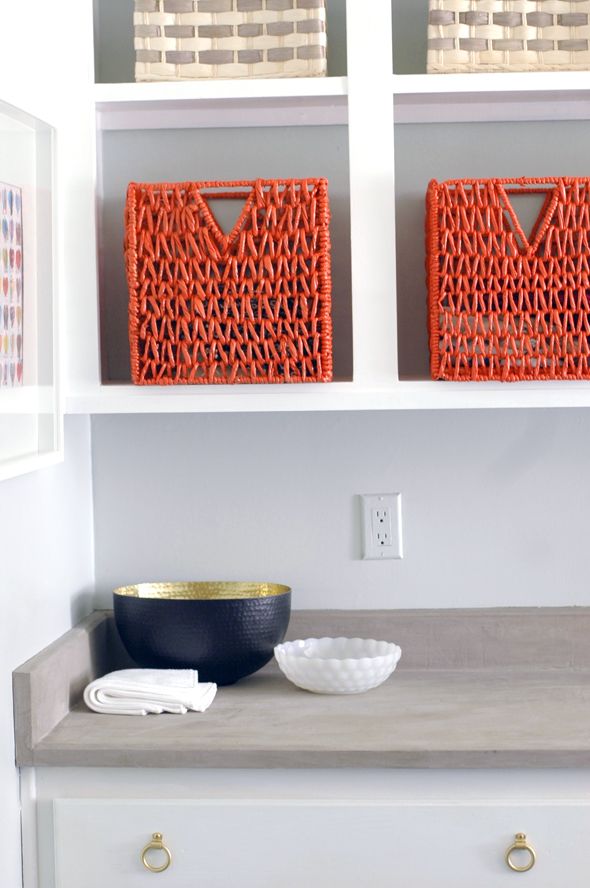
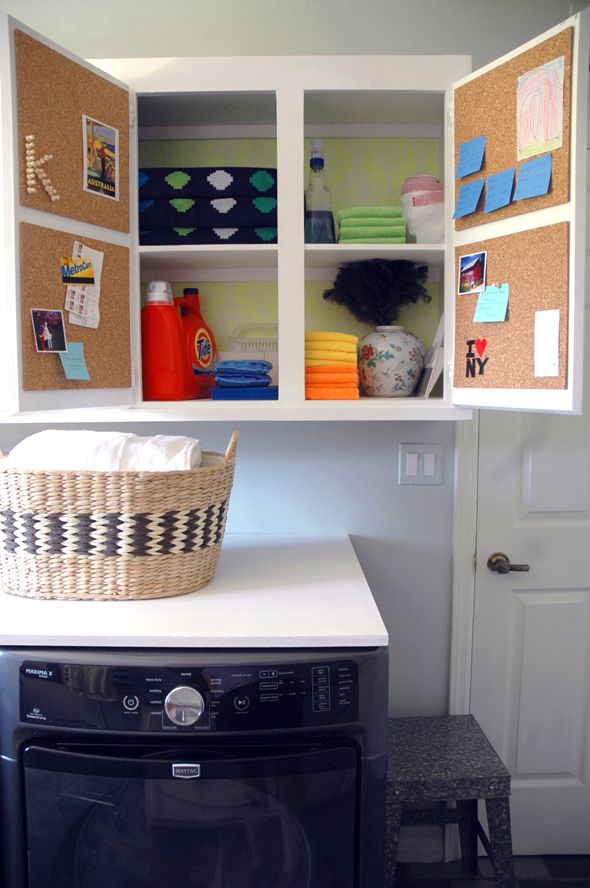
Other things that were painted in the room besides the walls and floors? The ceiling fan (just white spray paint!), the cabinets (Ben Moore's White Dove in semi gloss), the mis-matched new hardware (three cheers for gold spray paint!), the IKEA woven baskets (spray painted tomato red!) and the new light fixture above the window (made the green line on the globes with green nail polish!).
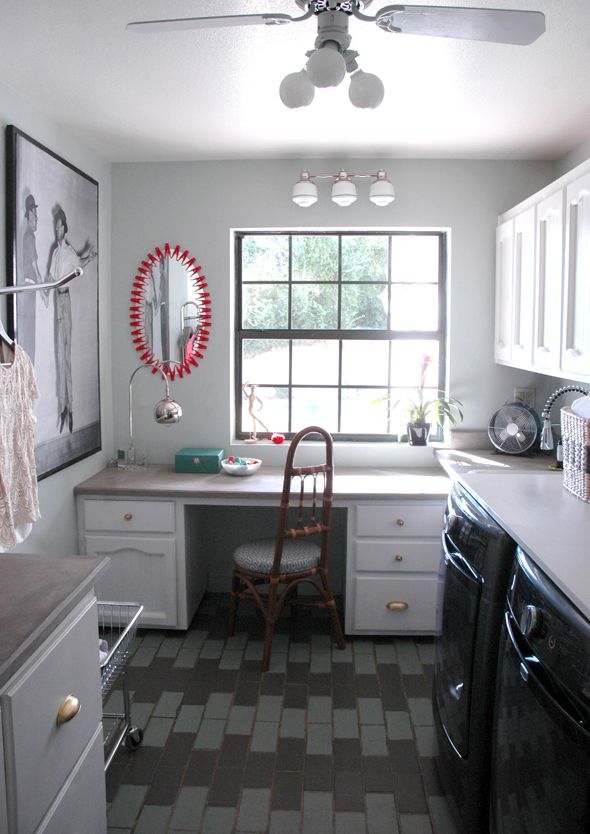
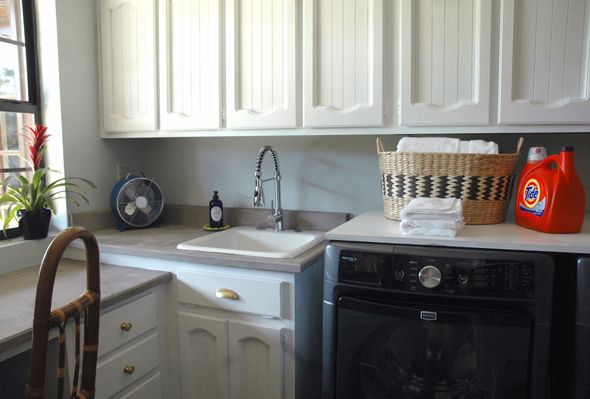
We purchased a few new things for the room to make it more functional. I found the pull-out spray faucet for a great price on eBay and let me tell you - it is changing my life to have a deep utility sink and a really amazing faucet in my laundry room! :)
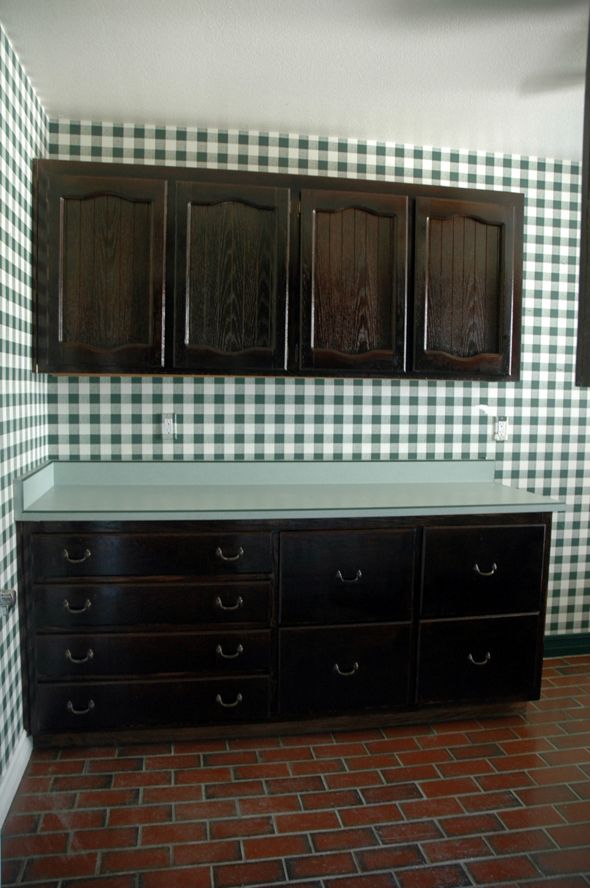
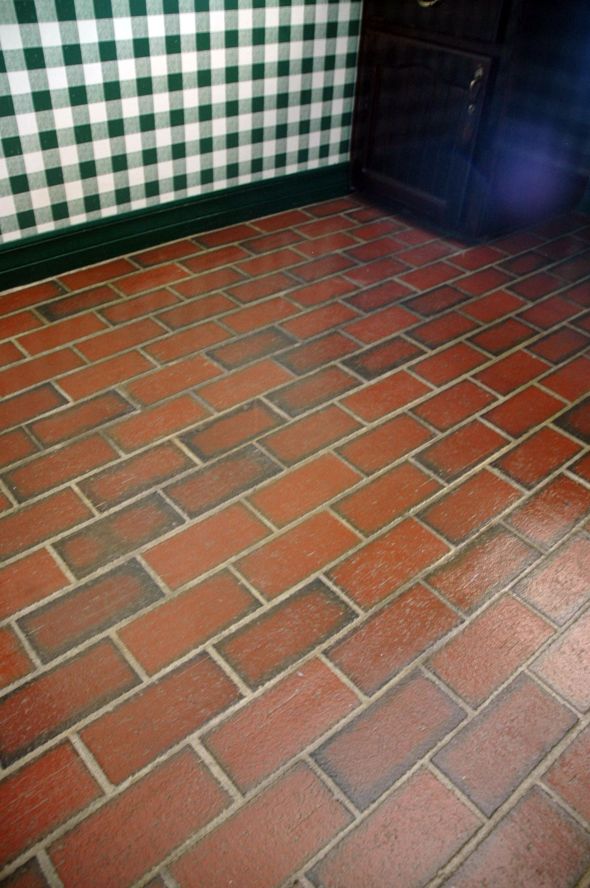
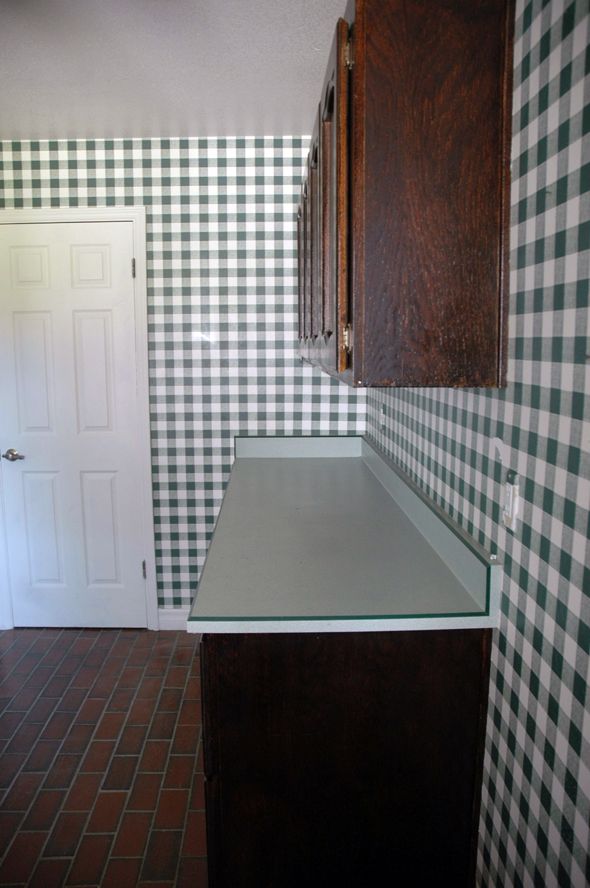
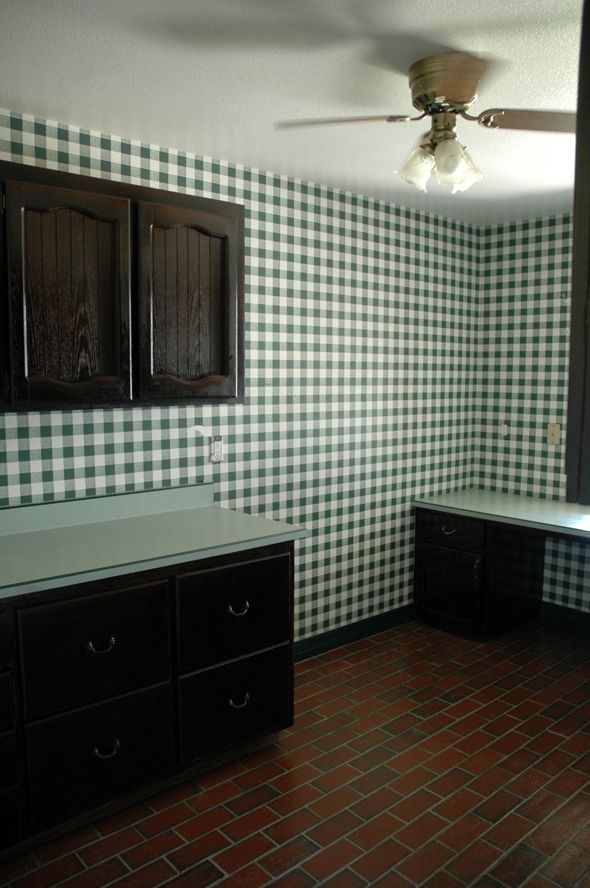
The sad before:
I wasn't sure about keeping this sink (was really wanting to put in that IKEA apron front that I've been eyeing) until we had to pull it out to replace the faucet. This thing is quality. It weighs about a million pounds (cast iron) and it is extra, extra deep. It's perfect for projects and it cleaned up really well with a little Bar Keeper's Friend.
There wasn't really a space to add a hanging bar in here, and seriously who doesn't love a rolling laundry cart? So when I stumbled across this laundry butler online that was exactly counter depth, it was a no-brainer purchase.
You can see here above how we opted to take off the doors on part of the upper cabinets. Here's what the uppers looked like before:

My sweet and totally ripped sister, Ali, basically karate chopped her way through the bottom shelf so we could get it out of the cabinet frame. True sisterly love right there.
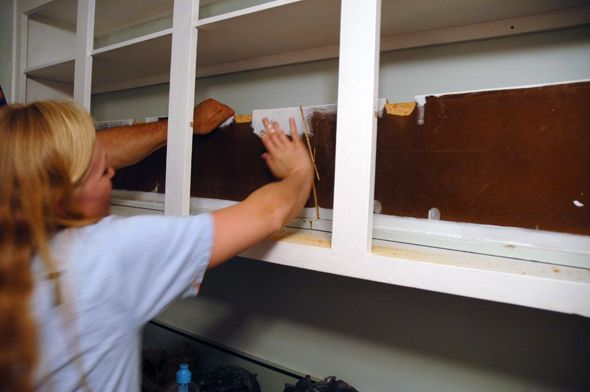
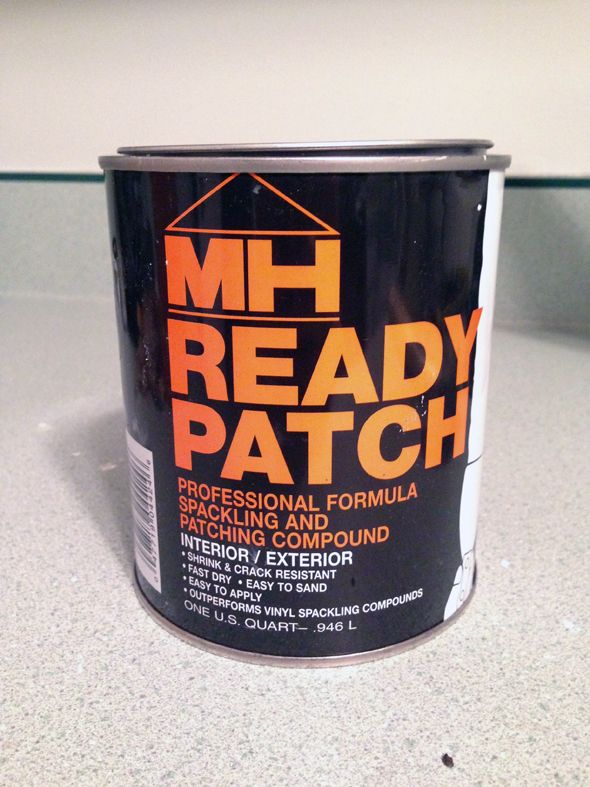
Once the doors were off and the bottom shelf was out, we could fill the holes and sand the imperfections and then touch up the paint. I discovered my new favorite putty/patching compound
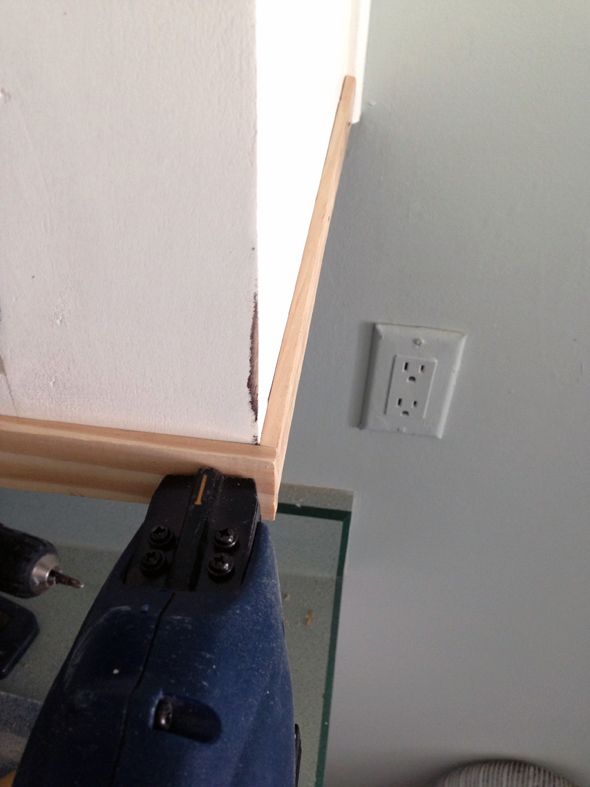
We added a little furring strip to the bottom of the cabinet and to the fronts of the top shelf to finish off the edges. This helped the shelf look SO much better.
We also painted the backs of the shelf the color of the wall. I think between that and the addition of the furring strips, the cabinet started to look like a wall shelf instead of uppers without their doors.

We added a furring strip to the bottom of the upper cabinets on the other side of the room too, just to help finish those off as well. I wish we could have replace those doors so much, but I think the white paint helps clean them up a lot and they're not so, so country now. Compromises for the budget! :)
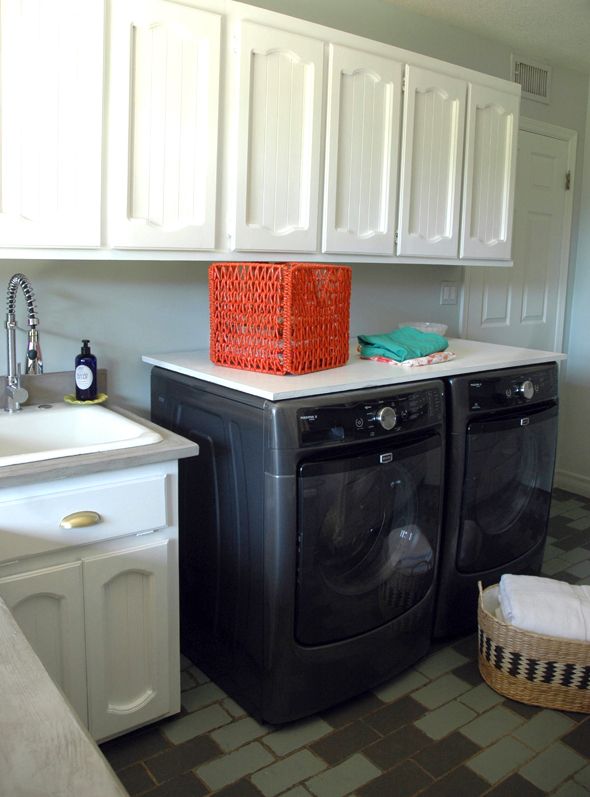
I also had a piece of MDF cut to fit the top of the new Maytag appliances for a make-shift folding station. Someday, I'd love to get a piece of remnant stone cut to fit, but the wood works well for now. No baby socks falling behind the dryer in this house!

In the upper cabinets above the appliances, I modpodged the backs with neon gift wrap from Homegoods (the best place to buy wrapping paper IMHO).
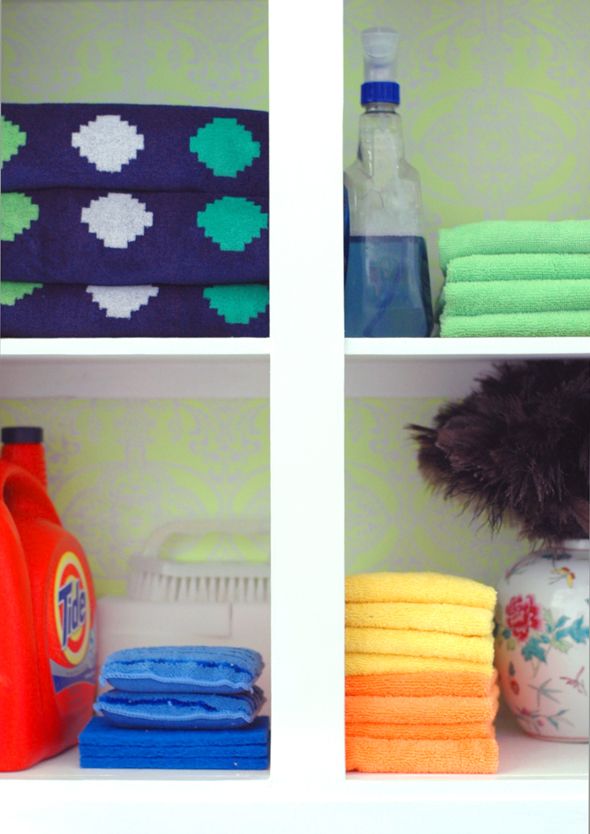
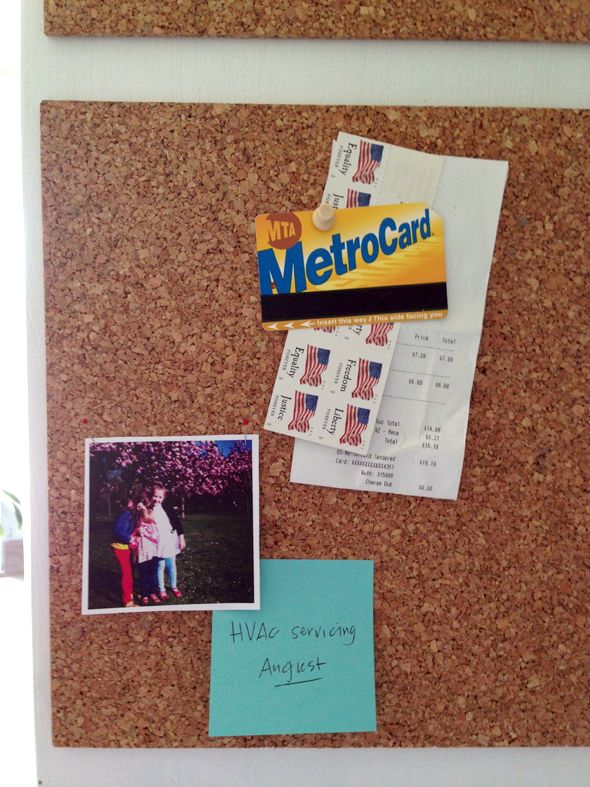
I also added cork tiles to the insides of the doors for pinning up little reminders and momentos that make me smile while I'm reaching for the detergent.
I needed some cheap wall art in the room so I did my $4 print trick using a quirky image I found online of Gene Kelly and Fred Astaire.
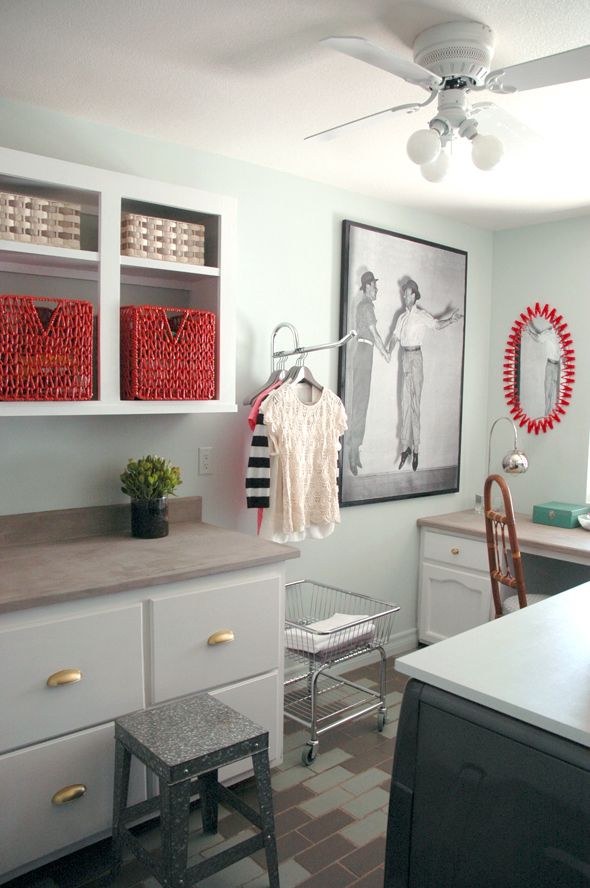
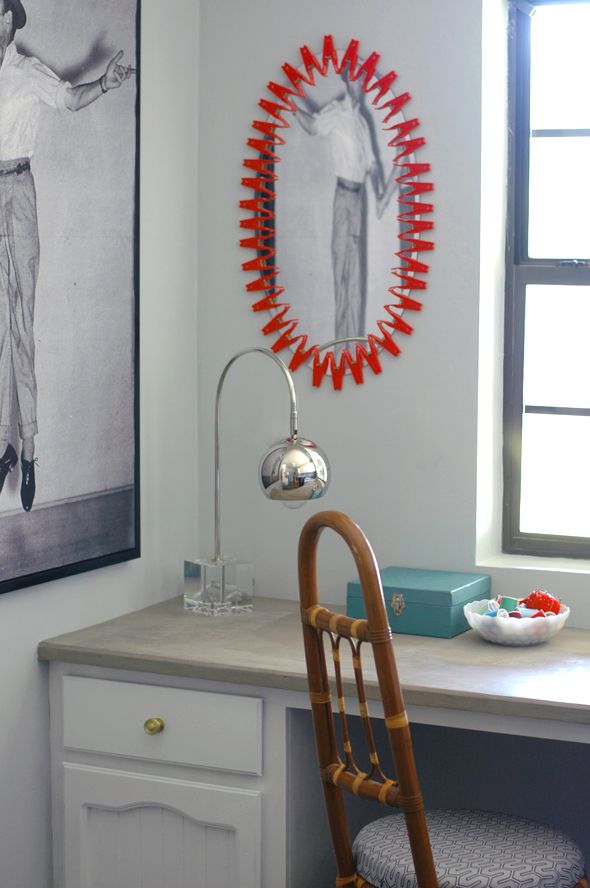
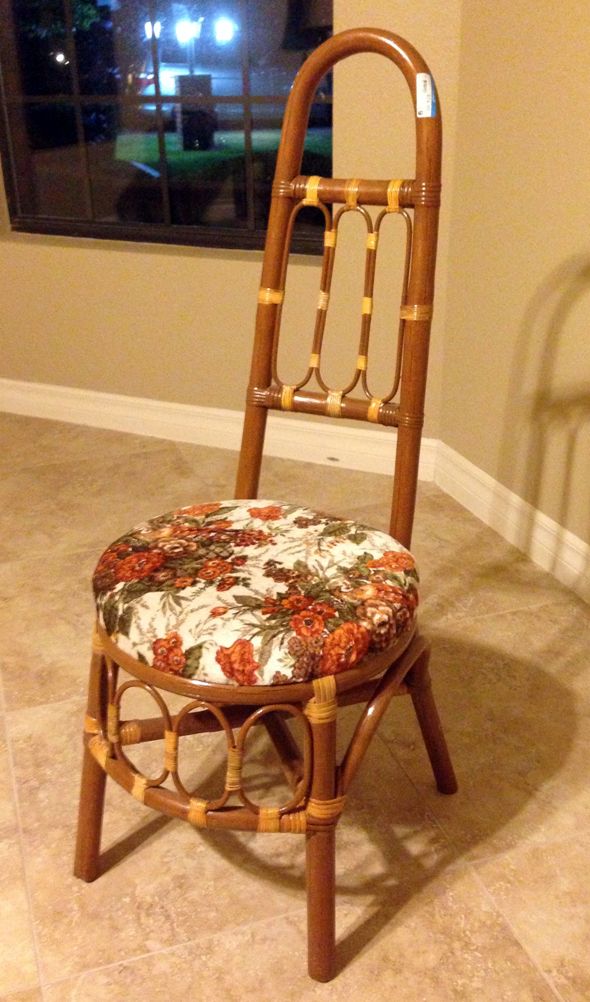
I also made a sunburst-esque mirror out of laundry clips from IKEA that I thought turned out pretty cute. The arc lamp is from Homegoods. I found that little chair at Goodwill for $15 and reupholstered it in some Dwell Studio fabric from Home Fabrics in Mesa that was about $7/yd. Love that store so much.
I think my favorite project in the room has to be the new countertops though. We used a concrete product called Ardex Feather Finish to resurface the old laminate. I'm excited to share the tutorial!
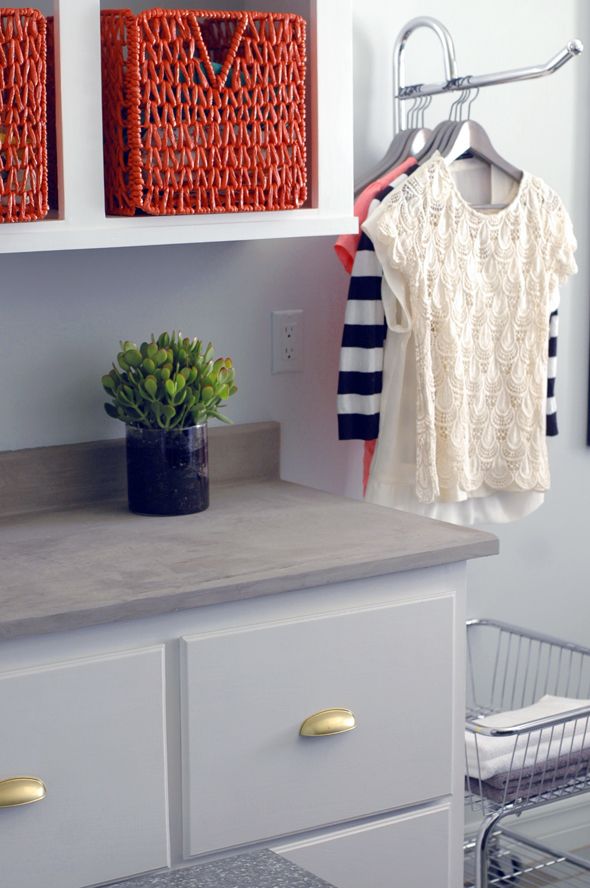
The concrete made the room feel instantly more modern.
Feel free to check out all my tips here and to ask questions in the comments section, but I'll be posting some of the tutorials from this room soon. I wish I could have put more details here, but this post is already monster-sized. :) And now for the exciting part:
Maytag, Tide and The Home Depot are giving away a new washer/dryer set like the set I have below (which I am honestly LOVING, by the way), including a full year's supply of Tide's HE laundry detergent. They are also giving away a $5,000 Mastercard gift card for your laundry room redo, which I will help the winner design (and then feature the plan here on LGN)!
To enter, visit the contest site here. Ten additional winners will receive a year's supply of Tide HE detergent, so chances of winning something are looking good! :)
This post was brought to you by The Home Depot, Tide HE and Maytag. Thank you for supporting LGN sponsors!
Those counter tops look amazing!! I can't wait to see the tutorial!
ReplyDeleteGorgeous! I am amazed at how you turned the room around. Can't wait to see the other transformations!
ReplyDeleteJaw dropping. Curious to know what you spent in all. Can't be much for what you accomplished. I LOVE IT.
ReplyDeleteHoly cow. This whole thing just blows me away. Everything is my favorite part.
ReplyDeleteHoly cow, what a wonderful transformation. This room makes me actually want to DO laundry! My least favorite thing in the world!
ReplyDeleteYou seriously did an amazing job! I love the countertops and can't wait to hear how you did those!
ReplyDeleteThis is just getting me more and more excited for the rest of the house!
Love it, especially the art! What did you do for framing the Gene Kelly photo?
ReplyDeleteAWESOME!! Gah the concrete countertops are incredible. Great job!!!
ReplyDeleteAh- I love this! We close on our first little house in two weeks and watching you reno your has been so fun knowing that I will be doing the same so soon!
ReplyDeleteOh Yippee...a reno reveal! The laundry room looks amazing-a nice little retreat from the other reno work when you need to do the laundry work! I love the demolition update, too.
ReplyDeletelovely..such a serene place to do laundry! Love all the shades of gray and blue.
ReplyDeleteJenny, you are a master at your craft! Can't wait to see the rest.
ReplyDeleteJenny, I am amazed! You never fail to impress me with what you are able to accomplish in a short amount of time. Its so inspiring to see your DIYs! Thank you for sharing!
ReplyDeleteIt looks fantastic! I can't believe that you made the upper cabinets look like built-in shelves. Usually when cabinet doors are removed off of uppers it looks very DIY. These on the other hand, look amazing. The Cashmere Gray was a great choice of paint and that artwork makes the whole room. Great job!
ReplyDeleteThis renovation is so amazing. And my favorite part is the small budget! Do you have an estimate of how much all the changes ended up costing?
ReplyDeleteYour laundry room looks amazing! Wow such a transformation.
ReplyDeleteTeresa
I am exhausted just seeing how much you've already gotten done. AMAZING. And it looks wonderful. I'm officially totally inspired.
ReplyDeleteSO excited to see the tutorial on the countertops. My husband and I just decided against replacing with granite in our kitchen, and I'm desperate for something to replace the fugly. Go Jenny Go!
Wow, there's nothing much to say except this is incredible. I mean, if this isn't the bets calling card for your talent I don't know what is! I'm pretty excited for the rest of the house to get it on now! It's going to look great.
ReplyDeleteThis is just soooo freakin good Jenny. Love all the DIY inspiration in this room redo. The floors look brand new!
ReplyDeleteAahh! I can't wait to see how you did the counters. All my kitchen and bath counters are the same style and I've been trying to figure out how to fix them without replacing. Beautiful room btw!
ReplyDeleteYou're SO talented! Wow, everything looks amazing. Especially those concrete countertops, paired with the gold hardware and the Cashmere Grey. I love all of it!
ReplyDeleteThis is so inspiring and honestly, when looking at the before pictures I was like...how is she going to pull this off. BUT YOU DID! Your work is inspiring and amazing. Kudos to a great room.
ReplyDeleteJenny, the only thing I have to say is you are truly a miracle worker! The laundry room looks fab, can't wait to see what else you have up your sleeve!
ReplyDeleteI love this! Cannot wait to read the countertop tutorial - we're working with some 1972 Avocado Green laminate at the moment.
ReplyDeleteJenny are y ou real?
ReplyDeleteLove the mirror, the pattern on the floor, the red baskets- so so clever! You always surprise and delight with your spot-on creativity, Jenny, great job!
ReplyDeleteIncredible transformation, as always :)
ReplyDeleteUm...you are a genius!
ReplyDeleteYour laundry room is phenomenal! What a bright, happy, well-utilized space. My husband and I bought our first house in January that's desperate for an update everywhere, especially in the inefficient laundry room. Looking forward to seeing more of the tips and tutorials you'll be sharing!
ReplyDeleteYou are amazingly talented! Thank you for sharing your creative and beautiful ideas.
ReplyDeleteyou are a wizard.
ReplyDeleteYou really knocked this one out of the park Jenny! I am constantly amazed by your budget friendly, high style make-overs. Go girl, can't wait to see what is in store for the rest of your new home!!!!
ReplyDeleteAmazing job Jenny! You keep me inspired and motivated to press on through my own projects.
ReplyDeleteAmazing job Jenny! You keep me inspired and motivated to press on through my own projects.
ReplyDelete1. Wonderful giveaway!
ReplyDelete2. I just saw this simple idea at betterafter.net, to reverse cabinet doors and use the plain backside: https://safaffect.wordpress.com/2010/06/30/before-after-roberts-condo-kitchen/
3. LOVE what you've done in the laundry room. Must have taken a lot of patience to paint those floors!
4. When the dust settles (literally), will your profile get an update to switch out brownstone for the AZ Valley House as the site of your creative DIY? :)
WOW... beautiful!
ReplyDeleteLove your redo! My favorite part are the countertops too! Everything looks great! Awesome giveaway!
ReplyDeleteI had to scroll between the first two pictures to believe it was really the same room. This is one of my favorite of your renovations. Great work.
ReplyDeleteKERPOW!!!!
ReplyDeleteIts amazing, and well worth the wait. Looking forward to seeing the rest of the house progress!
Oh my goodness I love your laundry room redo! Love the floors & the countertops, just everything. So inspiring. I wish this were my laundry room. Ha, like that is ever going to happen.
ReplyDeleteBRAVO, Jenny! You are a genius!
ReplyDeleteCannot WAIT for the concrete tutorial! It's exactly what ive been wanting for my own navy-laminate-infested kitchen!!! Please hurry ;-)
ReplyDeleteSo incredible! I am most amazed that you managed to transform those brick pavers. Whets my appetite for the rest of the house!!!
ReplyDeleteWhat an amazing giveaway! And I am completely blown away with the way you transformed that room on such a small budget! Amazing what some paint can do!
ReplyDeleteI'm speechless! It looks amazing!
ReplyDeleteHoly freakin' moly! If I were you I would never want to leave that room.
ReplyDeleteI second everyone else's comments!!! Maybe you should charge admission and let's us AZ pals come take a tour when you are all done!!! A-mazing
ReplyDeleteAmazing job...Do you ever sleep?
ReplyDeleteAre you going to use BM White Dove for all your white trim? I'm wondering because I've started painting doors and trim with that color, now thinking it may be too gray and I should have stuck with my tried and true favorite BM Super White?!
Just wish my laundry room wasn't in the dungeon....I'd have such grand plans. :) Beautiful job, colors are fantastic.
ReplyDeleteMagic!
ReplyDeleteI think I read through this post like 5 times each time just in awe! Its absolutely incredible!!!
ReplyDeletethis may be a dumb question, but did you remove the green checkerboard wallpaper first or did you just paint over it?
looks amazing!!!
That floor is awesome! And what a clever solution to the countertop problem. Such a pretty space.
ReplyDeleteYour update looks so awesome! This gives me so much hope for my own sad, sad laundry room. I know you'll be doing a post for resurfacing the laminate counters but I just can't wait to ask. Do you think something like this will hold up in a kitchen??? This may work well for my "Lipstick On A Pig" budget I've got going on in my home. Great job, Jenny!
ReplyDeleteLOVE it! Can you tell me what brand of gold spray paint you use? It looks amazing!
ReplyDeleteWhat a fantastic transformation! Love what you have done with the counters and the open cabinets. So fantastic!!
ReplyDeleteYou did an AMAZING job!!!
ReplyDeleteHoly crap, it's all so amazing. I love that you did this on a budget since my husband and I have a lot of upgrades we'd love to make on our new house, but we've run out of dollahs to spend.
ReplyDeleteWhat a transformation!I love your neutral with pops of tomato red accents. Beautiful, as always!
ReplyDeletejenny , its beautiful , I dislike doing laundry , but would love to spend my time in there and surely will enjoy doing laundry. A question about the lamp ... have you purchased it in homegoods recently ? I have been searching high and low for something like it.
ReplyDeleteI am blown away by how you treated the brick. Really really smart. The floors are the superstar of the room.
ReplyDeletewow!! this is a wow makeover. beautiful room, well done!
ReplyDeletelooking very forward to the countertop tutorial. One question, did you paint the wallpaper?
Londen
Too Gorgeous! Do you have a breakdown of how much you spent?
ReplyDeleteAHmazing! I've always rolled my eyes at laundry room re-dos but this is SUCH a transformation from bad to good! It is totally merited.
ReplyDeleteI really hope that you post a tutorial on painting the floor. I have ceramic tiles in my kitchen and living room (beautiful wood floors in the rest of the house) and I have no budget to replace them. I'd be satisfied with a black and white check design, but I haven't been able to find any information on painting floor tiles.
Oozing inspiration! We just bought our first house (which is turning into more of a fixer upper than we thought it would be!) and our laundry "station" is a sad little corner of our filthy garage. It needs 911 design help, thanks for motivating me!
ReplyDeleteLOVE IT ALL! You are amazing! I am so excited to see the countertops tutorial. I would love to do this in my kitchen until I find what I really want.
ReplyDeleteYes yes yes please! Love the redo!
ReplyDeleteSo in love with that little lamp! The hunt is on!!!!
ReplyDeleteI am sure you will cover this in your tutorials, but did you paint over the wallpaper? The room is amazing!
ReplyDeleteAmazing job!!!
ReplyDeleteHi jenny,
ReplyDeleteI am really impressed with your transformation. Remarkable, k
I love, love, love this room. You did an amazing job!
ReplyDeleteAmazing!!! It looks incredible! Where did you find the gold hardware???
ReplyDeleteI can't even believe those countertops aren't new. Can't wait for the tutorial!!
ReplyDeletejenny, you are too much. this house is going to be AMAZING...and on a budget. bonus!
ReplyDeleteI am just amazed!!! I love your style , your new house is coming together beautifully. Thanks for sharing.
ReplyDeleteAmazing job on your laundry room! Wow, such a huge difference you've made with all the updates!
ReplyDeleteWhitney
http://www.whitneyjdecor.com
I too am excited to see the countertop tutorial! I will be interested to hear if it is something that could be done in the kitchen. We are hoping to sell our house and we are already losing money on it, so anything that can modernize on the cheap is especially appealing to me!!
ReplyDeleteMy jaw dropped when I saw the before and after. You did an amazing job! I now want to paint my bedroom that wall color.
ReplyDeleteThat is wonderful! What a change. I love the mirror.
ReplyDeleteA. MA. ZING.
ReplyDeletePainting the brick floors was a stroke of genius! I also love the red baskets!
You did SO well. Especially on a small budget and in so little time!
You're awesome, Jenny!
Annie XO
omg, you are ridiculous! How do you come up with these ideas!! Such a transformation...
ReplyDeleteWow! What a transformation! Please say this isn't real time!?! How can someone get ssssoooo much done so quickly? Super in awe!
ReplyDeleteJenny, I have been looking forward to this all week, and as expected you did not disappoint! You killed it! Awesome, awesome job. So inspiring for those of us on a budget! Can't wait to see what you do with the rest of the place.
ReplyDeleteSuch a great use of paint!! Stunning! Looking forward to seeing the counter top tutorial!
ReplyDeleteI am speechless...WOW.
ReplyDeleteThis is unbelievable. My jaw dropped. The floor paint pattern is inspired. When on earth have you had time to do all this?! There are a ton of projects in this room! Love it!
ReplyDeleteGet out of town. Not only am I loving your laundry room (it makes me actually want to do laundry), but I was just looking at a new washer and dryer since we bought ours right after we got married. They are a-shakin' and a-creakin'.
ReplyDeleteGo Mesa Fabrics. (and btw, I can't wait to see what you do with easy access to SAS and all that vintage trim!)
I'm in shock! What an amazing before and after. You are Wonder Woman Jenny! Such a talent...
ReplyDeleteJenny you are simply amazing. Can't believe what a total transformation you made. Cant wait to see the rest of the house.
ReplyDeleteI love how light and bright it is. Beautiful.
ReplyDeleteThis looks fabulous. You are totally inspiring me to make some small but significant changes in my laundry room--starting with a board across my washer and dryer as a placeholder for the folding station I want eventually!
ReplyDeleteI really wont to try the arced feather finish concrete product and look forward to the tutorial. Very smart idea on the corkboard and clothespin. I have a 1980 washer/ dryer and that Maytag well I can only say much deserved. I have an 1960 bradybunch house bought 2 years ago and I follow your blog. Homegoods paper is nice. amazing ideas! Congrats on the baby! Many blessings
ReplyDeleteI love how light and bright it is. Beautiful.
ReplyDeleteI really wont to try the arced feather finish concrete product and look forward to the tutorial. Very smart idea on the corkboard and clothespin. I have a 1980 washer/ dryer and that Maytag well I can only say much deserved. I have an 1960 bradybunch house bought 2 years ago and I follow your blog. Homegoods paper is nice. amazing ideas! Congrats on the baby! Many blessings
ReplyDeleteI am speechless. Your floors blow me away! But the more I look, the harder it is to decide my favorite part. It is all so beautiful!
ReplyDeleteI can't believe it is the same room -- great work!
ReplyDeleteEverything is so awesome, Jenny! Can't wait to tackle my own laundry room when we close on our first house in August :)
ReplyDeleteLOVE the whole room, the floors and counter tops are amazing!
ReplyDeleteVery beautiful update! I know I'm going to get flack for this, but that print is a Philippe Halsman. I'm surprised Kinko's would print something for you that's copyrighted.
ReplyDeletewhat you did with the tile floor surprised me the most! A really great solution and you won't feel guilty ripping it out in the future if you ever change your mind.
ReplyDeleteLove the transformation! Especially loved how you worked with what you had, made me feel like I really can transform my space without any demo really.
ReplyDeletewhat?? i am amazed. like i keep scrolling between the old and new pictures. Jenny, you are so talented. i absolutely love it!! everything is perfect. countertops, floor, cabinets....ikea baskets....can i move in there please?
ReplyDeleteLove it! Where did you find the big lightbulbs for the ceiling fan? They really made it look more modern!
ReplyDeleteI can't wait for the counter top tutorial! I need to do something about ours on a serious budget, and cannot get over how good yours looks! Everything about this space is brilliant (I would have never thought to do that with the floors)! I'd expect nothing less from you.
ReplyDeleteAmazing, I love everything you did! So clever!! I can't decide what idea I love best! You thought of everything! Can't wait to see what you are going to do with the rest of the house! Congratulations!!
ReplyDeleteAmazing, I love everything you did! So clever!! I can't decide what idea I love best! You thought of everything! Can't wait to see what you are going to do with the rest of the house! Congratulations!!
ReplyDeleteI gasped out loud when I saw the first "after" picture (probably did the same seeing the original laundry room tour)! The floor is wonderful!
ReplyDeleteIf this is what you've done to the laundry room, then the rest of the house is going to be epic! Beyond epic. And I'm so grateful you are sharing all of it with us! Thank you, Jenny!
WOW, WOW, WOW... you amaze... moving cross country w/ 3 kids and you have had time to redo the laundry room?
ReplyDeleteso inspiring... love the washer/dryer combo... entered the contest... in the process of redoing my laundry room (former bathroom) but I guess I'll rip it all out if we win!
Thsnks for sharing.
Great job, Jenny! Hooray for pretty pictures making a return!
ReplyDeletedang, you're good!! your vision is a gift, and you nail style every time doing the unexpected - i almost wish i had linoleum something so that i could concrete it.
ReplyDeleteOh my goodness! Fantastic job, Jenny! I love the laundry room you guys did such a good job. I especially like the floor!
ReplyDelete~Pam
You do more than throw up paint. You're eye for detail and practical upgrades (think furring strip) is what sets you apart. You have a gift and I'm so grateful for your willingness (and energy) to share. Just lovely!
ReplyDeleteThis is amazing, and add me to the list of people who can't wait to see the countertop tutorial. And that, by the way, is my very favorite thing about your blog -- I learn about all these great, budget-friendly DIY workarounds that I didn't even know were possible. (BTW, I'm making a roman shade from mini-blinds this weekend - ha!)Awesome, awesome job.
ReplyDeleteDo you mind sharing which tomato red spray paint you used for the baskets? I love the color!!
ReplyDeleteWow! You get things done fast! What an awesome job!!!! Love your blog!
ReplyDeletehttp://reuschinteriordesign.blogspot.com
Wow! What a difference! I've been trying to decide whether to paint my ugly oakish kitchen cabinets white or dark. Thanks for the tips. Maybe some of our readers will help me decide: http://gustoandgrace.wordpress.com/2013/07/19/light-or-dark-yall/
ReplyDeleteJenny! You seriously knocked this one out of the park. Seeing such a transformation on a tight budget is even more inspirational than if the sky had been the limit. Seriously. Lovely, modern, functional...the best qualities of any space!
ReplyDeleteSeriously impressive. I think the floors are my favorite - not crazy town at all!
ReplyDeleteHoly crap you are seriously amazing.
ReplyDeleteThis is AMAZING! It scarcely looks like the same room. You must be thrilled with how all your hard work has turned out :) xx
ReplyDeletemy pick my jaw off the floor. this transformation is insane! how long did this take?
ReplyDeleteLOVE IT!!! I think the cabinets look loads better painted and how inspiring to show people how different a room can look without gutting it!! Everyone would love to gut a room and start from scratch but so often there isn't enough $$ in the budget. Can't wait to see the journey of this house reno!!
ReplyDeleteI have been looking forward to this post for weeks!!! Feels like Christmas with the generosity of eye candy.
ReplyDeleteStunningly awesome redo! I can't even believe it's the same room! And it seems like it was pretty inexpensive and not too difficult to boot! Great job!
ReplyDeleteoh my my my! that is incredible! i am so jealous...we just have a laundry closet...and it is not pretty! ;) great job...can't WAIT to see the rest of the house!!!
ReplyDeleteSo, so great! I love how airy and bright it is now, without any structural changes.
ReplyDeletehttp://greenmountainglobetrotter.blogspot.com/
Jenny,
ReplyDeleteThis before and after is simply incredible. Awesome what some paint, elbow grease, and a little creativity can do!
If you don't mind, I'm going to pin this to The Home Depot's All About Paint Pinterest board.
Cheers,
Caroline
Senior Editor, homedepot.com
Looks amazing!
ReplyDeleteWOW - what an amazing & cheerful transformation!
ReplyDeleteHoly smokes!! You are so talented!!
ReplyDeleteWow what a difference!!!! Looks great!
ReplyDeleteHoly moly, I need help so much help with my laundry room... There are holes in the wall...not a pretty site!!
ReplyDeleteAaaaaagggghhh! I'm a wee bit tortured by how good you are! I mean, I look around at my house and think, "well geez, WWJD"? What would Jenny do with this?!
ReplyDeleteWow, what an improvement.. Very clever.
ReplyDeleteThe Laundry Room is incredible. Seriously beyond impressed. And I'm renting and my laundry room is a cupboard in Phoenix, but with a husband in med school the laundry detergent would be awesome. You're amazing!
ReplyDeleteHoley cannoli!!!! You have such great design vision. I look at that room and just groaned. Blown away by after.
ReplyDeleteits amazing!!!!! good job!
ReplyDeletefantastic!! super creative and so fresh. love it !
ReplyDeleteYour work is amazing, you work magic. It's just insane.
ReplyDeleteLove your blog! This post was great! Love those counter tops! And the mirror!
ReplyDeleteWow! It's amazing! So beautiful. Do you think concrete counter tops would work in the kitchen?
ReplyDeleteIncredible makeover! One would never guess the before by looking at the after. Well done!
ReplyDeleteWow, NICE! I am loving those modern countertops, what a happy place this was transformed to!
ReplyDeleteso good to see you back at it! and i was wrong in my guessing, you even kept the fan! everything looks amazing! we have a home fabrics here in kansas city and it is definitely my favorite little place! i did my entire daughter's nursery in fabric from there!
ReplyDeletehttp://www.themakerista.com/2013/07/millys-nursery_15.html
thanks for sharing, jenny! your gifts are many and the fact that you share them with others is very kind. have a lovely weekend!
I absolutely love everything you did! I have to admit that I am blown away by those counter tops! I'll be excited to see your tutorial and then do it to mine!
ReplyDeleteSeriously so amazing. It doesn't even look like the same room! And how did you do it so fast? I can't wait to see the countertop tutorial. Love me some concrete counters.
ReplyDeleteAmazing!
ReplyDeleteI have that same bubbly milk glass bowl! Love me some milk glass.
ReplyDeleteYou did such a good job with the floors! It looks fantastic. And, despite you repeating a zillion trillion times how much faux brick was in the new house, I still thought for a moment that you had laid new tile. Amazing job.
Completely amazing - i was looking forward to the re-do ..but you basically took every project I'd ever like to do in a budget-friendly home re-do, and accomplished it in this one room- hats off!
ReplyDeleteI am once again amazed at your vision and creativity -- and the speed in which you get things done. Genius!
ReplyDeleteWow, this looks amazing Jenny! You are an inspiration for sure. Thanks for always giving us great design, ideas, and DIY! Thankful for you and your blog.
ReplyDeleteHappy Weekend!
Wow, this looks amazing Jenny! You are an inspiration for sure. Thanks for always giving us great design, ideas, and DIY! Thankful for you and your blog.
ReplyDeleteHappy Weekend!
You did a FANTASTIC job!! I especially dig the resurfaced counters, it really looks like concrete. Isn't it amazing what a little paint can do? Your post is very timely for me, as I am in the middle of my own laundry room redo! I've finished laying the new floor and painting, and am now getting to the "fun stuff", decorating! I'll be posting about my redo this coming week at www.theyearoflivingfabulously.com if you're curious. Keep up the great make-overs! -Marie Vlasic
ReplyDeleteYou did a FANTASTIC job!! I especially dig the resurfaced counters, it really looks like concrete. Isn't it amazing what a little paint can do? Your post is very timely for me, as I am in the middle of my own laundry room redo! I've finished laying the new floor and painting, and am now getting to the "fun stuff", decorating! I'll be posting about my redo this coming week at www.theyearoflivingfabulously.com if you're curious. Keep up the great make-overs! -Marie Vlasic
ReplyDeleteI can't believe you accomplished SOOOOOO much so fast?!?! Wow! I am inspired. This looks better than my kitchen...and all you used was paint? Holy cats. Amazing!
ReplyDeleteThanks for the inspiration!!!!
Wow!! So impressive! Looking forward to seeing more "pretty" :) Have been enjoying the house tour, but can't wait to see what you do with what you have. If the rest is half as amazing as the laundry room, we're in for a treat! Thanks for the opportunity to enter the contest. My laundry room has been in need of help for quite a while and it's so small that the layout keeps stumping me. Would LOVE your design help even more than the cash!
ReplyDeleteincredible! i dont even know what the point of doing a total reno is when you apparently make a DIY project look this good. cant wait to see the concrete counter tutorial. (biting my nails)
ReplyDeleteGet out...I love the floors! I am inspired to PAINT my entire laundry room AND kitchen after seeing this. I am looking forward to the counter DIY
ReplyDeleteThe whole makeover is fabulous, but what you did with the brick floors is truly inspired.
ReplyDeleteCamille
This is the 5th time that I have come back to this post to just admire it. You have such talent my friend! To be able to turn the room into amazing on such a little budget. So great! I can't WAIT to hear about the countertops. I have some dated, faux wood counters that need to be replaced desperately. This could extend their lives with a little bit of lipstick. Thank you for being so great!
ReplyDeleteI can NOT wait to see your tutorial on the counter tops. I've been really interested in the whole Ardex thing, so I am psyched. The room is gorgeous, and looks so expensive!
ReplyDeleteWow! I am loving watching you make this new house "you". Thank you for thus giveaway and all you do on this blog.
ReplyDeleteWow it looks amazing. If the rest of the house looks as good as this it will be incredible. Loving reading your blog.
ReplyDeleteWow it looks amazing. If the rest of the house looks as good as this it will be incredible. Loving reading your blog.
ReplyDeleteJenny,
ReplyDeleteHow did you get so smart and creative at such a young age! :o)))
I love all your tricks and tips! Keep them coming!
~ Becky
Woah, Just catching up here. This is aMaZiNg seriously.
ReplyDeleteI don't even really have a laundry room. Just a "dump it all" nightmare.
Love everything you have done!!!!
I hope you post about the floors. Can you just paint the brick or do you have to sand the finish? Looks beautiful. I love the spray painted bins.
ReplyDeleteHi, I was wondering if put anything in between the wood and the washer and dryer surface? I have recently as similar style and want a counter type space on top but do not want to scratch the top of the washer and dryer if the board slides around.
ReplyDeleteLove it!!!
ReplyDeleteLovely what you did to those floors. Love the colors and the pattern. What a great idea to improve that awful, weird brick. :)
ReplyDeleteI cannot WAIT for that countertop tutorial! Your room looks great-- so many good ideas here!
ReplyDeleteLove, love! The counter tops and paint color are awesome! The artwork is eye-catching too...as most wouldn't think to place such art in a laundry room. Can't wait to see more of this house demo!
ReplyDeleteCrazy good transformation. How did you paint all those separate tiles on the floor?
ReplyDeleteCrazy good transformation. How did you paint all those separate tiles on the floor?
ReplyDeleteJenny I would love a tutorial on how you painted the floors!!! We are moving into a rental with brown 70s tile and would love to paint them because they are actually a cool shape!!!
ReplyDeleteHi Jenny,
ReplyDeleteGreat "afters"! We have a large laundry room, but I can't keep it looking cute because I need the space too much for non-cute items. For example, all of our cabinets are filled with paint (now that we live in a climate where it's too hot to store paint in the garage). What do you do with all of your not-pretty stuff, if not stored in the laundry room? And, since I'm on topic - where do you store paint?
Hi Jenny,
ReplyDeleteGreat "afters"! We have a large laundry room, but I can't keep it looking cute because I need the space too much for non-cute items. For example, all of our cabinets are filled with paint (now that we live in a climate where it's too hot to store paint in the garage). What do you do with all of your not-pretty stuff, if not stored in the laundry room? And, since I'm on topic - where do you store paint?
Amazing Job!! I love the counters, I've been thinking of that same project, thanks for confirming it looks great! The floor looks so good and the green stripe on the light using nail polish- genius! Love it all!!
ReplyDeleteYou continue to be one of the most inspiring bloggers out there. I'm always blown away by what you accomplish and you make me feel like I could jump in and actually get something done. Count me as another one who'd like more detail on how you painted the floors.
ReplyDeleteThis is incredible! I was wondering what you were going to do with awful brick pavers, but lo and behold, you made them into something amazing! And the counter tops! I've been waiting for a DIY concrete kit, and they look amazing! Great job! I'm really enjoying this reno process of your new house =)
ReplyDeleteThis is incredible! I was wondering what you were going to do with awful brick pavers, but lo and behold, you made them into something amazing! And the counter tops! I've been waiting for a DIY concrete kit, and they look amazing! Great job! I'm really enjoying this reno process of your new house =)
ReplyDeleteGorgeous! I love the Gene Kelly print. So fun.
ReplyDeleteTotally amazing!!!! I absolutely LOVE it and your blog!!! You are a super DIY Dynamo!!!!
ReplyDeleteWow, I have kept coming back to this post the last couple days - it is SO GOOD! Definitely one of my favorite room redos ever and I just can't wait for each of the individual DIYs (I hope you do one on painting cabinets!) and I hope to do a makeover of my own laundry room eventually. Such great inspiration Jenny - you knocked this one out of the park! It seems like so much work though - I'd love to know roughly how long each of the projects took when you do your DIY posts.
ReplyDeleteHi Jenny! Would you post a cabinet painting tutorial? Also, did you paint the cabinets or do the cement counter first?
ReplyDelete
ReplyDeleteOh wow that's impressive! the result is amazing!
I don't know how you do it, it all looks so easy with you. I wish I were more like you.
Btw, the piture of Kelly/Astaire is so great! I want it! where did you find it? I couldn't find a big enough one to print!
thanks ;)
scaricare musica
Love this room. You were so brave and did such a great job! I would LOVE to give this giveaway to my mom. She is the best and her laundry room needs some TLC!
ReplyDeleteI'm so jealous!
ReplyDeleteSO inspired! Love it.
ReplyDeleteJenny, this doesn't even look like the same room. Your floor looks amazing! I really love the Benjamin Moore Cashmere Gray in here and would love to feature this on my paint color blog, Involving Color. Let me know if you're interested!
ReplyDelete