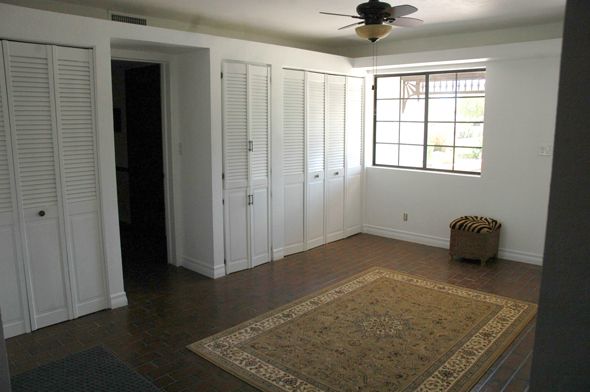
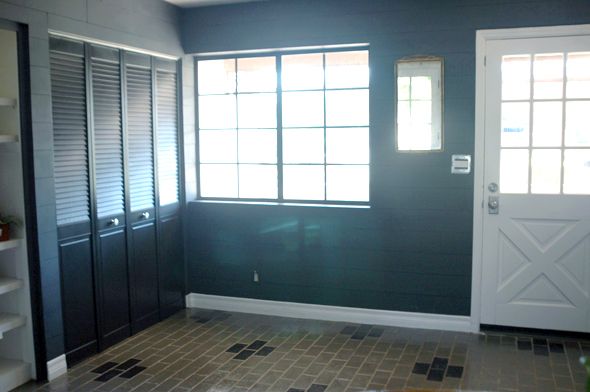
It's still a work in progress, but I love the direction we're going in here. The room is completely flooded with light all day long, so I decided to go dark and dramatic on the walls and the floors.
Here's the full break down...
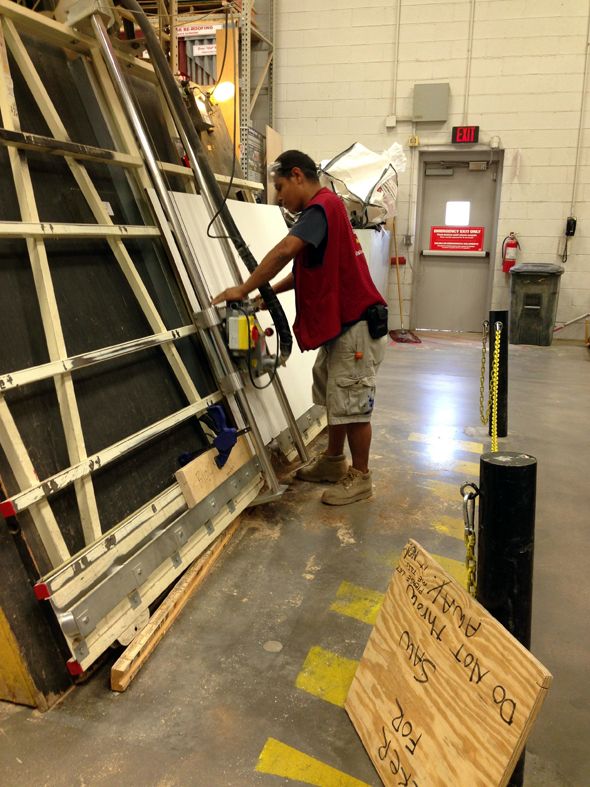
A couple days ago we headed over to Lowes to have the wood cut for the wall planks. We decided on 1/4" melamine boards because they're inexpensive, light and easy to hang. Lowes has a pretty generous lumber cutting policy. Usually they'll do all your cutting for free (even many multiple cuts like with these planks), but sometimes they'll charge 10-25 cents per cut. We cut my stack of five 8x4' melamine board ten times, so it wasn't that expensive to have the wood cut quickly and precisely. I had all the boards cut to be 6" wide and 4' long.
The installation part is a breeze. You'll want a miter saw, a nail gun, a handful of nickels, a level, a hammer and maybe a nail set if you want to see no nail heads.
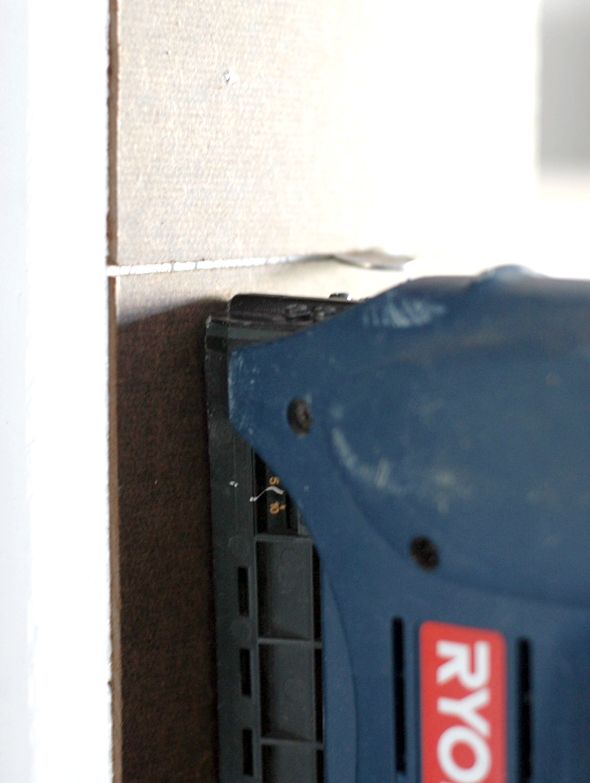
So to start, just use a level to hang your first plank up against the ceiling and then stagger the next plank underneath and maybe cut it down a little too so not every plank is the same length. You'll have lots of different lengths to choose from before long though as you hit corners and doors/windows.
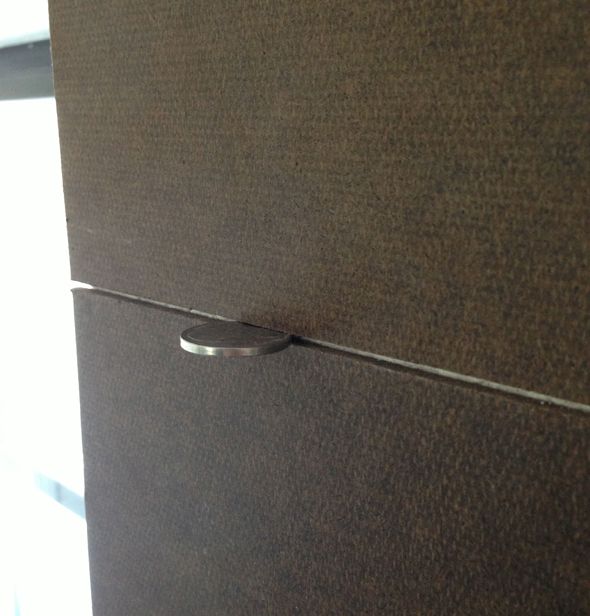
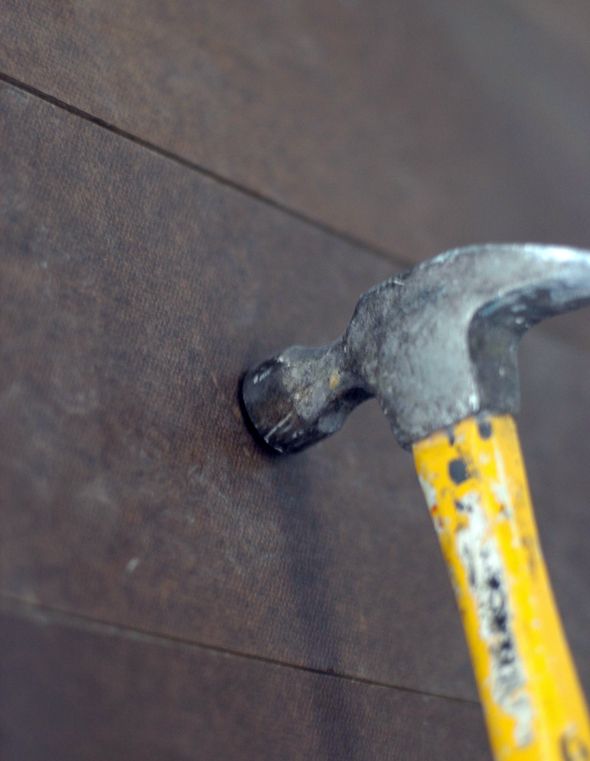
I used a couple of nickels to space out my planks before I nailed them in. Worked like a charm to create a small, consistent sized gap between the planks. And to make my nail heads more flush with the planks, I just tapped the nails the rest of the way in with a hammer. I didn't set mine in yet though because I don't mind seeing the shadow of the nails in the planks.
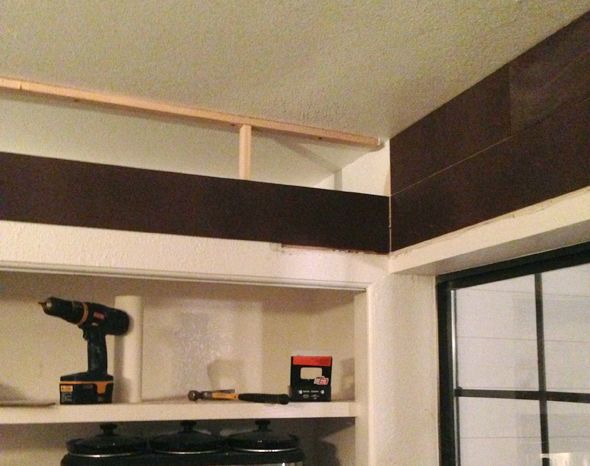
To fill in the plant shelf area above the closets, I sort of framed out the space with 1x2's and just nailed in the planks on the frame. I probably should have just drywalled in the space, but this worked too.
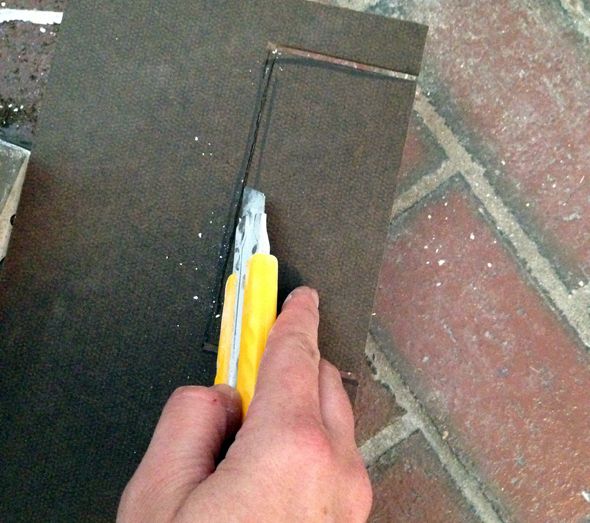
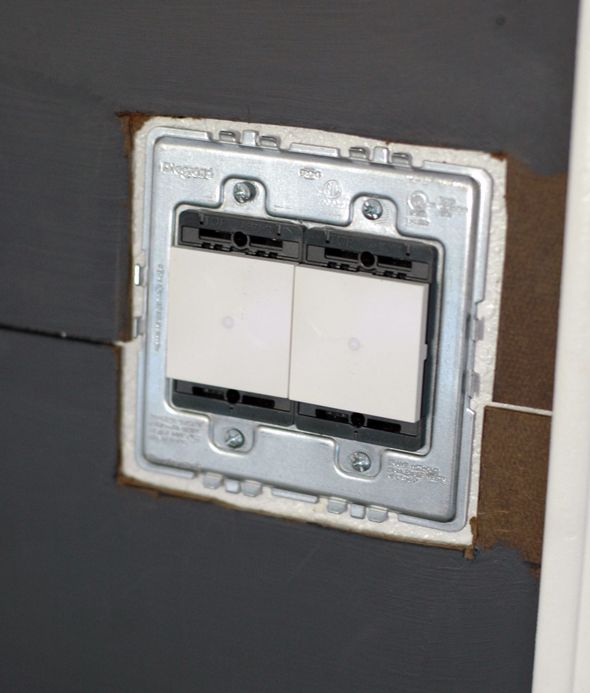
One of the great things about using melamine board is that it can be cut with a razor blade. If you score it over and over again, it actually cuts pretty easily. It was nice to not have to pull out my small Dremel saw or some other tool to cut around light switches and electrical outlets.
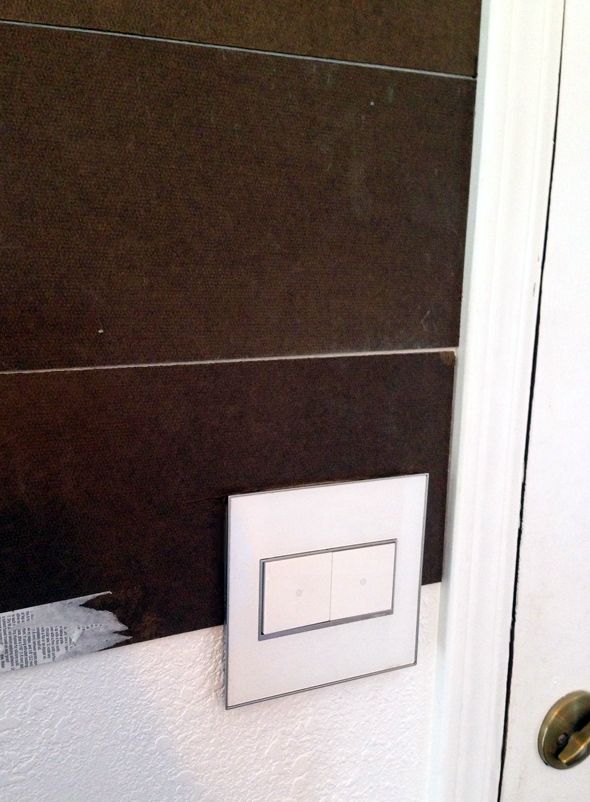
The room isn't finished yet. I'm still working on the built-ins part of the room, so the planking doesn't go all the way around the space yet. I got anxious though and decided to paint what I have done so far (the brown melamine was hurting my eyes). So I took off all the switch plates again and threw on a coat of paint.
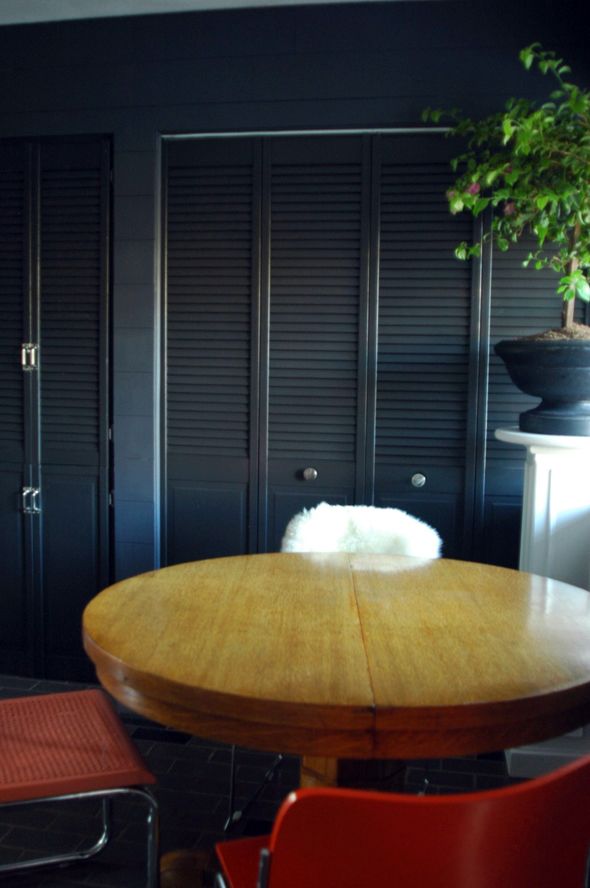
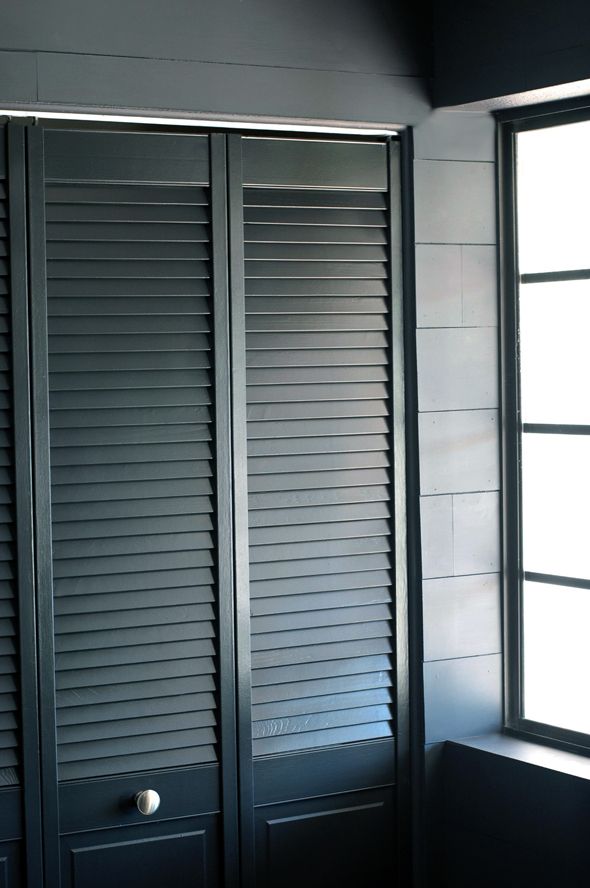
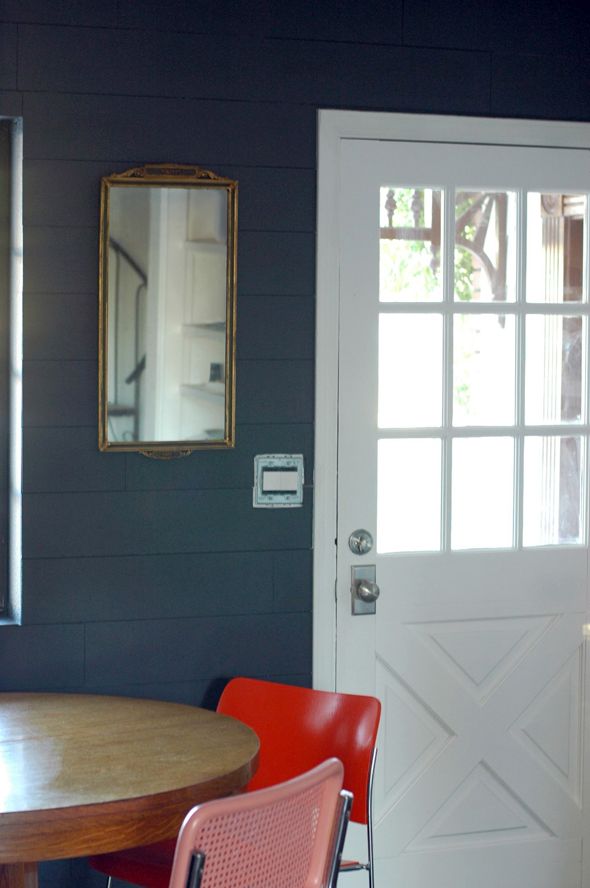
I've been using Benjamin Moore's Onyx on our doors (you can see it here in action on the louvered doors below) and I decided to go a couple shades lighter on the walls in here. The color is called Day's End and it's a really pretty charcoal with blue undertones. It looks navy for part of the day, which I'm digging.
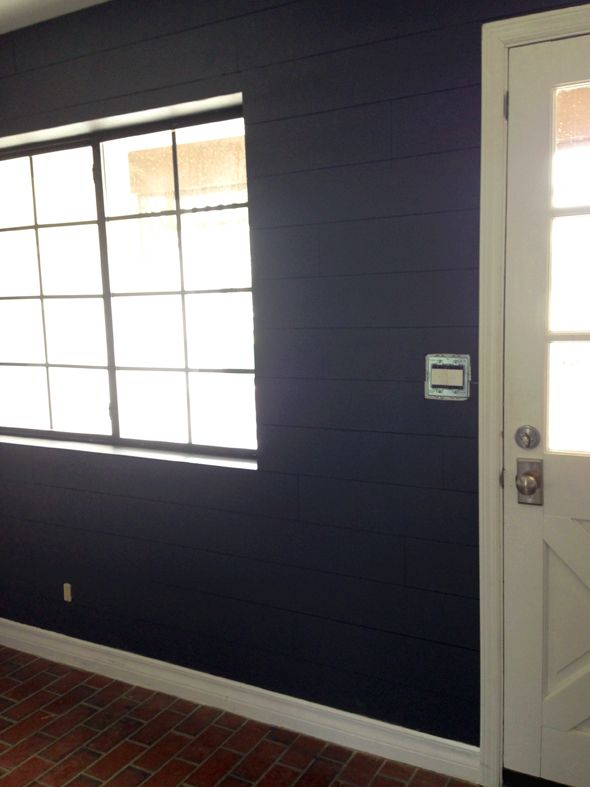
The brown side of the melamine board takes paint SO well. The white side sort of deflects paint in the same way most IKEA furniture does, so I'd stick with the brown side even if I was going with a light paint color. I just brushed the paint on so I could get into the cracks between the planks easily.

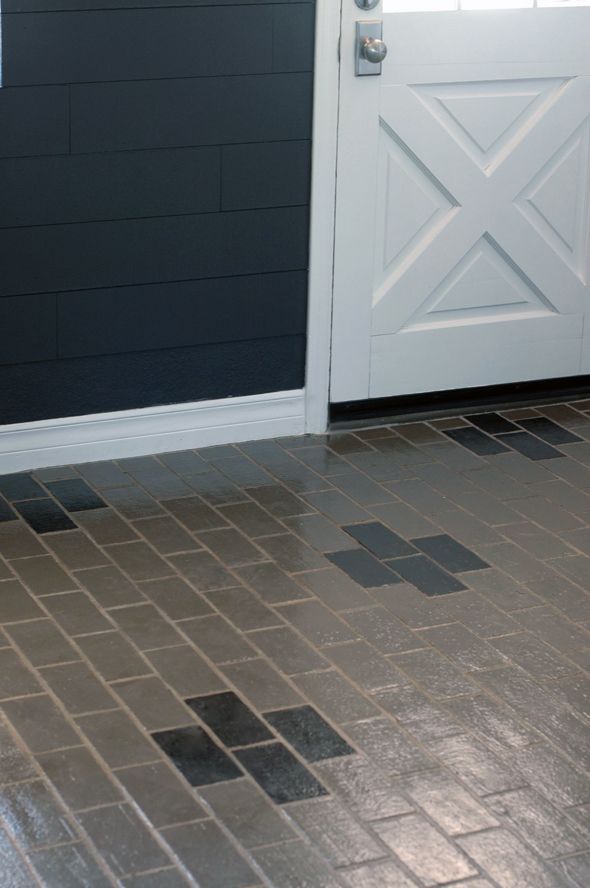
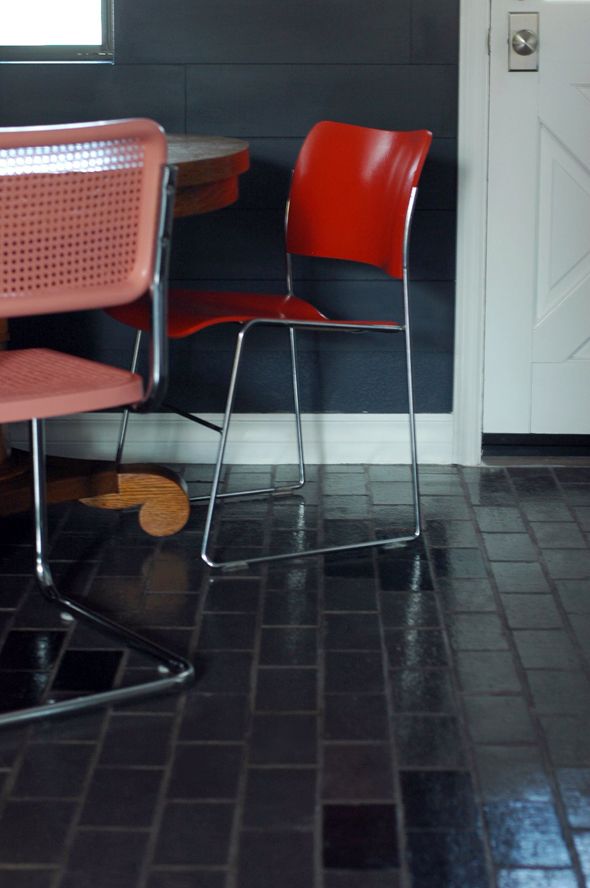
On Monday night my kids had a sleepover with their cousins at my sister's house so I took advantage of their absence and painted the floors. I decided I wanted to try a sort of medallion pattern in here, but wanted it to be not as busy as the laundry room floors.

I marked out my idea with painters tape and then painted most of the tiles the same color as I painted the kitchen floors (post coming there).
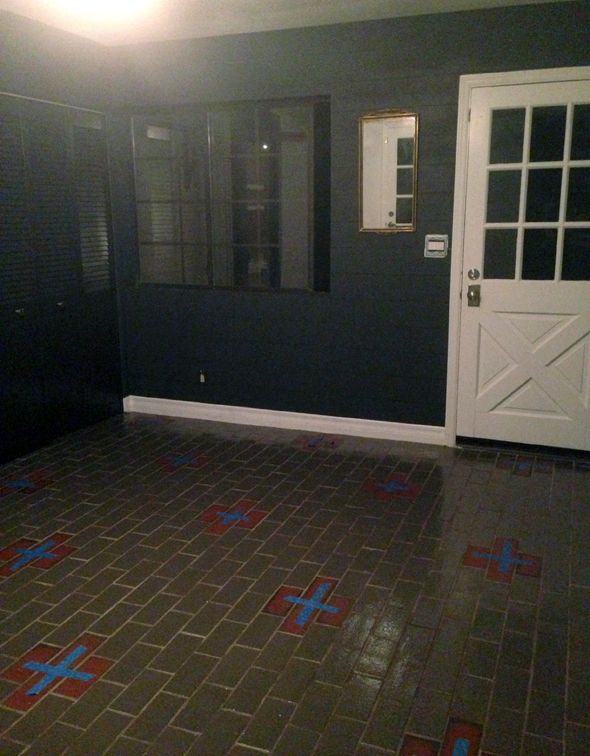
And then I filled in the medallions with black paint.
This whole area will get reworked when we do the big kitchen renovation in a year or two, so I'm fine with this temporary fix on both the walls and the floors. I spent only about $50 on wood and supplies and I love how it's looking.

Here are those freshly sprayed closet and cabinet doors. Man, I love that Critter sprayer!
I also used the Critter to spray the chairs in here, which are all a similar style, but were thrift store finds on different days over the past couple weeks.
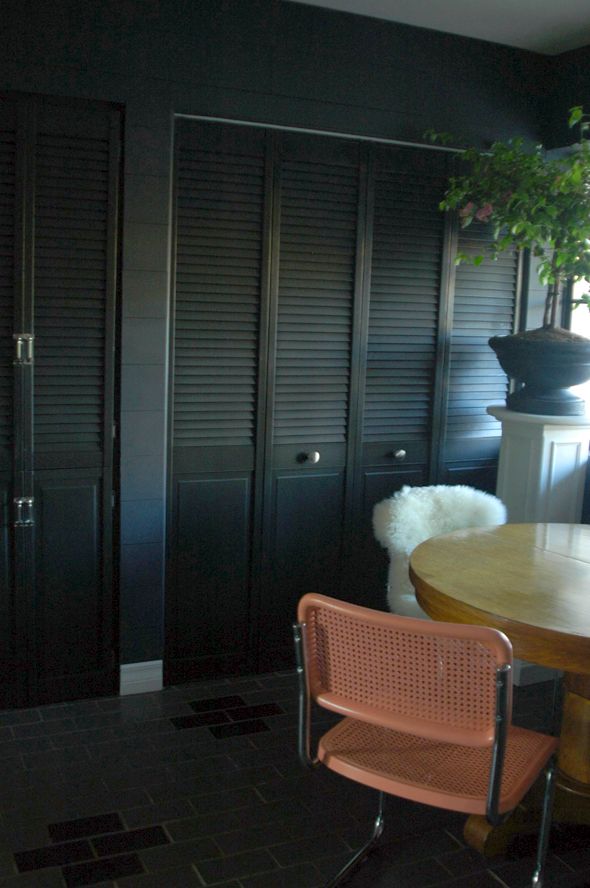
And actually, the bright orange-red chair was a garbage room find from when we lived at the loft. I should dig up some before photos - it cleaned up really well with that new coat of sprayed paint.
Remember that mirror from the powder bath in the brownstone? It fits perfectly on this little wall. I always love having a mirror by an exit door so I can verify I don't look like a complete fool before leaving my house. This came in handy earlier today when I noticed a big smear of black paint on my forehead as I was leaving to pick up the kids. Daughter-embarrassment dodged!
Lots and lots to do in here still, but, you know, it's progress!
Wow! What a transformation! I love how the dark walls and doors look with the table you've brought in. Gorgeous. As much work as it all is, you must be having fun over there getting to try out so many new things (like painting floors and wood panelled walls). It's great eye candy for all of us. Can't wait to see more of the house as it comes together.
ReplyDeleteWhen do you sleep?!!?!?!? Standing ovation to you for your drive & determination! Loving all the results.
ReplyDeleteLove it! Way to go!
ReplyDeleteThis is one of the best planked walls I've seen. You make everything seem so easy, but I have a sneaking suspicion that it's your mad SKILLZ at work. :) Love watching this house get its transformation!
ReplyDeleteLooks amazing! I love the dark walls, And what a great thing that Critter is!!
ReplyDeleteI have pinned so many plank wall pictures and always thought it would be a "someday splurge"... but as usual, you have shown me that DIY is possible! Going to try it somewhere for sure. Thanks for showing the way!
ReplyDeleteLove it. I've been meaning to try this on my stairs for a while.
ReplyDeleteWow Jenny! I'm always in awe of what you can do with a little money and a lot of elbow grease. It looks amazing!
ReplyDeletehttp://www.fullbellywornsoles.com
You are amazing! That space looks unbelievable.
ReplyDeleteAre the floors actual brick, or something made to look like it?
ReplyDeleteThat looks really sharp. I love the way you are working with your floor instead of just replacing it. It looks really good.
ReplyDeleteAmazeballs!!!! Fixing up our house, I wish I had half your talent! Great job!
ReplyDeleteYou must be the most productive blogger in the world! Didn't you move into your house, like, five minutes ago? I wish I could bottle your energy and creativity to complete one half of what you've done. Amazing.
ReplyDeleteI know this is a "short-term" solution before you take on a larger renovation of your kitchen, but this look is a keeper!
WOW! you have been a very busy lady! Looks fanTAStic!
ReplyDeleteIt looks AMAZING!!! I'm loving the dark, plank walls. You are constantly inspiring me with new ideas. One day, maybe I'll pull some of them off!
ReplyDeleteIt looks amazing! I think you have the energy and output of 5 women in one body. And I'm loving that we get to see some awesome DIY before it all gets second phase renovation. The planks and floors are crazy great inspiration.
ReplyDeleteI am always blown away by your projects and your fearlessness. I think my boyfriend must get tired of me saying "Well, Jenny Komenda did this thing..." :)
ReplyDeleteI've been planning a wall treatment using fence planks, but you have me re-thinking that! Love this look and the color your chose!
ReplyDeleteWow, that looks fantastic! This makes me want to incorporate some plank walls in my house!
ReplyDeleteYou totally make rooms look high end and custom without having to pay lots of money. I am totally writing this down for future reference!!!! Amazing job! Love the color!!!
ReplyDeleteIt looks terrific! Bravo!!!
ReplyDeleteThe paint job is so professional looking! (Though you ARE a Pro!) Lookin' Good!
ReplyDeleteWonderful! I'm sure I'll look at this post again and again!
ReplyDeleteLovely color, it's going on my mental paint list.
ReplyDeleteYou're a magician. I would not have thought melamine would work for planks. It looks amazing, especially the paint on those doors!
ReplyDeleteWOW! Bravo!
ReplyDeleteI think the melamine planks could be just the idea to hide the ugly wood paneling in my daughters' room. I love the planking and adding one fabric wall might keep it just girly and modern enough for them.
ReplyDeleteThe room looks incredible so far. Your idea and energy is amazing.
Love this! enjoy watching your journey..I have a question about your blog header...Is that an actual fabric? I love it and want something like that to make pillows with! So glad I found your blog?
ReplyDeleteRich on ideas and low on budget, I love this. So pretty! Quick question: did you spray the hardware too, or change it out? Or does it just look different in the light?
ReplyDeleteRich on ideas and low on budget, I love this. So pretty! Quick question: did you spray the hardware too, or change it out? Or does it just look different in the light?
ReplyDeleteI can't believe how fast you are!! Didn't you just move?!?! ;) Great job!
ReplyDeleteJenny, this looks amazing! I love the different paint colors, and I am so inspired by how you handled those terrible plant shelves. We're getting ready to move to California, and I've been quite horrified by the number of homes that have those. Good to know there are options for concealing them!!
ReplyDeleteLike, WHAAAAAT?? I am always blown away at how you seem to demystify DIY versions of really expensive looking stuff, but this one takes the cake. I am... Actually speechless. Dude, I can totally do this! And I'm buying that critter sprayer. Like, in ten minutes.
ReplyDeleteLike, WHAAAAAT?? I am always blown away at how you seem to demystify DIY versions of really expensive looking stuff, but this one takes the cake. I am... Actually speechless. Dude, I can totally do this! And I'm buying that critter sprayer. Like, in ten minutes.
ReplyDeleteIf you don't win apartment therapy s diy blog of the year, then people are cray !!! Remember this fellow readers when it's time to vote ;)
ReplyDeleteAmen, Sam! This is fantastic.
ReplyDeleteseriously bananas!! I want to channel your energy & eye for just a day on my house, it would be amazing ;-)
ReplyDeleteI am always prepared to be impressed, but you outdid yourself twice in a row. So now I'm a believer in both the planks and the painted brick. But PLEASE share with us a few tips to help us be successful. First the floors--do you tape off or freehand? Do you paint the grout? And do you know how long this holds up? And for the planks, are they rough on the back, brown side? Did you have to do any sanding? Seriously, I adore both of these rooms!
ReplyDeleteAMAZING! Seriously, so soo gorgeous. Aside from how amazing the walls have turned out (and hiding that weird plant shelf area with the planks was brilliant!) what I actually might love the most is how the floor turned out! Who knew those pavers could look so chic. Love the blog, and of course FABULOUS work already! So excited to see more!
ReplyDeletexo
Becky
http://cuphalffull-sf.blogspot.com/
i love the dark walls. once again totally inspiring
ReplyDeleteamazing transformation. so dramatic. you make it look effortless. you tackled those ugly plant shelves! kudos!!!
ReplyDeleteYou amaze me! Every day another project. And I can't wait to buy myself a Critter and paint all my doors. Simplifies what I always thought was a complicated job.
ReplyDeleteWHOA! UH-mazing! I know you didn't move to another state and buy a, frankly, sort-of concerning house just to captivate readers like me with its transformation. But I'm captivated! And at the risk of being redundant: it's also amazing to see you operationalize in an accessible way all of these things that I pin. THANKS and I'll be back tomorrow and the next day and the next day...
ReplyDeletemmm....i would have a hard time doing a reno in a year or two. love this look way too much. your floors are killer. such an awesome look.
ReplyDeleteJenny, AHHHHMYAZZING!!! What a great post. I am so loving watching this new house transform. Question: did you just plank up that vent over the door, or what?
ReplyDeleteThere are cartoony hearts dancing around my head right now...I just love this. Question: did you just butt the edges up to existing trim work? How do the edges look on outside corners?
ReplyDeleteMan, I gotta find a place to do this in my house.
I love your style! So what kind of spray paint did you use for that red-orange chair? I've been looking for that style on Craigslist and i found someone who has 9 in different colors, but I want to paint them all one color. I was nervous that wouldn't hold up though if i spray them. They are metal.
ReplyDeleteThis is so brilliant! Do your DIY's ever not turn out? You really inspire me to try new things, but sometimes they don't turn out. :) Ha! I'm just curious if you ever face something that didn't go the way you had hoped. Your thinking inspired me to take a sharpie to a Kilim covered bench several months ago and I blogged about it today. This room is killer, Jenny!
ReplyDeleteLove it! Great tip on the melamine. I wanted to paint the back of my Ikea shelves and I assure you, I would not have figured out to just flip them around and paint them. I would have fussed and spent time on the stupid white side.
ReplyDeleteTears averted. Whoo hoo!
I love love love this. I have been thinking a lot about walls like this ever since Remodlista did a great post on shiplap.
ReplyDeleteAlso, I've used Zinsser BIN to prime melamine and then finished with Advance. BIN is toxic and smells like death but it works like a charm.
Hi Jess! The floors are brick pavers. They're about a 1/4" thick. So mostly they're just tile made to look like brick. Nothing special. :)
ReplyDeleteHi Johanna! The fabric in my header is Schumacher's Chiang Mai Dragon in Aquamarine. You can find pre-made pillows on etsy and yardage on eBay sometimes. Decoratorsbest.com sells it by the yard at retail price. Hope that helps!
ReplyDeletexo
Mishmosh- the hardware is new! I discovered a new section at Lowes and Home Depot that has cheaper stuff. It's chunkier and less finished looking, which I like. The door knob and deadbolt are new too. I posted about them on the keep.com post I did a week or so ago.
ReplyDeletexo
Hi Dani,
ReplyDeleteI did a post on painting the floors (I linked to it in this post too I think). I didn't paint the grout and I just free-handed it with a small 1" brush. It' s easy and fun! I used an oil-based paint on the kitchen and mudroom floors so it should hold up for a really long time. The good news if there are dings, I can touch them up easily! :)
I didn't sand the planks. The brown part is really really smooth. Just like MDF and it takes paint beautifully. Hope that helps!
xo
Hi Erica! I took off the shelf area in front of the vent so I'm just planking right around the vent, just like I have been the electrical outlets. I looks so much better than before! :)
ReplyDeleteNicole - Yup, just butted the edges up to the existing trim. I might put in chunkier baseboards down the road, but it looks fine for now.
ReplyDeleteI left the outside corners as is and didn't cover them with trim or anything. I like the look - it's kind of more modern looking maybe? I lined up the planks perfectly on those edges, so the lines are clean.
xo
Hi Amber! The paint was a orangey red color from BEHR called Red Hot. I sprayed it on using my new spray paint gun that I just posted about. If you're looking for a bright orangey red aerosol spray paint, I LOVE Rustoleum's Safety Red. It comes in tall Aluminum bottles and can be a little hard to find on the shelves sometimes because I think it was made for construction work? :) It's a really bright red!
ReplyDeletexo
Gwen! Ha! Of course things don't work out sometimes in my projects! I usually end up course correcting before things get unsalvageable. :) So glad you are enjoying LGN!
ReplyDeletexo
Hi Jenny,
ReplyDeleteI love the look of this wall. It's beautiful now, but I have a question about cleaning it. Do you plan to clean the cracks? If so how?
Thank you!
Kimberly - I already have some experience cleaning in the cracks! I cut the melamine on the floor in the mudroom and it makes a crazy amount of dust when you cut it. Some of it got in the cracks of the planks. I just used a microfiber cloth and it cleaned up really easily! No complaints so far. :)
ReplyDeleteBeyond talented! My jaw dropped when you came up with another beautiful pattern to paint your floors. Amazing!!!
ReplyDeleteYou are amazing! It all looks great.
ReplyDeleteThis transformation is amazing! Who knew planked walls would look so good!! You did a great job!
ReplyDeleteI'm just blown away by how you come up with these concepts, and so quickly! I'd be stricken with "decorating inertia" and would have to think about it for years! The mudroom looks fantastic!
ReplyDeleteDitto all of the above. You're amazing!! Looks fantastic!!
ReplyDeleteYou leave me speechless! This is once again amazing!
ReplyDeleteFantastic! I love the dark wood planks!
ReplyDeleteThis is completely wonderful! The colors, the medallion, and the planking. Btw, who thought plant shelves were a good idea?
ReplyDeleteYou are an amazing woman! Your vision and your can-do attitude. God did an amazing job infusing you with creativity! I am loving seeing your home transformed.
ReplyDeleteI can't believe all the DIY projects you tackle, and the end results are always so amazing!! Especially awesome considering you have three little munchkins! I LOVE how the planking came out and can't wait to use the melamine trick in my house!! Thank you!!
ReplyDeletewow! it looks amazing! i love that wall color and the planking is a great idea!
ReplyDeleteGreat advice! I've been thinking of adding wood walls and wondering about an inexpensive way to pull it off. I LOVE this! Love that you went dark too - brave. The floor is stunning too! What a great transformation!
ReplyDeleteLove the amazing transformation! I really like the plank walls. Looking forward to see more! You did a really good job.
ReplyDeleteHappy weekend!
Jessie
www.mixandchic.com
Love it! I think this is the answer for above my ginormous plant shelves in my great room. I'm ignoring the shelves but want to add a little architectural interest up there. Couple questions:
ReplyDeleteIt looks like you didn't paint behind the planks. Does the white show through?
Did you make sure to nail into studs all the time? Or is the melamine light enough that you just nailed into drywall?
Thanks! I'm so excited that you moved to the valley! Can't wait for you to share your finds nearby! ;)