There were lots of fun little projects from my dining room redo that I have been anxious to share with you all! I started writing this post thinking that I could get it all in one long entry, but I think this is going to be a two-parter!!
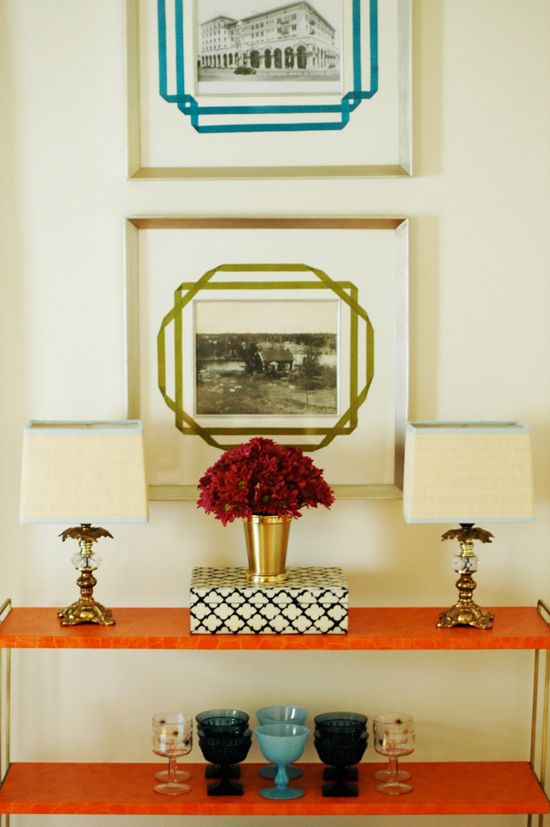
First up, I've had these little brass and lucite lamps for a long time now. They are sort of a little too...fancy for my taste, but I liked the scale in the room.
First up, I've had these little brass and lucite lamps for a long time now. They are sort of a little too...fancy for my taste, but I liked the scale in the room.

When I found these square lamp shades at Target, I knew I could make the lamps work.
 I wanted the shades to have a little color and texture so I ordered some grasscloth wallpaper samples to use for covering the lamp shades. But, thankfully, the order got messed up, and I was able to find this grasscloth for $3/yd at a fabric store in Philadelphia (BTW, if you live anywhere near Philly, please go check out Fabric Row! It's one amazing fabric store after another, with great deals to be had.)
{And yes, that is my big baby belly popping into the shot! Whoops.}
This was a really simple project. I just cut a strip of the grasscloth long enough to wrap around the entire shade. Then I used my trusty fabritac glue to attach the grasscloth, one side at a time, pressing and smoothing all the while.


Once all the side were covered, I trimmed the grasscloth down all the way to the edge of the shade.

Then I glued pale aqua cotton twill tape trim (also from the fabric store) very carefully around the outside perimeter of the shade first. Make sure your lines are straight and uniform here.

After some drying time, I carefully glued and folded down the edges.

Pretty, right? I think black trim would have been very pretty next to the grasscloth, but I felt like I needed the aqua with my orange shelves...

Speaking of the orange shelves...

These ugly shelves were freebies. To freshen up the brass rails on the side, I VERY lightly sprayed the metal with some Krylon gold metallic spray paint. Then I wiped down the shelves really well for a super clean surface for the contact paper to adhere to.

I randomly found about 3/4 of a roll of this croc contact paper on eBay. It is pretty expensive if you buy it new, but the rolls are HUGE and you could easily put up the remnants of the roll on eBay after you finish, like my seller did. Or split the roll with a friend.
{PS if you're looking for snakeskin, zebra or leopard contact paper, check out this much cheaper site}
This project couldn't have been easier - just trim to size, peel and stick!
This project couldn't have been easier - just trim to size, peel and stick!

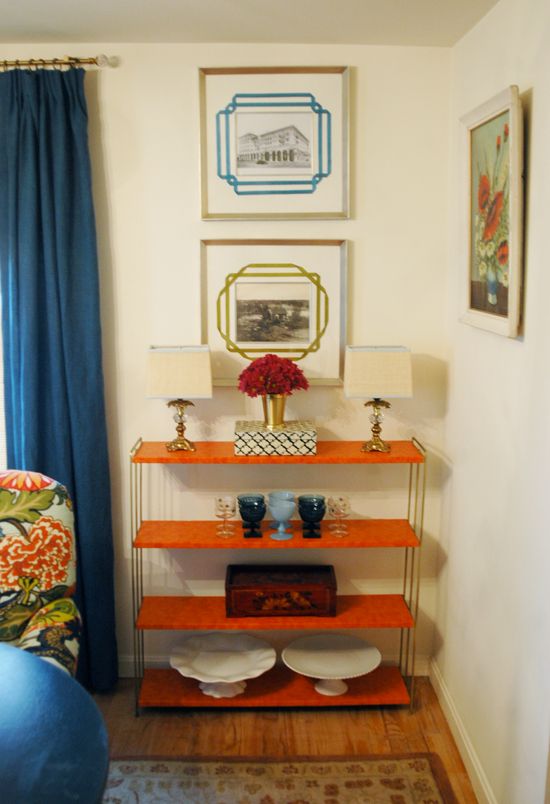
I think it's a fun pop of color and texture. The shelves still need some better styling, but I like the piece a lot.

The artwork above the shelves was seriously lacking. In my storage I had two frames from an Aarons Brothers sale that were the perfect candidates for this project from Martha's new Crafting book.
The directions in the book (pg. 183 - can't find them online) aren't very specific. And there aren't templates for the patterns in the back of the book, so I was a little nervous about doing the pattern myself.
The directions in the book (pg. 183 - can't find them online) aren't very specific. And there aren't templates for the patterns in the back of the book, so I was a little nervous about doing the pattern myself.

But it was actually pretty easy to just eyeball the design. The basic idea is to use bias tape trim to make a pretty border for picture mats. All you really need is a ruler, pencil, glue and a paint brush. And the bias tape, of course, which is available at fabric stores. Martha also carries a couple of colors in her ribbon line for Michaels, though you pay a premium for those! My trim was $0.30 a yard on Fabric Row.

I used a great paper glue called Zip Dry. It dries perfectly clear and if you mess up and go outside the lines, it rubs off sort of like rubber cement. Make sure to apply with a brush for a thin and flat application. And work in small sections because the glue dries pretty fast, as the name suggests.

Again, the basic idea is to draw a few straight lines with a pencil to act as a guide as you glue and smooth down the bias tape. The only sort of tricky part is the folding on the corners, but that got much easier after a few tries.

Here's the finished result. I decided to use a peacock blue and a chartreuse green and I love the contrast.

I was able to put together this entire wall (lampshades, orange shelves and trimmed out frames) in an afternoon. So please don't let my long and probably confusing instructions stop you from trying these projects!! They really are easy, I promise.
Come back for a few more projects on Monday. Have a GREAT weekend! Happy Halloween!
This is a beautiful little nook in your dining room. I am amazed after every post of yours at your creativity. But I do have two things that I am totally jealous of:
ReplyDelete1. your free reign of decorating in your house, because my husband would freak out if I used orange croc on anything
2. your amazing resources. Maybe one day I'll live around a bigger city. :)
Have a great weekend!
Jenny,
ReplyDeleteI have been reading your blog for a while now and LOVE everything you post! I love the energy that your decorating excudes and how everything goes together just so. I wish I had your decorating skills!
How funny, I just borrowed that same book by Martha Stewart from the library and thought that those photo frame projects were so cool! Now I'm glad to see them here and to know that they are not so hard to do. Thanks for your tips! The lamps look really lovely. One question: Does the fabri-tac dry clear? I wonder if you can see the lines of glue all across the shades when you turn the light on. Thanks, Jenny!
ReplyDeleteLove the lampshade ideas. The grasscloth looks great!
ReplyDeleteI love, love, LOVE your blog! I've been wanting to try this bias tape trick from Martha for some time. thanks for giving me the confidence to finally do it!! Love the way your dining room turned out.
ReplyDeleteYou did a beautiful job on the shelves... I need to contact paper somethign now!
ReplyDeleteI am blown away at your creativity! and patience!!!
ReplyDeletei posted about it on my blog..
http://rikshawdesign.blogspot.com/
How do you take such great photos of your rooms? I can never get the lighting right to show off accurate colors of anything (and even if I did get accurate colors, my rooms still wouldn't look as great as yours!)
ReplyDeletewww.classiccampbell.blogspot.com
First of all, I went out and bought fabritac glue specifically because of the amazing things you do with it. Secondly, you have such a great eye! The before pieces in your dining room are things I would walk right by, but you turn them into objects of great beauty. I love your blog!
ReplyDeleteJenny,
ReplyDeleteI have been looking for just the same grasscloth (and aqua ribbon no less!) for a lampshade project. Can you please share the store's name in hopes that they might ship me some?
Love the dining room transformation!
Talk about an amazing transformation!! WOW!
ReplyDeleteHappy Halloweekend -
xox,
Susan
confessionsofasineater.blogspot.com
Porjects, Part I, can't wait to see the rest. You are a jack of all trades.... any tips on your glueing prowess?
ReplyDeleteIt all looks so clean and polished.
Love the lighting of your photos too.
pve
You have over 100 comments on your last post, girl! you really are so so gifted! I've been reading daily for inspiration for our new place. Please come to England and wave your magic wand around in my flat!
ReplyDeleteDixie
Love that you share all your creativity! Thank you, thank you!
ReplyDeleteps. I think you should name your babe Myla :) -feminine but not over used. Happy Halloween
wow wow wow. i thought i was crafty but you take the cake! and best of all it doesn't look "crafty" it looks AMAZING!
ReplyDeleteYou are so talented!!! LOVE the orange (I'm doing my m-bath room orange). Also the pictures/ribbon, very classy/ladylike looking; I adore ribbons.
ReplyDeleteThanks for sharing your resource list! Happy Halloween!
this post is full of very useful ideas and tips on how to accomplish them. great resources and products, too. i'm new to all of this and appreciate reading about some of your tools.
ReplyDeletethx again!
More fun and genius diy! You are so good! I love how you dig right in and do things that I have only previously thought about trying..."one day..." Thanks for the lamp shade and matte trim ideas especially. They will come in handy!
ReplyDeleteutterly fantastic!! Jenny, one question:
ReplyDeleteHow do you hide the lamp cords? I notice this all the time in decor mags, etc. If you have any tips, please send them along. I hate seeing cords!
Hi Jenny,
ReplyDeleteYour blog is so wonderful. You are so creative and daring with your colors and projects. You inspire me. That being said, I know you mentioned that you cannot paint in your home right now but if you could, what colors would you be most likely to choose as backdrops for your great pieces and accessories. Specifically, I need bedroom colors.
Thanks so much,
Basha
Moved to the Philly area last year and have been looking for places other than "JoAnns" to buy fabric. Thanks for the tip on fabric row.
ReplyDeleteBeautiful ... I love your colour sense. The orange shelves, the aqua on the lamps and the borders on the pictures. Nice job!
ReplyDeleteBeautiful, beautiful, beautiful! Your blog has encouraged me to stretch my imagination and to consider new aesthetics. Keep up the good work!!
ReplyDeletethe idea of orange croc contact paper makes me really happy
ReplyDeleteYou are really good!! Everything looks great. Nice work.
ReplyDeleteGreat projects, thanks for sharing! I love the colors in your dining room. The bias tape accents are beautiful.
ReplyDeleteGorgeous!!! Yet again, I am impressed and inspired. Thanks for sharing!
ReplyDeleteI love the aqua trim on the lamps. You are great/fantastic at noticing the little details!
ReplyDeleteThanks for the tip about Fabric Row! I like just outside the city and I just bought a house so I have LOTS of projects that I'll need fabric for. Can't wait to check it out!
ReplyDeleteI love the way the ribbon dresses up the picture frames. I've been eyeing that project forever but I've been afraid to try it. You've inspired me to stop at Michael's on the way home from work to pick up some ribbon today!
ReplyDeleteYour posts always inspire me! I live in Philadelphia, but I have visited fabric row only once, and very briefly because I was a little intimidated. Do you have any recommendations as far as which shops you had the most success in? I would like to also suggest Jomar fabrics, which is just off of Columbus Blvd, near the Target. It is fabric heaven, with tons of selections at $1, $2, and $3 a yard. It's incredible!
ReplyDeleteFabulous as always! Love what you did with the frames!
ReplyDeleteI forgot to mention thanks for the How To - on the shades :)
ReplyDeleteI love how you made old cheapo shelves very chic!!
ReplyDeletei gave you a little shout out in my blog naming you one of my top 5 favorite blogs...because well you are! thought you might want to check it out! thanks for all the inspiration!!
ReplyDeleteJen
http://jenniferbrzinski.blogspot.com/2009/11/if-you-love-blogs-you-will-love-this.html
your creative mind works wonders! thanks so much for sharing your talent with the blogosphere!
ReplyDeleteWOW! You are incredibly talented. Thank you so much for such inspiring posts. :)
ReplyDeleteSuch great projects! The lamp one is definitely on my to-do list!
ReplyDeleteYour blog and projects just make me happy. I love how you "This is empty, so I'm just gonna do this and this." I'd say I do the same thing, but not to your scale.
ReplyDelete{And I love that your baby belly was in the shot : ) }
OMG - I'm speechless. I have so many DIY projects floating in my head that I never get around to doing. I am so impressed with how creative and prolific you are and even have the time to share the details of how you did it. Amazing, and of course dining room looks phenomonal once everything is pulle dtogether. A+
ReplyDeleteJenny-
ReplyDeleteI was not sure if my comment went through. I love what you did with your dining room and living room! Your DIY ideas are so fabulous!
very talented! Fabulous colours!
Michelle
i love your little lamps! so glad i found you today. xo kitty
ReplyDeleteYou have some great ideas. I like the shelves and frames.
ReplyDeleteYou are one clever kat! Love your dining room. If fact, I redoing my office after I saw yours...only problem is will it stay clean??
ReplyDeleteI am trying to looking for a house which have a great dining room, once I saw a beautiful house through costa rica homes for sale
ReplyDeleteI think those houses are very wonderful. I am really interested now because they are very wide and beautiful.
This is just one of the main reasons why I really love visiting your blog. I always found a very informative post just like this one. This project is very creative. I am sure that I can also do what you just did.
ReplyDeleteBecause of their antique pandora jewelry aspect, Art Deco rings make excellent engagement rings. Art Deco rings are vintage pieces, which creates a wonderfully buy Pandora romantic feel. These are antique, and thus, they make a perfect jewelry to pass on to future generations. With their hand engraved designs that discount pandora hearkens back to a simpler time, these pieces also possesses a very feminine pandora jewerly look.Art Deco engagement rings are truly unique with its large square center stone surrounded by smaller square stones or triangular stones. They put a pandora earrings unique twist on the traditional and classic diamond rings.The following are a few tips in buying Art Deco engagement rings.Make sure that cheap pandora earrings your future wife will not mind having an Art Deco engagement ring instead of the traditional diamond engagement ring.
ReplyDeleteThis is just outstanding. You always have the most clever ideas that are so chic and easy. Thanks so much for all the glorious inspiration! Best, Stephanie @ Covet Living
ReplyDeleteJenny-- for the bias tape, did you buy single fold and iron it open? or did you buy double fold and glue it closed? or did you use twill tape? I started this project, but when I made my first corner, I realized the opposite side of my single fold had two ends coming together. Obviously, not the right look. Not sure the double fold is right either. HELP needed in Darien!
ReplyDelete