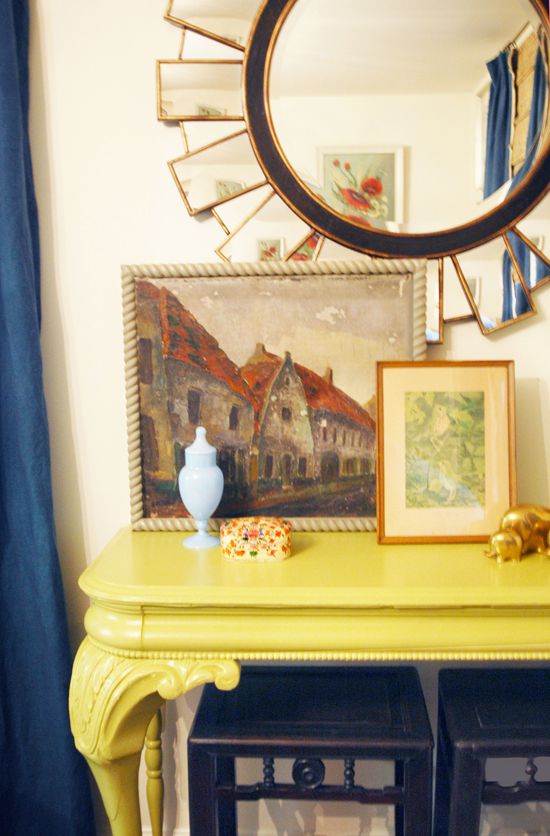
I had a very old (and not particularly special) oil painting that I got for half a Euro at a flea market in Brussels. I thought it would look nice in my dining room because it's mostly neutral, but has a little pop of orange-red. It really needed a frame though, and since European canvases are not the same size as American standard sizes (and it's old, I think before there were standard sizes), I knew I would have to get a custom frame.
These two options from Michael's were along the lines of what I wanted - small and somewhat understated. Guess how much though, even with a 60% off sale? $175 each. For just a little bit of moulding! Custom framing is crazy expensive.

I saved myself all that cash by picking up a set of these framing slats on that same trip to Michael's. There are several finishes to choose from and then it's just a matter of buying the correct length and width slats for the painting. With my coupon, the frame was $10 total.

I stopped by Home Depot on the way home and picked up an 8-foot length of decorative moulding for $5. I liked the rope moulding (below) a lot and it worked well for this project because it was the exact width as my Michael's frame.
When I got home I assembled the frame according to the package directions, with a little bit of wood glue. While that dried, I laid out my moulding on top of the frame and marked the corners off. {Note: I probably could have used a miter box here, but I'm lazy and knew I was going to fill the corners}

Then I just used my very favorite $7 coping saw and easily made the corner cuts. I used wood glue to attach the pieces to the frame front and then filled in the gaps in the corners with wood filler.

Once everything was dry, I spray painted the new frame with Krylon's Grecian Stone spray paint. I was going to gold leaf the frame, but I ended up really liking the gray in the room. The frame is not museum-quality, but it was only $15.
Next project! Who doesn't love a good gourd lamp? I found this one at TJ Maxx on major clearance for $4.50. I think it was so cheap because the brand is Amy Coe, which I'm pretty sure is a nursery line? Yeah, so were not talking about a Christopher Spitzmiller lamp here, but I thought the shape was pretty.

First, after taping off the cord, I spray painted only the base gold.

After letting that completely dry, I taped off the gold and spray painted the body of the lamp a nice peacock blue color from Sherwin Williams' clearance aisle. Unfortunately the color is much less teal in actuality, and more of a true blue, but I think it's fine in the dining room.


I finished off the lamp with a few coats of Wipe On Poly in the gloss finish, to really shine the lamp up.

The last project to share today was really simple. I reupholstered the drop seat of this little side chair with some leaf green linen that was pretty, but a little boring as it was.

So I taped off stripes with some frog tape and spray painted the seat (a la Eddie Ross) with the same blue that I used on the lamp.


I think the stripes are a fun pop of pattern in the room! And they don't look spray-painted on, even up close.
I'm off to do some fabric shopping with my mom and sister, who are in town visiting for the week. Hope you're having a great Tuesday!
Thanks for the great idea with the frame! I'm having the same issue with framing my suzani, and it's virtually impossible to find a decent priced frame in the right size..
ReplyDeleteWhat is this wax on poly stuff?? LOVE it!!
dagny
Man what does it take to be the first commenter around here? It's before 7! I love how you take these basic things and make them extraordinary! You must feel so at home at Home Depot! Have fun w/ your fam. I wanna see pics of your belly and kkiddos. How can I go about doing that?:) Miss you guys!
ReplyDeletelove the way everything is a project.
ReplyDeletesuch fun knowing the history and the evolution behind the objects in your home. makes me love them more!
pve
Very clever!
ReplyDeleteX
V
This is so amazing. I love the lamp, the chair and your gorgeous mirror and the yellow side table and so on..... Hayley
ReplyDeleteCustom Framing is very expensive (I know, I'm a framer)and when I saw your post I first thought OH NO! I usually hate skinny frames on canvas unless they are very modern...but this looks very nice. Good Job.
ReplyDeleteOne other trick to doing a frame on the cheep that looks nice for a canvas...buy a ready made frame(Hobby Lobby often will run a 50% off sales and you can get some great looking 4 inch wide moulding) Make sure it's a few inches bigger than your canvas, cut a peice of foam core or masonite (depending on the weight) to fit the frame, cover it with fabric then center your canvas and mount on top of the foam/masonite. Linen looks really nice, but depending on the art you could really have fun with the fabric.
Love your blog...lots of great DIY's! Love the lamp!
You never cease to amaze me! All your projects look so good!
ReplyDeleteYou have got to be the craftiest person EVER! I love what you've done.
ReplyDeleteJenny, I can't tell you how inspiring you are. Thanks for the how-tos for such great ideas. Thanks to you, I finally went to Home Despot, picked up new bamboo shades for my living room, some red lacquer spraypaint for dinged up old furniture and gave my dining and living rooms a quickie makeover. Thank you!
ReplyDeleteYou are so creative, and great with paint colors! I love the frame. My husband and I are convinced Michael's ALWAYS has a framing sale, so really they're not on sale! It is kind of a rip. I have paid to much there before. Will try making my own next time. Love the rope trim!
ReplyDeleteI especially love your trick for the custom frame - thanks for the tip! (And the way you play with color is really inspiring).
ReplyDeleteJust keeps getting better! Love the lamp!
ReplyDeleteI love your blog so much. I have an enormous map that I need to frame, and a custom job was going to be through the roof. That tutorial is exactly what I need! Thank you!
ReplyDeleteLove the frame and I'm totally stealing that idea! I'd often wondered how I could turn all the pretty mouldings I see into frames because it would be so much less expensive. Now I know. Thanks!
ReplyDeleteThank you for sharing about your dining room redo! We've just moved into our first house, so I'm constantly looking for budget conscious ways of appeasing my design wishes. The lamp tutorial is perfect - we have an ugly green and gold one that belongs better in a 1970's study than my traditional modern front room, but maybe if I can paint it and gloss it, it'll become exactly the right accent.
ReplyDeleteI just ran across your blg this morning! I love, love, LOVE that you've done everything on a budget but it looks so high end! You are VERY talented. I've gotten some great ideas! Keep blogging!
ReplyDeleteGenius! Thanks for sharing the details on how to get the great looks!
ReplyDeleteThis comment has been removed by the author.
ReplyDeleteSuper pretty! Your posts always make me want to visit the antique store. :)
ReplyDeleteI do a lot of projects like these and was always thinking of starting a blog about them, you're inspiring :)
I would have never thought to spray paint those stripes on that chair. I just love it!
ReplyDeleteI'm still crossing my fingers that you talk about your settee that you upholstered yourself. You probably can't do a whole tutorial on it but I'd love to know the story behind it. Hearing your story just might give me to confidence to tackle a chair I have that's in deperate need of re-covering.
I'm really fascinated by your use of wipe on poly. I used it for a project and got drippy yellow-tinged results. Plus it turned my paint pink to peach (not necessarily a bad thing... good thing it still worked for the room). I'd love to know your secret how you get such great results. Maybe it's the rag you use? I was very very careful with it, so I dont think it was my application. Who knows.
ReplyDeleteGreat job as always :)
I LOVE your lamp!
ReplyDeleteI have that same starburst mirror except for mine is a smaller version, and I have one of those elephant figurines that I found at goodwill. I mean it looks exactly the same! I spray painted mine a metallic silver and it is so pretty!
http://cjcjordan.blogspot.com/2009/10/metallic-spray-paint-rocks-my-socks.html
Love all of the projects you've been posting... especially the cost!!
ReplyDeletesuch good ideas! i am dying to try the diy frame project. was your canvas already stretched?
ReplyDeleteyou are amazing! I wish i could go fabric shopping with you on a tuesday!
ReplyDeleteall great projects! love the blue you chose for the lamp.
ReplyDeleteI absolutely love your style and how you mix patterns and colors. I also love the chiang mai schumacher fabric. At first I didn't think this little farm house I live in was ready for that fabric, but your blog has given me confidence. Also, I follow this blog from a woman in Australia and her style is very similar to yours, she also loves and does things with that same fabric. Her blog is http://absolutelybeautifulthings.blogspot.com/
ReplyDeleteI'm adding my voice to the throng here: AMAZING! I thought I was good at trash-to-treasure, but you must be The Queen!
ReplyDeletexox,
Susan
http://confessionsofasineater.blogspot.com/
You are absolutely incredible at putting things together - and having them look amazing!! What a brilliant idea - thanks for sharing, it's so inspiring! Trina
ReplyDeleteYou have the most wonderful projects . I am currently finishing off our house and I am so inspired by your achievable and inspiring tips. I am so gonna use that spraypaint on fabric idea . thank you
ReplyDeleteyou so rock jenny. Love it.
ReplyDeleteAwesome projects!!! Everything turned out beautifully!
ReplyDeleteyou are a clever girl!
ReplyDeleteThat frame is just brilliant! I really want to copy that for an oil painting I have currently unframed. And the stripes are awesome! Another amazing round-up with projects, you are brilliant!
ReplyDeleteAmazing job with the diy-frame. And can I say how much I love the chair! The stripes are so fresh!
ReplyDeleteHi! Thought you might like to know that I nominated you for a Blog Award.
ReplyDeleteCheck it out.
Stephanie
http://afinehouse.blogspot.com/2009/11/sharing-blog-love.html
Love it!
ReplyDeleteIs frog tape the same as painters tape?
Also, exactly what type of paint did you use from Sherwin Williams? Looks from pics like a sort of metallic rustoleum type paint?
Thanks,
Michele
I love your posts! You have so many creative ideas! I wish I could make my spaces look as great as yours do! Keep those decorating ideas coming!!!
ReplyDeletethis post makes me want to redo my entire house!
ReplyDeleteGreat projects ... love the frame and gourd lamp. I noticed the chair seat in your early post and think I commented how pretty it was .... all without prompting!!!
ReplyDeleteJenny-
ReplyDeleteI love what you did with your dining room and your living room ideas too! Fabulous DIY projects! Your designs look lovely! You are so talented!
Michelle
Woman, you are freaky brilliant. I've been stealing ideas from you for the past month now, and just when I think you can't possibly come up with something new, here you go, saving me money on framing. I love this blog, my revamped craft room project is looking like a designer showpiece thanks to all your inspiration. Yay!
ReplyDeleteThis is my first visit here, and I'm blown away. You have great ideas and somehow everything ends up looking classy, not cheap. And I disagree that that painting is nothing special; I full-on covet it. (I've lived in Bruxelles, so that's part of it, but also I just love the painting.)
ReplyDeletethanks for the inspiration!!! I painted one of my bedroom lamps after seeing your post. Check it out...
ReplyDeletehttp://sevensisters.typepad.com/sevensisters/2009/11/a-study-in-lamps.html
Incredible! I love everything about this, but I might be partial to the bright, simple red framed collection of prints. And that chair! Wow!
ReplyDeleteI am the idiot that paid a fortune to have a print from Paris framed.aaahhhhh. Well, that was before I discovered blogging and now I am reformed!!! Never again!! I'm going to keep your ideas so that I can use them and of course give your credit when I blog about them! Thank you for being such a creative person! I am trying to learn to be this way!
ReplyDeleteI just started following your blog about a month ago and I can't tell you how inspiring you are! You are so talented! Thanks for making me feel like I don't have to spend a ton of money on a room makeover. Hopefully with your amazing tips, taste, and tutorials I can fall in love with my house again. Keep it up.
ReplyDeleteA HUGE fan, Tiffany
cannot wait to do this with a chalkboard!
ReplyDeletethanks for the tips!!
I love love love the lamp.
ReplyDeleteWay to go, girl!
wah! Super clever. Love the custom frame and the painted chair seat... thought that would make me super nervous. Looks great!!
ReplyDeletesuch great ideas -i may just have to duplicate some of them! Easy and cheap!
ReplyDeleteI will say that you really made a great job in your little project. I think this is a great project that I can share to all my friends. Thank you for sharing it.
ReplyDeleteBecause of their antique pandora jewelry aspect, Art Deco rings make excellent engagement rings. Art Deco rings are vintage pieces, which creates a wonderfully buy Pandora romantic feel. These are antique, and thus, they make a perfect jewelry to pass on to future generations. With their hand engraved designs that discount pandora hearkens back to a simpler time, these pieces also possesses a very feminine pandora jewerly look.Art Deco engagement rings are truly unique with its large square center stone surrounded by smaller square stones or triangular stones. They put a pandora earrings unique twist on the traditional and classic diamond rings.The following are a few tips in buying Art Deco engagement rings.Make sure that cheap pandora earrings your future wife will not mind having an Art Deco engagement ring instead of the traditional diamond engagement ring.
ReplyDelete